| Last Modified: 7-3-2017 | 6.8:8.0.40 | Doc ID: RM000001CDX00MX |
| Model Year Start: 2007 | Model: LX470 | Prod Date Range: [08/2006 - ] |
| Title: SEAT: FRONT SEAT FRAME WITH ADJUSTER: INSPECTION; 2007 MY LX470 [08/2006 - ] | ||
INSPECTION
1. INSPECT FRONT SEAT ADJUSTER ASSEMBLY
|
(a) Check the operation of the slide motor. (1) Check if the motor rotates smoothly when the battery is connected to the slide motor connector terminals. OK:
If the result is not as specified, replace the seat adjuster. |
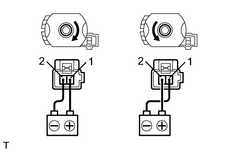
|
(b) Check the operation of the slide motor PTC thermistor.
HINT:
*: Passenger side
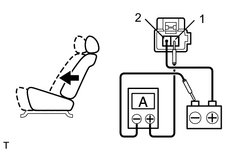
(1) Connect the positive (+) lead from the battery to terminal 2 (1*), the positive (+) lead from the ammeter to terminal 1 (2*) and the negative (-) lead to the battery negative (-) terminal, and then move the seat cushion to the front position.
(2) Continue to apply voltage and check that current changes to less than 1 A within 4 to 90 seconds.
|
(3) Disconnect the leads from the terminals. |
|
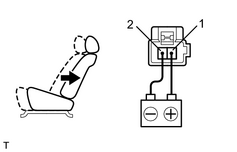
(4) Approximately 60 seconds later, connect the positive (+) lead from the battery to terminal 1 (2*) and the negative (-) lead to terminal 2 (1*) and then check that the seat cushion begins to move backwards.
If the result is not as specified, replace the seat adjuster.
|
(c) Check the operation of the front vertical motor. (1) Check if the motor rotates smoothly when the battery is connected to the slide motor connector terminals. OK:
If the result is not as specified, replace the seat adjuster. |
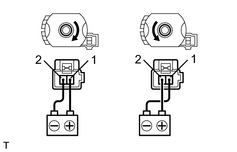
|
(d) Check the operation of the front vertical motor PTC thermistor.
HINT:
*: Passenger side
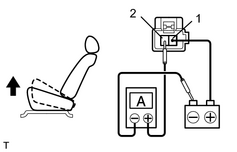
(1) Connect the positive (+) lead from the battery to terminal 1 (2*), the positive (+) lead from the ammeter to terminal 2 (1*) and the negative (-) lead to the battery negative (-) terminal, and then move the seat cushion to the highest position.
(2) Continue to apply voltage and check that current changes to less than 1 A within 4 to 90 seconds.
|
(3) Disconnect the leads from the terminals. |
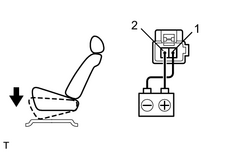
|
(4) Approximately 60 seconds later, connect the positive (+) lead from the battery to terminal 2 (1*), and the negative (-) lead to terminal 1 (2*), and check that the seat cushion begins to descend.
If the result is not as specified, replace the seat adjuster.
|
(e) Check the operation of the lifter motor. (1) Check if the motor rotates smoothly when the battery is connected to the slide motor connector terminals. OK:
If the result is not as specified, replace the seat adjuster. |
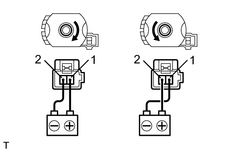
|
(f) Check the operation of the lifter motor PTC thermistor.
HINT:
*: Passenger side
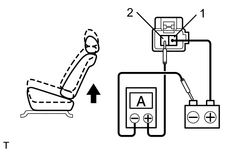
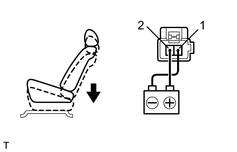
(1) Connect the positive (+) lead from the battery to terminal 1 (2*), the positive (+) lead from the ammeter to terminal 2 (1*) and the negative (-) lead to the battery negative (-) terminal, and then move the seat cushion to the highest position.
(2) Continue to apply voltage and check that current changes to less than 1 A within 4 to 90 seconds.
|
(3) Disconnect the leads from the terminals. |
|
(4) Approximately 60 seconds later, connect the positive (+) lead from the battery to terminal 2 (1*) and the negative (-) lead to terminal 1 (2*), and check that the seat cushion begins to descend.
If the result is not as specified, replace the seat adjuster.
|
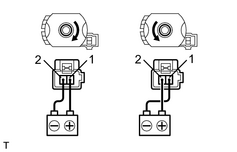
(g) Check the operation of the reclining motor. (1) Check if the motor rotates smoothly when the battery is connected to the slide motor connector terminals. OK:
If the result is not as specified, replace the seat adjuster. |
|
(h) Check the operation of the reclining motor PTC thermistor.
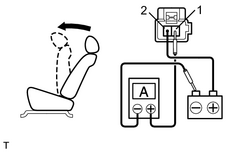
(1) Connect the positive (+) lead from the battery to terminal 2, the positive (+) lead from the ammeter to terminal 1 and the negative (-) lead to the battery negative (-) terminal, and then tilt the seatback to the most forward position.
(2) Continue to apply voltage and check that current changes to less than 1 A within 4 to 90 seconds.
|
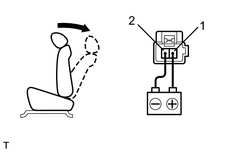
(3) Disconnect the leads from terminals. |
|
(4) Approximately 60 seconds later, connect the positive (+) lead from the battery to terminal 1 and the negative (-) lead to terminal 2, and check that the seatback begins to recline.
If the result is not as specified, replace the seat adjuster.

|

|