- Automatic light control sensor (solar sensor)
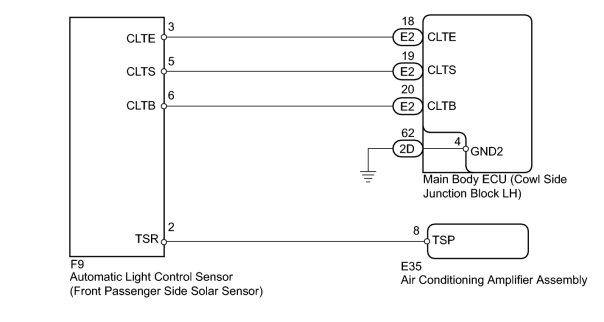
- Harness or connector between solar sensor and air conditioning amplifier assembly
- Harness or connector between solar sensor and main body ECU (cowl side junction block LH)
- Main body ECU (cowl side junction block LH)
- Air conditioning amplifier assembly
| Last Modified: 11-27-2007 | 1.6 C | |
| Service Category: Vehicle Interior | Section: Heating/Air Conditioning | |
| Model Year: 2008 | Model: LX570 | Doc ID: RM000002LLF009X |
| Title: HEATING / AIR CONDITIONING: AIR CONDITIONING SYSTEM: DESCRIPTION (2008 LX570) | ||
|
DTC |
B1421/21 |
Solar Sensor Circuit (Passenger Side) |
DESCRIPTION
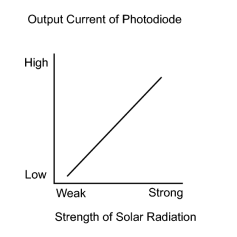
The automatic light control sensor (solar sensor), which is installed on the upper side of the instrument panel, detects sunlight and controls the air conditioning in auto mode. The output current from the solar sensor varies according to the amount of sunlight. When the sunlight increases, the output current increases. As the sunlight decreases, the output current decreases. The air conditioning amplifier assembly detects output current from the solar sensor.
|
DTC Code |
DTC Detection Condition |
Trouble Area |
|---|---|---|
|
B1421/21 |
An open or short in the passenger side solar sensor circuit. |
|
HINT:
If DTC B1244 is output at the same time, troubleshoot DTC B1244 first.
WIRING DIAGRAM
INSPECTION PROCEDURE
PROCEDURE
|
1. |
READ VALUE USING TECHSTREAM (FRONT PASSENGER SIDE SOLAR SENSOR) |
(a) Use the Data List to check if the front passenger side solar sensor is functioning properly.
Air Conditioner
|
Tester Display |
Measurement Item/Range |
Normal Condition |
Diagnostic Note |
|---|---|---|---|
|
Solar Sensor (P Side) |
Passenger side solar sensor / Min.: 0, Max.: 255 |
Passenger side solar sensor voltage increases as brightness increases |
Open in the circuit: 0. Short in the circuit: 255. |
OK:
The display is as specified in the normal condition.
|

|
2. |
CHECK HARNESS AND CONNECTOR (AUTOMATIC LIGHT CONTROL SENSOR - AIR CONDITIONING AMPLIFIER) |
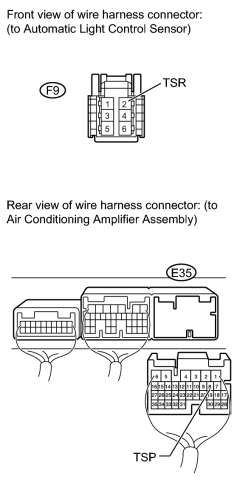
(a) Disconnect the F9 sensor connector.
(b) Disconnect the E35 amplifier connector.
(c) Measure the resistance according to the value(s) in the table below.
Standard Resistance:
|
Tester Connection |
Condition |
Specified Condition |
|---|---|---|
|
F9-2 (TSR) - E35-8 (TSP) |
Always |
Below 1 Ω |
|
E35-8 (TSP) - Body ground |
Always |
10 kΩ or higher |
|
|
3. |
INSPECT AUTOMATIC LIGHT CONTROL SENSOR (TSR - CLTE VOLTAGE) |
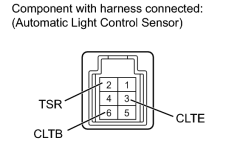
(a) Remove the automatic light control sensor
 .
.
(b) Apply battery voltage between terminals 6 (CLTB) and 3 (CLTE) of the solar sensor.
(c) Measure the voltage according to the value(s) in the table below.
Standard Voltage:
|
Tester Connection |
Condition |
Specified Condition |
|---|---|---|
|
2 (TSR) - 3 (CLTE) |
Sensor exposed to electric light |
0.8 to 4.3 V |
|
Sensor covered with a cloth |
Below 0.8 V |
HINT:
- As the inspection light is moved away from the sensor, the voltage decreases.
- Use an incandescent light for inspection. Bring it about 300 mm (11.8 in.) from the solar sensor.
|
|
4. |
CHECK HARNESS AND CONNECTOR (MAIN BODY ECU - AUTOMATIC LIGHT CONTROL SENSOR) |
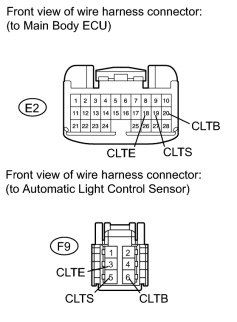
(a) Disconnect the E2 ECU connector.
(b) Disconnect the F9 sensor connector.
(c) Measure the resistance according to the value(s) in the table below.
Standard Resistance:
|
Tester Connection |
Condition |
Specified Condition |
|---|---|---|
|
E2-20 (CLTB) - F9-6 (CLTB) |
Always |
Below 1 Ω |
|
E2-19 (CLTS) - F9-5 (CLTS) |
||
|
E2-18 (CLTE) - F9-3 (CLTE) |
||
|
E2-20 (CLTB) - Body ground |
Always |
10 kΩ or higher |
|
E2-19 (CLTS) - Body ground |
||
|
E2-18 (CLTE) - Body ground |
|

|

|