| Last Modified: 11-27-2007 | 1.6 J | |
| Service Category: Vehicle Exterior | Section: Lighting (ext) | |
| Model Year: 2008 | Model: LX570 | Doc ID: RM000002T2G007X |
| Title: LIGHTING (EXT): LIGHTING SYSTEM: WIRING DIAGRAM (2008 LX570) | ||
|
Automatic Light Control Function does not Operate |
WIRING DIAGRAM
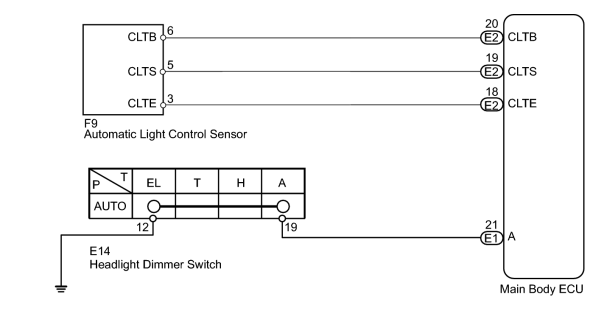
INSPECTION PROCEDURE
PROCEDURE
|
1. |
READ VALUE USING TECHSTREAM (AUTOMATIC LIGHT CONTROL SENSOR) |
(a) Using the Techstream, read the Data List.
Main Body
|
Tester Display |
Measurement Item / Range |
Normal Condition |
Diagnostic Note |
|---|---|---|---|
|
Illumination Rate Info |
Illuminance detected by automatic light control sensor/0 to 235600 lx |
Illuminance value displayed |
- |
OK:
Illuminance value is displayed normally.
|

|
2. |
READ VALUE USING TECHSTREAM (HEADLIGHT DIMMER SWITCH) |
(a) Using the Techstream, read the Data List.
Main Body
|
Tester Display |
Measurement Item / Range |
Normal Condition |
Diagnostic Note |
|---|---|---|---|
|
Light Auto SW |
Headlight dimmer switch (AUTO) signal/ ON or OFF |
ON: Headlight dimmer switch (AUTO) on OFF: Headlight dimmer switch OFF |
- |
OK:
When the headlight dimmer switch operation is performed, the result will be the same as above.
|
|
3. |
INSPECT HEADLIGHT DIMMER SWITCH |
(a) Remove the headlight dimmer switch
 .
.
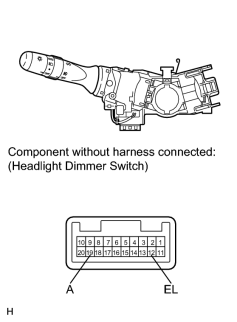
(b) Measure the resistance according to the value(s) in the table below.
Standard Resistance:
|
Tester Connection |
Switch Condition |
Specified Condition |
|---|---|---|
|
19 (A) - 12 (EL) |
Headlight dimmer switch (Light control switch) AUTO |
Below 1 Ω |
|
Headlight dimmer switch (Light control switch) off |
10 kΩ or higher |
|
|
4. |
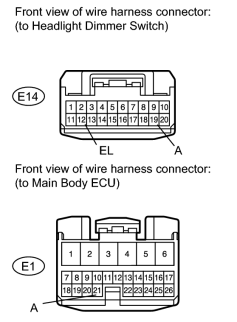
CHECK HARNESS AND CONNECTOR (HEADLIGHT DIMMER SWITCH - MAIN BODY ECU AND BODY GROUND) |
|
(a) Disconnect the E14 switch connector. |
(b) Disconnect the E1 ECU connector.
(c) Measure the resistance according to the value(s) in the table below.
Standard Resistance:
|
Tester Connection |
Condition |
Specified Condition |
|---|---|---|
|
E14-19 (A) - E1-21 (A) |
Always |
Below 1 Ω |
|
E14-12 (EL) - Body ground |
||
|
E14-19 (A) - Body ground |
Always |
10 kΩ or higher |
|
|
5. |
CHECK HARNESS AND CONNECTOR (AUTOMATIC LIGHT CONTROL SENSOR - MAIN BODY ECU) |
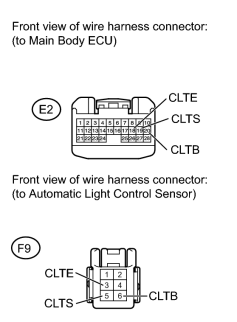
(a) Disconnect the E2 ECU connector.
(b) Disconnect the F9 sensor connector.
(c) Measure the resistance according to the value(s) in the table below.
Standard Resistance:
|
Tester Connection |
Condition |
Specified Condition |
|---|---|---|
|
E2-20 (CLTB) - F9-6 (CLTB) |
Always |
Below 1 Ω |
|
E2-19 (CLTS) - F9-5 (CLTS) |
||
|
E2-18 (CLTE) - F9-3 (CLTE) |
||
|
E2-20 (CLTB) - Body ground |
Always |
10 kΩ or higher |
|
E2-19 (CLTS) - Body ground |
||
|
E2-18 (CLTE) - Body ground |
|
|
6. |
CHECK MAIN BODY ECU (CLTB VOLTAGE) |
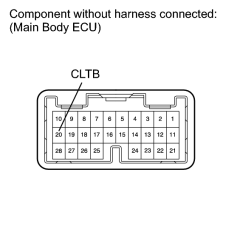
(a) Disconnect the E2 ECU connector.
(b) Measure the voltage according to the value(s) in the table below.
Standard Voltage:
|
Tester Connection |
Switch Condition |
Specified Condition |
|---|---|---|
|
20 (CLTB) - Body ground |
Engine switch on (IG) |
11 to 14 V |
|

|

|