| Last Modified: 11-27-2007 | 1.6 A | |
| Service Category: Engine/Hybrid System | Section: Fuel System | |
| Model Year: 2008 | Model: LX570 | Doc ID: RM0000039W900DX |
| Title: 3UR-FE FUEL: FUEL TANK: REMOVAL (2008 LX570) | ||
REMOVAL
1. DISCHARGE FUEL SYSTEM PRESSURE

2. DISCONNECT CABLE FROM NEGATIVE BATTERY TERMINAL
CAUTION:
Wait at least 90 seconds after disconnecting the cable from the negative (-) battery terminal to disable the SRS system.
NOTICE:
- After the engine switch is turned off, the HDD navigation system requires approximately 6 minutes to record various types of memory and settings. As a result, after turning the engine switch off, wait 6 minutes or more before disconnecting the cable from the negative (-) battery terminal.
-
When disconnecting the cable, some systems need to be initialized after the cable is reconnected
.
w/ Navigation System:
3. REMOVE REAR SEAT ASSEMBLY
(a) Remove the rear No. 1 seat assembly and rear No. 2 seat assembly
.
4. REMOVE FRONT FLOOR CARPET ASSEMBLY
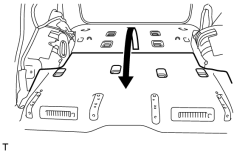
|
(a) Fold back the floor carpet. HINT:
Fold back the carpet until it is possible to remove the air duct. |
5. REMOVE REAR FLOOR NO. 2 SERVICE HOLE COVER
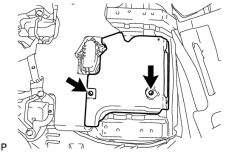
|
(a) Remove the 2 screws and air duct. |
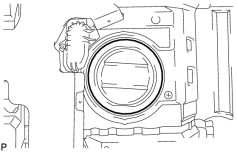
|
(b) Remove the service hole cover. |
6. REMOVE FUEL TANK CAP ASSEMBLY
7. REMOVE NO. 1 FUEL TANK PROTECTOR SUB-ASSEMBLY
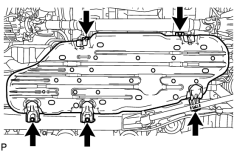
|
(a) Remove the 5 bolts and fuel tank protector. |
8. DISCONNECT FUEL TANK MAIN TUBE SUB-ASSEMBLY
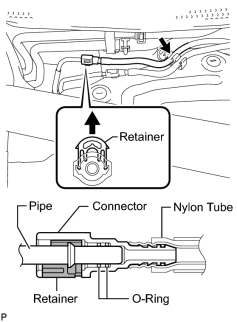
|
(a) Detach the fuel tube clamp. |
(b) Pull up the retainer and disconnect the fuel tank main tube.
NOTICE:
- Check for foreign matter in the pipe and around the connector. Clean if necessary. Foreign matter may damage the O-ring or cause leaks in the seal between the pipe and connector.
- Do not use any tools to separate the pipe and connector.
- Do not forcefully bend or twist the nylon tube.
- Check for foreign matter on the pipe seal surface. Clean if necessary.
- Put the pipe and connector ends in plastic bags to prevent damage and foreign matter contamination.
- If the pipe and connector are stuck together, pinch the connector between your fingers and turn it carefully to disconnect it.
9. DRAIN FUEL
(a) Connect the cable to the negative (-) battery terminal.
NOTICE:
When disconnecting the cable, some systems need to be initialized after the cable is reconnected
.
(b) Connect the Techstream to the DLC3.
(c) Turn the engine switch on (IG).
NOTICE:
Do not start the engine.
(d) Turn the Techstream main switch on.
(e) Enter the following menus: Powertrain / Engine and ECT / Active Test / Control the Fuel Pump / Speed.
CAUTION:
- Do not smoke or be near an open flame when working on the fuel system.
- Secure good ventilation.
- Keep gasoline away from rubber or leather parts.
HINT:
If the fuel pump does not operate, remove the fuel tube joint clip and No. 1 fuel tube joint, and drain fuel from the port shown in the illustration.
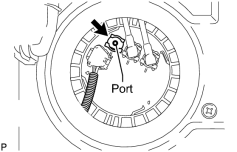
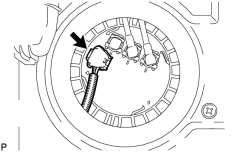
|
(f) Disconnect the fuel pump and fuel sender gauge connector. |
(g) Disconnect the cable from the negative (-) battery terminal.
CAUTION:
Wait at least 90 seconds after disconnecting the cable from the negative (-) battery terminal to disable the SRS system.
NOTICE:
- After the engine switch is turned off, the HDD navigation system requires approximately 6 minutes to record various types of memory and settings. As a result, after turning the engine switch off, wait 6 minutes or more before disconnecting the cable from the negative (-) battery terminal.
-
When disconnecting the cable, some systems need to be initialized after the cable is reconnected
.
w/ Navigation System:
10. DISCONNECT FUEL TANK RETURN TUBE SUB-ASSEMBLY
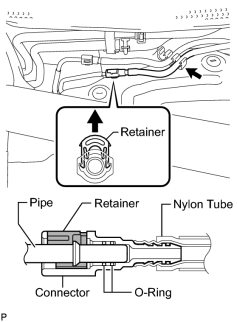
|
(a) Detach the fuel tube clamp. |
(b) Pull up the retainer and disconnect the fuel tank return tube.
NOTICE:
- Check for foreign matter in the pipe and around the connector. Clean if necessary. Foreign matter may damage the O-ring or cause leaks in the seal between the pipe and connector.
- Do not use any tools to separate the pipe and connector.
- Do not forcefully bend or twist the nylon tube.
- Check for foreign matter on the pipe seal surface. Clean if necessary.
- Put the pipe and connector ends in plastic bags to prevent damage and foreign matter contamination.
- If the pipe and connector are stuck together, pinch the connector between your fingers and turn it carefully to disconnect it.
11. DISCONNECT NO. 2 FUEL TANK BREATHER TUBE SUB-ASSEMBLY
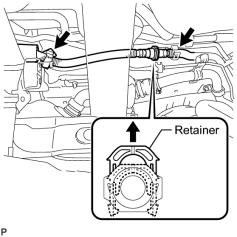
|
(a) Detach the 2 fuel tube clamps. |
(b) Pull up the retainer and disconnect the fuel tank breather tube.
NOTICE:
- Do not use any tools in this procedure.
- Check for any dirt and foreign matter contamination in the pipe and around the connector. Clean if necessary. Foreign matter may damage the O-rings or cause leaks in the seal between the pipe and connector.
12. DISCONNECT FUEL TANK BREATHER TUBE SUB-ASSEMBLY
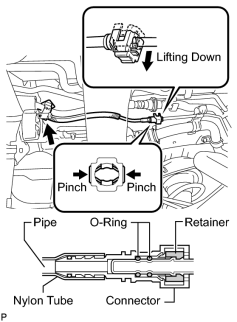
|
(a) Detach the fuel tube clamp. |
(b) Disconnect the fuel tank breather tube.
NOTICE:
- Check for foreign matter in the pipe and around the connector. Clean if necessary. Foreign matter may damage the O-ring or cause leaks in the seal between the pipe and connector.
- Do not use any tools to separate the pipe and connector.
- Do not forcefully bend or twist the nylon tube.
- Check for foreign matter on the pipe seal surface. Clean if necessary.
- Put the pipe and connector ends in plastic bags to prevent damage and foreign matter contamination.
- If the pipe and connector are stuck together, pinch the connector between your fingers and turn it carefully to disconnect it.
13. DISCONNECT FUEL TANK TO FILLER PIPE HOSE
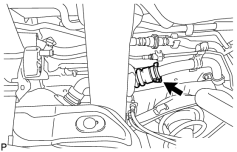
|
(a) Disconnect the fuel tank to filler pipe hose from the fuel tank filler pipe. |
14. REMOVE FUEL TANK SUB-ASSEMBLY
(a) Place a transmission jack under the fuel tank.
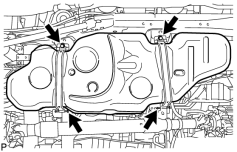
|
(b) Remove the 2 bolts, 2 clips, 2 pins and 2 fuel tank bands. |
(c) Slowly lower the transmission jack slightly.
15. REMOVE FUEL TANK MAIN TUBE SUB-ASSEMBLY AND FUEL TANK RETURN TUBE SUB-ASSEMBLY
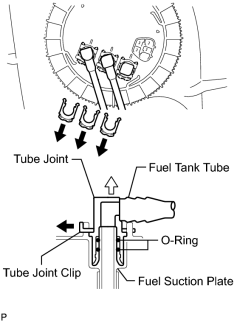
|
(a) Remove the 3 fuel tube joint clips and pull out the 2 fuel tubes and No. 1 fuel tube joint. NOTICE:
|
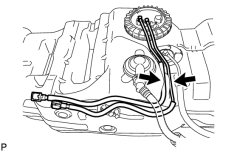
|
(b) Remove the fuel main tube and fuel return tube from the fuel tank. |
16. REMOVE FUEL SUCTION WITH PUMP AND GAUGE TUBE ASSEMBLY
17. REMOVE FUEL TANK TO FILLER PIPE HOSE
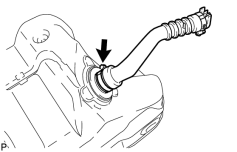
|
(a) Remove the fuel tank to filler pipe hose from the fuel tank. |
18. REMOVE NO. 1 FUEL TANK HEAT INSULATOR
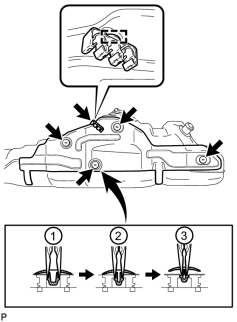
|
(a) Remove the fuel tube clamp from the No. 1 fuel tank heat insulator. |
(b) Using needle-nose pliers, remove the 4 clips shown in the illustration and then remove the No. 1 fuel tank heat insulator.

|

|