| Last Modified: 11-27-2007 | 1.6 A | |
| Service Category: Suspension | Section: Suspension Control System | |
| Model Year: 2008 | Model: LX570 | Doc ID: RM0000039ZY002X |
| Title: SUSPENSION CONTROL: DAMPING FORCE CONTROL ACTUATOR (for Front Side): INSTALLATION (2008 LX570) | ||
INSTALLATION
HINT:
- Use the same procedures for the RH side and LH side.
- The procedures listed below are for the LH side.
-
A bolt without a torque specification is shown in the standard bolt chart
 .
.
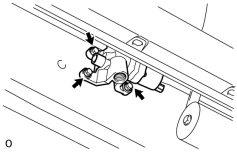
1. INSTALL FRONT SUSPENSION CONTROL VALVE ASSEMBLY LH
|
(a) Install the control valve with the 3 bolts. Torque: 31 N·m (316 kgf·cm, 23 ft·lbf) |
|
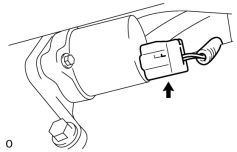
(b) Connect the control valve connector. |
2. INSTALL FRONT NO. 3 SUSPENSION CONTROL ACCUMULATOR LH
|
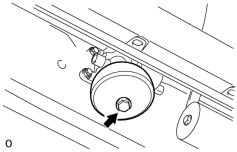
(a) Apply a small amount of suspension fluid to a new O-ring and new back-up ring and install them to the accumulator. |
(b) Install the accumulator to the control valve.
Torque: 150 N·m (1530 kgf·cm, 111 ft·lbf)
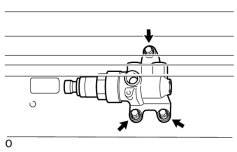
3. INSTALL FRONT SHOCK ABSORBER CONTROL VALVE ASSEMBLY LH
(a) Install the bleeder plug and bleeder plug cap to the control accumulator.
Torque: 8.3 N·m (85 kgf·cm, 73 in·lbf)
|
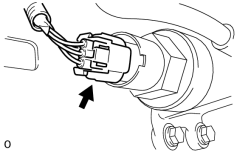
(b) Install the control valve to the vehicle with the 3 bolts. Torque: 31 N·m (316 kgf·cm, 23 ft·lbf) |
|
(c) Connect the connector. |
4. INSTALL FRONT NO. 2 SUSPENSION CONTROL ACCUMULATOR LH
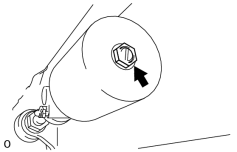
(a) Apply a small amount of suspension fluid to a new O-ring and install it to the accumulator.
|
(b) Install the accumulator to the shock absorber control valve. Torque: 57 N·m (581 kgf·cm, 42 ft·lbf) |
5. CONNECT NO. 2 SUSPENSION CONTROL PRESSURE HOSE
(a) Install a new gasket to the No. 2 suspension control pressure hose, then connect the pressure hose to the control valve with the union bolt.
Torque: 50 N·m (510 kgf·cm, 37 ft·lbf)
6. INSTALL NO. 2 HEIGHT CONTROL TUBE LH
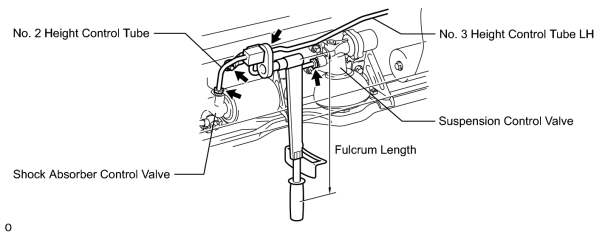
(a) Using a union nut wrench, connect the No. 2 height control tube to the No. 3 height control tube, shock absorber control valve and control valve.
Torque: 44 N·m (450 kgf·cm, 33 ft·lbf)
Torque: 40 N·m (408 kgf·cm, 30 ft·lbf)
HINT:
- Use a torque wrench with a fulcrum length of 300 mm (11.8 in.).
- The torque value for use with a union nut wrench is effective when the union nut wrench is parallel to the torque wrench.
(b) Install the No. 2 height control tube with the bolt.
Torque: 31 N·m (316 kgf·cm, 23 ft·lbf)
7. INSTALL FRONT NO. 1 SUSPENSION CONTROL ACCUMULATOR ASSEMBLY LH
|
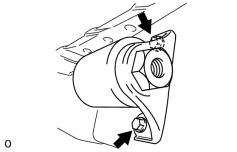
(a) Install the No. 1 suspension control accumulator to the frame with the 2 bolts. Torque: 31 N·m (316 kgf·cm, 23 ft·lbf) |
8. INSTALL NO. 1 HEIGHT CONTROL TUBE LH
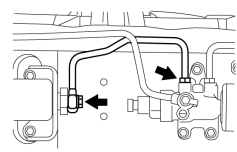
|
(a) Install a new gasket to the No. 1 height control tube, then temporarily install the No. 1 height control tube to the control valve and control accumulator with the union bolt and union nut. |
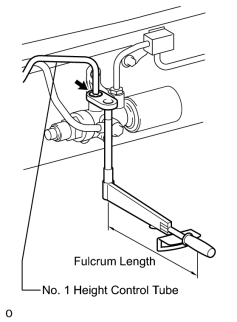
|
(b) Using a union nut wrench, install the No. 1 height control tube. Torque: 44 N·m (450 kgf·cm, 33 ft·lbf) Torque: 40 N·m (408 kgf·cm, 30 ft·lbf) HINT:
|
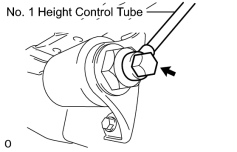
|
(c) Tighten the union bolt. Torque: 43 N·m (438 kgf·cm, 32 ft·lbf) |
9. BLEED AIR FROM SUSPENSION FLUID
10. CHECK FLUID LEVEL IN RESERVOIR
11. INSPECT FOR SUSPENSION FLUID LEAK
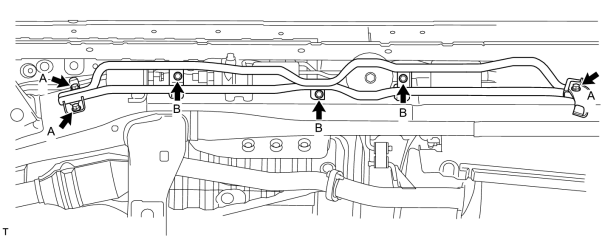
12. INSTALL HEIGHT CONTROL PROTECTOR PIPE BRACKET
(a) Install the 3 brackets with the 6 bolts.
Torque: 31 N·m (316 kgf·cm, 23 ft·lbf)
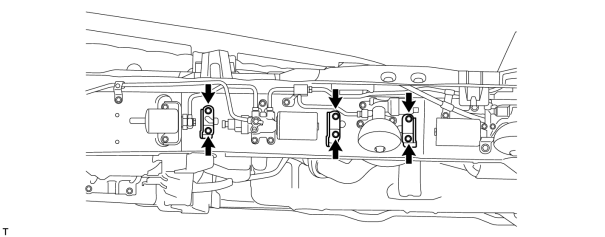
13. INSTALL SIDE STEP ASSEMBLY
14. INSTALL FRONT FENDER MUDGUARD LH
15. INSTALL HEIGHT CONTROL PROTECTOR PIPE
(a) Install the protector pipe with the 6 bolts.
Torque: 31 N·m (316 kgf·cm, 23 ft·lbf)
Torque: 16 N·m (163 kgf·cm, 12 ft·lbf)

|

|