SEAT POSITION SENSOR > INSTALLATION |
| 1. INSTALL SEAT POSITION SENSOR |
Check that the ignition switch is off.
Check that the negative battery (-) terminal is disconnected.
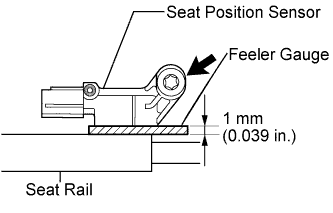 |
Using a feeler gauge 1 mm (0.039 in.), install the seat position sensor.
Using a "torx" socket wrench (T30), tighten the "torx" screw to install the seat position sensor.
Make sure that a clearance between the seat position sensor and the seat rail is within 0.6 mm (0.023 in.) to 1.4 mm (0.055 in.).
Check that there is no looseness in the installation parts of the seat position sensor.
Connect the connector to the seat position sensor.
| 2. INSTALL SEAT SLIDE POSITION SENSOR PROTECTOR |
| 3. INSTALL FRONT SEAT CUSHION SHIELD ASSEMBLY |
| 4. INSTALL SLIDE AND VERTICAL POWER SEAT SWITCH KNOB |
| 5. INSTALL RECLINING POWER SEAT SWITCH KNOB |
| 6. INSTALL FRONT SEAT ASSEMBLY |
Place the front seat assembly in the vehicle and align the adjuster pin with the hole on the vehicle side.
Connect the connector.
Install the clamp.
Connect the negative battery cable.
Move the front seat assembly to the rearmost position by operating the slide and vertical power seat switch knob.
Temporarily install the front side of the front seat assembly with the 2 bolts.
Move the front seat assembly fully forward by operating the slide and vertical power seat switch knob.
Temporarily install the rear side of the front seat assembly with the 2 bolts.
Move the front seat assembly to the rearmost position by operating the slide and vertical power seat switch knob.
Fully tighten the 2 bolts on the front side of the front seat assembly in the order of the inner side bolt and then the outer side bolt.
Move the front seat assembly fully forward by operating the slide and vertical power seat switch knob.
Fully tighten the 2 bolts on the rear side of the front seat assembly in the order of the inner side bolt and then the outer side bolt.
| 7. CONNECT CABLE TO NEGATIVE BATTERY TERMINAL |
| 8. PERFORM INITIALIZATION |
Perform initialization (Click here).
| 9. INSPECT CHECK POWER SEAT FUNCTION |
| 10. INSPECT SEAT HEATER OPERATION |
| 11. INSPECT SRS WARNING LIGHT |
Inspect the SRS warning light (Click here).
