REPAIR INSTRUCTION > INITIALIZATION |
| System Name |
| SFI System |
| Occupant Classification System |
| Lighting System |
| Power Door Lock Control System |
| Power Window Control System |
| Back Door Closer System |
| Power Back Door System |
| Electrical Back Door Outside Handle System |
| Sliding Roof System |
| PERFORM INITIALIZATION |
Apply the parking brake and chock the vehicle.
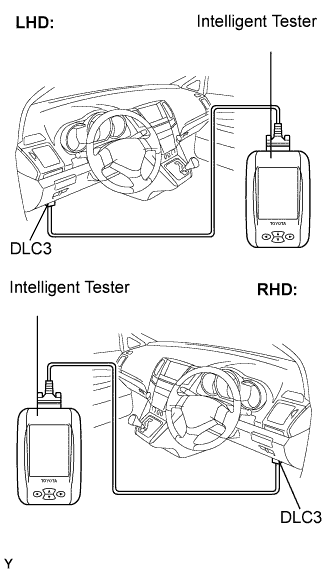 |
Connect the intelligent tester to the DLC3.
Put the engine in the inspection mode.
Select the following menu items: Powertrain / Engine / Data List / Coolant Temp.
Warm up the engine with the A/C switch off until the coolant temperature is 83°C or more.
Select the following menu items: Powertrain / Hybrid Control / Data List / SOC.
Move the shift lever to the N position, set the A/C switch to MAX cool or turn on the front defroster, and leave the vehicle until the SOC value is below 40%.
Move the shift lever to the P position and turn the ignition switch off.
Disconnect the negative terminal from the auxiliary battery and leave it for 1 minute or more.
Reconnect the negative terminal to the auxiliary battery and turn the ignition switch ON.
Select the following menu items: Powertrain / Engine / Data List / Coolant Temp.
Check that the engine coolant temperature is 83°C or more.
Select the following menu items: Powertrain / Engine / Data List / Calculated Load.
Move the shift lever to the D position while depressing the brake pedal with the left foot.
Depress the accelerator pedal with the right foot while firmly depressing the brake pedal with the left foot, and maintain an engine load value of 45% or more (60 to 70% of full acceleration) for approximately 30 seconds.
Shift the shift lever to the P position. Turn the ignition switch off and then wait for 5 seconds before putting the vehicle into the READY-on state again.
Select the following menu items: Powertrain / Engine / Data List / ISC Learning.
Check that the air conditioner is off. Lightly depress the accelerator pedal and release it when the engine starts.
Check that "COMPLETE" is displayed on the intelligent tester screen.
| AFS ECU INITIALIZATION |
Run the vehicle on the place where few curve or traffic congestion exist at least 100 m at the speed between 20 km/h (12 mph) and 80 km/h (48 mph).
| AFS ECU RE-INITIALIZATION (WHEN NOT USING INTELLIGENT TESTER) |
| 1.SHIFT TO INITIALIZATION |
Engine is running and shift range is in the P position.
Press the AFS OFF switch eight times at approximately one-second interval (once for ON and once more for OFF, i.e. 4 times ON and 4 times OFF).
| |||||
| 2.INITIALIZATION OF AFS ECU |
Turn the steering wheel to adjust the tires so that they point straight ahead.
Do not change the steering wheel position. Press the AFS OFF switch twice (once ON and once OFF).
Do not change the steering wheel position and press the AFS OFF switch twice within 3 to 10 seconds.
Do not change the steering wheel position and press the AFS OFF switch twice again within 3 to 10 seconds.
| |||||
| 3.CHECK COMPLETION OF AFS ECU INITIALIZATION |
When the initialization of the steering sensor signal is completed normally, the AFS OFF indicator light goes off, comes on, or blinks depending on the specific condition 3 second after the indicator light goes off.
| Proceed to | Result |
| A | Goes off: Initialization is started with the AFS OFF switch OFF (not pressed) Comes on: Initialization is started with the AFS OFF switch ON (pressed) |
| B | Blinks: Blinks twice per second |
|
| ||||
|
| ||||
|---|---|---|---|---|---|
| AFS ECU RE-INITIALIZATION (WHEN USING INTELLIGENT TESTER) |
Connect the intelligent tester to the DLC3.
Turn the ignition switch to the ON position and press the intelligent tester main switch ON.
Select "STEER SENS INIT" on "DIAGNOSTICS MENU AFS" display.
Turn the steering wheel with the engine starting until the tires face straight ahead, and press "ENTER".
Check "CONFIRM" display and press "YES".
Check the display for completion of the operation.
| BACK DOOR LOCK |
When the battery is reconnected:
If the back door is locked and therefore cannot be opened, it is necessary to unlock the back door using the door control switch or transmitter switch.
When the back door lock is replaced:
The power back door ECU cannot receive a switch signal from the lock. This may cause the power back door system to enter fail-safe mode and DTC B2215 to set, as well as to make the system disabled. When the lock is replaced, be sure to perform the following: first properly connect the lock, second clear the DTC from memory using the intelligent tester and finally recheck that no DTC is output.
| RESET (INITIALIZE) POWER WINDOW REGULATOR MOTOR |
Turn the ignition switch ON.
Halfway open the power window by pressing the power window switch.
Fully pull up the switch until the power window is fully closed and continue to hold the switch for approx. 1 second after the power window is fully closed.
Check that the AUTO UP/DOWN function operates normally.
If the AUTO UP/DOWN function operates normally, reset operations have been completed at this time. If not normal, follow steps below.
Disconnect the negative battery terminal for 10 seconds.
Connect the battery terminal.
Turn the ignition switch ON.
Halfway open the power window by pressing the power window switch.
If the AUTO UP/DOWN function operates normally, reset operations have been completed at this time.
If not normal, follow steps below.
Turn the ignition switch ON.
Halfway open the power window by pressing the power window switch.
Fully pull up the switch until the power window is fully closed and continue to hold the switch for approx. 12 seconds after the power window is fully closed.
Check that the AUTO UP/DOWN function operates normally.
| BACK DOOR LOCK |
When the battery cable is reconnected:
If the back door is locked and therefore cannot be opened, it is necessary to unlock the back door using the door control switch or transmitter switch.
When the back door lock is replaced:
The power back door ECU cannot receive a switch signal from the lock. This may cause the power back door system to enter fail-safe mode and DTC B2215 to set, as well as make the system disabled. When the lock is replaced, be sure to perform the following: first properly connect the lock, second clear the DTC from memory using the intelligent tester and finally recheck that no DTC is output.
| RESET (INITIALIZE) |
Resetting the power back door system:
The power back door ECU records the fully open position and the fully closed position of the power back door in its memory and the power back door fully opens and fully closes based on this memory. In the case where any of the batteries, fuses, power back door ECU or power back door drive unit are removed and then reinstalled, the power back door ECU loses the memory of the door positions. In such cases, resetting the system is necessary. However, the back door closer system has no effect on ECU memory.
Reset the power back door system as follows:
Fully close the power back door if opened.
Check that the back door fully opens and fully closes.
| BACK DOOR LOCK |
When the battery is reconnected:
If the back door is locked and therefore cannot be opened, it is necessary to unlock the back door using the door control switch or transmitter switch.
When the back door lock is replaced:
The power back door ECU cannot receive a switch signal from the lock. This may cause the power back door system to enter fail-safe mode and DTC B2215 to set, as well as make the system disabled. When the lock is replaced, be sure to perform the following: first, properly connect the lock, second clear the DTC from memory using the intelligent tester, and finally recheck that no DTC is output.
| BACK DOOR LOCK |
When the battery is reconnected:
If the back door is locked and therefore cannot be opened, it is necessary to unlock the back door using the door control switch or transmitter switch.
When the back door lock is replaced:
The power back door ECU cannot receive a switch signal from the lock. This may cause the power back door system to enter fail-safe mode and DTC B2215 to set, as well as make the system disabled. When the lock is replaced, be sure to perform the following: first, properly connect the lock, second, clear the DTC from memory using the intelligent tester, and finally recheck that no DTC is output.
| RESET (INITIALIZE) |
Resetting the power back door system:
The power back door ECU records the fully open position and the fully closed position of the power back door in its memory and the power back door fully opens and fully closes based on this memory. In the case where any of the batteries, fuses, power back door ECU or power back door drive unit are removed and then reinstalled, the power back door ECU loses the memory of the door positions. In such cases, resetting the system is necessary. However, the back door closer system has no effect on ECU memory.
Reset the power back door system as follows:
Fully close the power back door if opened.
Check that the back door fully opens and fully closes.
| RESET SLIDING ROOF DRIVE GEAR SUB-ASSEMBLY |
Turn the ignition switch on.
If the sliding roof is opened, close it fully.
Push the open switch of the slide switch or the up switch of the tilt switch on the personal light, making the sliding roof operation as follows:
Tilt up → Approximately 1 second → tilt down → slide open → slide close
Sliding roof stops at the fully closed position.
Finish the initialization.
Check that the operation works normally with AUTO operation.
