METER / GAUGE SYSTEM > ON-VEHICLE INSPECTION |
| 1. INSPECT SPEEDOMETER |
Check the operation.
Using a speedometer tester, check the speedometer indication according to the table below.
| Standard indication | Acceptable range |
| 20 mph | 21.0 to 23.5 mph |
| 40 mph | 42.0 to 44.5 mph |
| 60 mph | 62.5 to 66.0 mph |
| 80 mph | 83.1 to 87.1 mph |
| 100 mph | 103.9 to 108.4 mph |
| 120 mph | 124.7 to 129.6 mph |
| 140 mph | 145.4 to 150.7 mph |
| Standard indication | Acceptable range Data in ( ) is for reference |
| 20 km/h | (21.0 to 25.0 km/h) |
| 40 km/h | 41.7 to 46.2 km/h |
| 60 km/h | 62.7 to 67.2 km/h |
| 80 km/h | 83.4 to 88.4 km/h |
| 100 km/h | 104.3 to 109.3 km/h |
| 120 km/h | 125.1 to 130.6 km/h |
| 140 km/h | 145.8 to 151.8 km/h |
| 160 km/h | 166.2 to 173.2 km/h |
| 180 km/h | 188.9 to 194.5 km/h |
| 200 km/h | 207.7 to 215.7 km/h |
| 220 km/h | 228.4 to 236.8 km/h |
| 240 km/h | 249.2 to 258.0 km/h |
Check the deviation from the acceptable value of the speedometer indication.
| 2. INSPECT FUEL RECEIVER GAUGE |
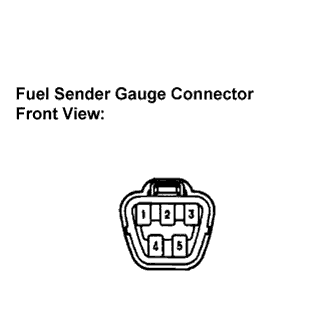 |
Disconnect the connector from the sender gauge.
Turn the ignition switch to the ON position, then check the position of the receiver gauge needle.
Connect the terminals 2 and 3 on the wire harness side connector of the fuel sender gauge.
Turn the ignition switch to the ON position, then check the position of the receiver gauge needle.
| 3. INSPECT FUEL LEVEL WARNING LIGHT |
Disconnect the connector from the sender gauge.
Turn the ignition switch to the ON position, then check the fuel level needle indicates EMPTY and the fuel level warning light comes on.
| 4. INSPECT LOW OIL PRESSURE WARNING DISPLAY |
Disconnect the connector from the low oil pressure switch.
Turn the ignition switch to the ON position.
Ground the terminal of the wire harness side connector, then check the low oil pressure warning in the multi-display.
| 5. INSPECT LOW ENGINE OIL LEVEL WARNING DISPLAY |
Disconnect the connector from the engine oil level sensor.
Turn the ignition switch to the ON position.
Ground the terminal of the wire harness side connector, then check the low engine oil level warning in the multi-display.
| 6. INSPECT MULTI-INFORMATION DISPLAY |
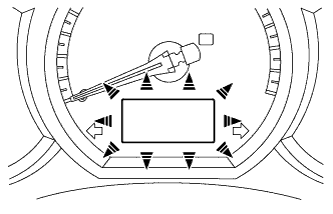 |
Turn the ignition switch off.
Press the "DISP" button and hold it down.
Turn the ignition switch to the ON position.
Turn the ignition switch off to finish the test mode.
