REMOVAL
Removal / installation
| 1. DISCONNECT CABLE FROM NEGATIVE BATTERY TERMINAL |
| 2. REMOVE TONNEAU COVER ASSEMBLY |
| 3. REMOVE DECK BOARD SUB-ASSEMBLY |

Disengage the 5 clips and turn up the front side of the deck board.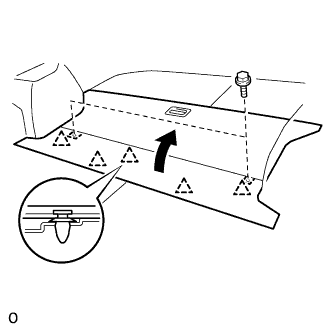

Remove the 2 bolts and deck board sub-assembly.
| 4. REMOVE DECK FLOOR BOX FRONT |
Using a clip remover, remove the 2 clips and deck floor box front.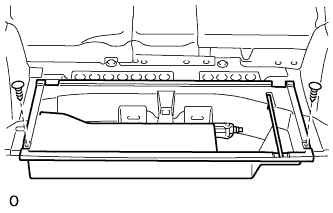
| 5. REMOVE DECK FLOOR BOX REAR |
Using a clip remover, remove the 2 clips and deck floor box rear.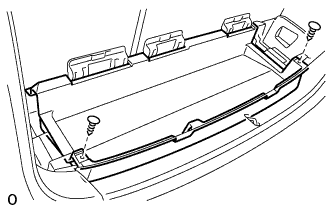
| 6. REMOVE DECK NO.3 BOARD SUB-ASSEMBLY |
Remove the 2 bolts, 2 nuts and deck No.3 board sub-assembly.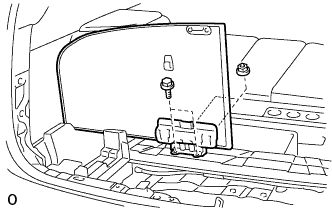
| 7. REMOVE DECK NO.2 BOARD SUB-ASSEMBLY |
Remove the 4 blots, 2 nuts and deck No.2 board sub-assembly.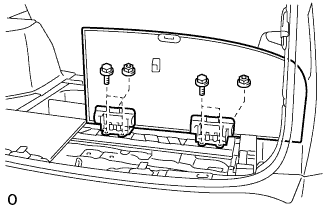
| 8. REMOVE BACK DOOR WEATHERSTRIP |
| 9. REMOVE REAR FLOOR FINISH PLATE |
Using a clip remover, remove the 2 clips.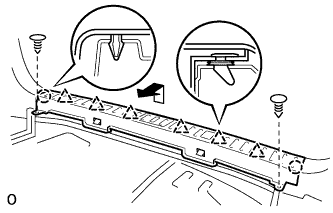
Disengage the 2 claws and 6 clips, and remove the rear floor finish plate.
| 10. REMOVE JACK CARRIER ASSEMBLY |
Remove the jack carrier support, jack assembly and jack carrier assembly.
| 11. REMOVE DECK SIDE TRIM LH BOX |
Remove the clip (A).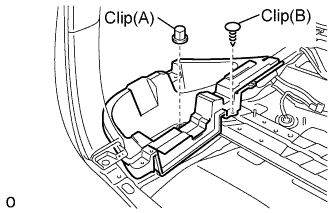
Using a clip remover, remove the clip (B) and deck side trim box.
| 12. REMOVE DECK SIDE TRIM RH BOX |
| 13. REMOVE REAR SEAT TRACK BRACKET COVER |
Move the rear seat assembly LH to the rearmost position by operating the rear seat track adjusting handle.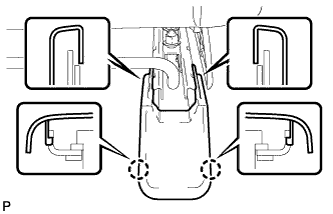
Using a screwdriver, disengage the 4 claws.
- HINT:
- Tape the screwdriver tip before use.
Pull the 2 rear seat track bracket covers toward the rear of the vehicle and remove them.
| 14. REMOVE REAR SEAT ASSEMBLY LH |
Using a clip remover, remove the 3 clips.
Remove the bolt and disconnect the floor anchor side of the fold seat stopper band assembly No.2.
Move the rear seat assembly LH to the rearmost position by operating the rear seat track adjusting handle.
Remove the 2 bolts on the front side.
Move the rear seat assembly LH fully forward by operating the rear seat track adjusting handle.
Remove the 3 bolts on the rear side.
Move the rear seat assembly LH to the center position and adjust the seatback to the vertical position.
Remove the rear seat assembly LH.
| 15. REMOVE REAR SEAT TRACK BRACKET COVER |
Move the rear seat assembly RH to the rearmost position by operating the rear seat track adjusting handle.
Using a screwdriver, disengage the 4 claws.
- HINT:
- Tape the screwdriver tip before use.
Pull the 2 rear seat track bracket covers toward the rear of the vehicle and remove them.
| 16. REMOVE REAR SEAT ASSEMBLY RH |
Using a clip remover, remove the 5 clips.
Remove the bolt and disconnect the floor anchor side of the fold seat stopper band assembly No.1.
Move the rear seat assembly RH to the rearmost position by operating the rear seat track adjusting handle.
Remove the 2 bolts on the front side.
Move the rear seat assembly RH fully forward by operating the rear seat track adjusting handle.
Remove the 3 bolts on the rear side.
Move the rear seat assembly RH to the center position and adjust the seatback to the vertical position.
Remove the rear seat assembly RH.
| 17. REMOVE FRONT DOOR SCUFF LH PLATE |
Disengage the 6 claws and 4 clips, and remove the front door scuff plate.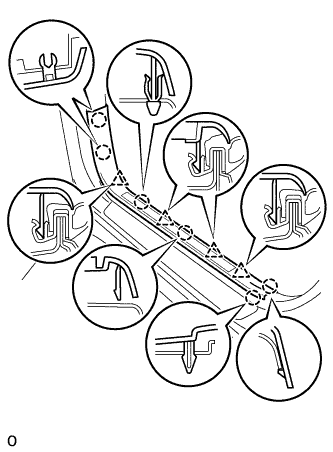
Disconnect the connector. (w/ illumination scuff plate)
| 18. REMOVE FRONT DOOR SCUFF RH PLATE |
| 19. REMOVE FRONT DOOR OPENING TRIM LH WEATHERSTRIP |
| 20. REMOVE FRONT DOOR OPENING TRIM RH WEATHERSTRIP |
| 21. REMOVE REAR DOOR SCUFF LH PLATE |
Disengage the 4 claws and 2 clips, and remove the rear door scuff plate.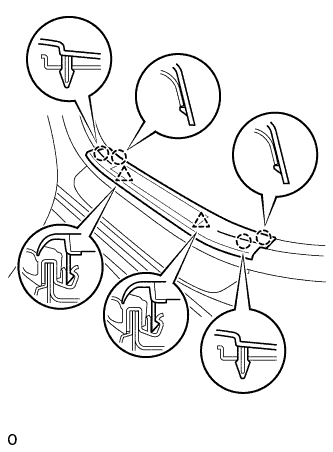
Disconnect the connector. (w/ illumination scuff plate)
| 22. REMOVE REAR DOOR SCUFF RH PLATE |
| 23. REMOVE REAR DOOR OPENING TRIM LH WEATHERSTRIP |
| 24. REMOVE REAR DOOR OPENING TRIM RH WEATHERSTRIP |
| 25. REMOVE FRONT PILLAR LH GARNISH |
Detach clip (A) from the vehicle body. Pull the pillar garnish so that the tip of clip (B) locks in the pillar garnish hole.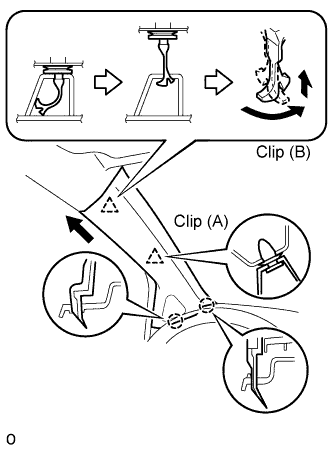
Using needle-nose pliers, rotate clip (B) 90°.
Disengage the 2 claws and remove the front pillar garnish.
Remove clip (B).
Protect the curtain shield airbag assembly.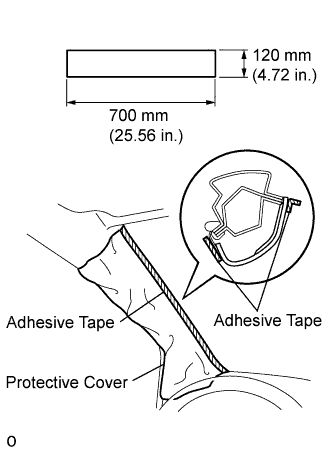
Thoroughly cover the airbag with a cloth or nylon sheet that is 700 mm (27.56 in.) x 120 mm (4.72 in.) and fix the ends of the cover with adhesive tape, as shown in the illustration.
- NOTICE:
- Cover the curtain shield airbag with a protective cover as soon as the front pillar garnish is removed.
| 26. REMOVE FRONT PILLAR RH GARNISH |
| 27. REMOVE LAP BELT OUTER ANCHOR COVER |
Disengage the 2 claws and remove the lap belt outer anchor, as shown in the illustration.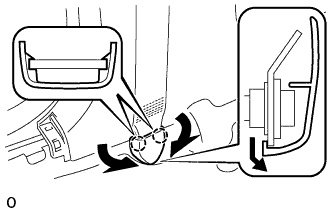
- HINT:
- Use the same procedure to remove the other side.
| 28. SEPARATE FRONT SEAT OUTER LH BELT ASSEMBLY |
Remove the bolt and separate the front seat outer LH belt assembly.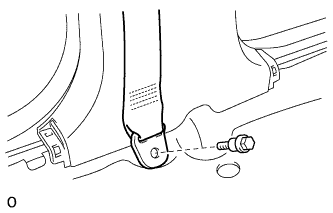
| 29. SEPARATE FRONT SEAT OUTER RH BELT ASSEMBLY |
| 30. REMOVE CENTER PILLAR LH GARNISH LOWER |
Disengage the 3 claws and 2 clips, and remove the center pillar garnish lower.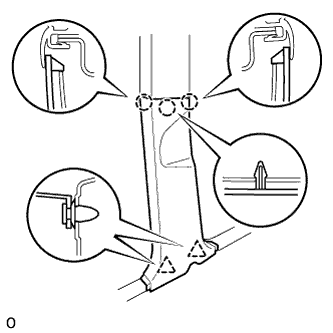
| 31. REMOVE CENTER PILLAR RH GARNISH LOWER |
| 32. REMOVE CENTER PILLAR LH GARNISH |
Remove the 2 screws.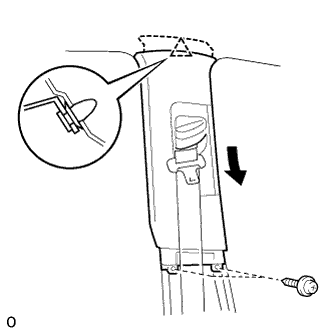
Disengage the clip and remove the center pillar garnish by pulling it down.
| 33. REMOVE CENTER PILLAR RH GARNISH |
| 34. REMOVE DECK SIDE TRIM LH COVER |
Using a moulding remover, disengage 3 claws (A).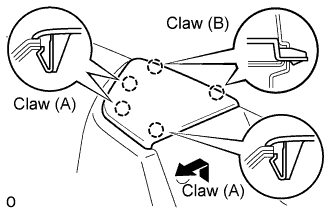
Disengage 2 claws (B) and remove the deck side trim cover by pulling it to inside the vehicle.
| 35. REMOVE DECK SIDE TRIM RH COVER |
| 36. SEPARATE REAR NO.1 SEAT OUTER LH BELT ASSEMBLY |
Remove the bolt and separate the rear No.1 seat outer belt assembly.
| 37. SEPARATE REAR NO.1 SEAT OUTER RH BELT ASSEMBLY |
| 38. REMOVE REAR SEAT SIDE LH COVER |
Using a clip remover, remove the 3 clips.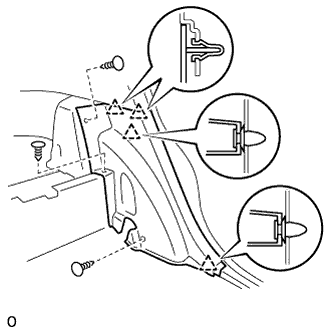
Disengage the 4 clips and remove the rear seat side cover.
| 39. REMOVE REAR SEAT SIDE RH COVER |
| 40. REMOVE REAR FLOOR FINISH SIDE LH PLATE |
Using a clip remover, remove the clip.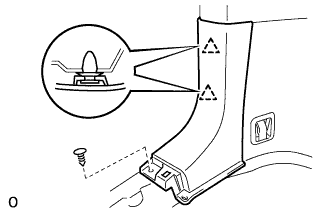
Disengage the 2 clips and remove the rear floor finish side plate.
| 41. REMOVE REAR FLOOR FINISH SIDE RH PLATE |
| 42. REMOVE ROPE HOOK |
Remove the 2 bolts and 2 rope hooks.
- HINT:
- Use the same procedure to remove the other side.
| 43. REMOVE DECK TRIM SIDE LH PANEL ASSEMBLY |
Using a clip remover, remove the 4 clips.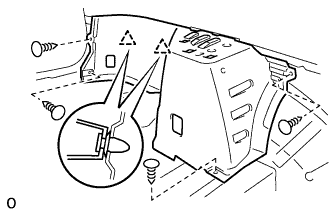
Disengage the 2 clips and remove the deck trim side panel assembly.
| 44. REMOVE DECK TRIM SIDE RH PANEL ASSEMBLY |
| 45. REMOVE ROOM LIGHT ASSEMBLY NO.2 |
Using a screwdriver, disengage the claw and remove the room light assembly No.2.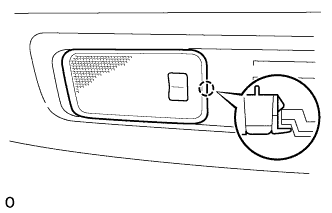
- HINT:
- Tape the screwdriver tip before use.
Disconnect the connector.
| 46. REMOVE ROOF SIDE LH GARNISH ASSEMBLY INNER |
Using a screwdriver, remove the tonneau cover holder cap.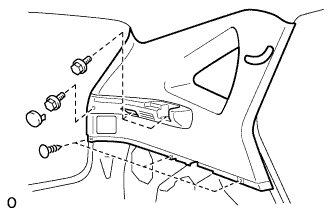
- HINT:
- Tape the screwdriver tip before use.
Remove the 3 bolts.
Using a clip remover, remove the 3 clips.
Disengage the 7 clips and remove the roof side garnish assembly inner.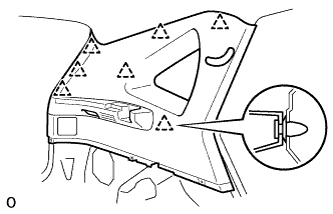
Disengage the 4 claws and separate the seat belt bezel.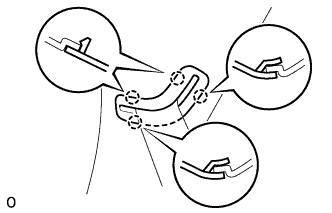
| 47. REMOVE ROOF SIDE RH GARNISH ASSEMBLY INNER |
| 48. REMOVE ASSIST GRIP SUB-ASSEMBLY |
Using a screwdriver, disengage the 3 claws and remove the 2 assist grip covers.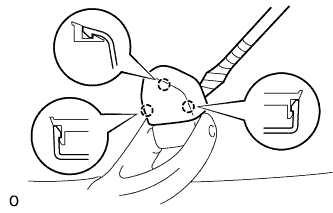
- HINT:
- Tape the screwdriver tip before use.
Remove the 2 screws and assist grip sub-assembly.
- HINT:
- Use the same procedure for the other 3 assist grips.
| 49. REMOVE RAIN SENSOR (W/ RAIN SENSOR) |
Release the stopper by pulling it down, and separate the rain sensor.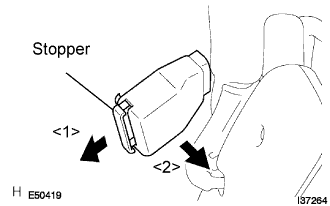
Disconnect the connector and remove the rain sensor.
| 50. REMOVE ROOM LIGHT ASSEMBLY NO.1 |
Using a screwdriver, disengage the 4 claws and remove the lens cover.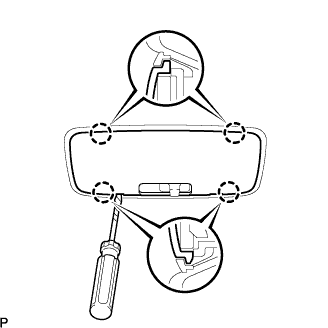
- HINT:
- Tape the screwdriver tip before use.
Using a screwdriver, disengage the 2 springs, as shown in the illustration.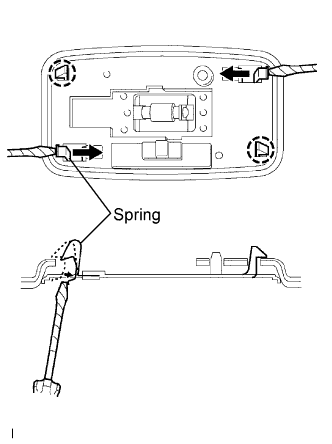
- HINT:
- Tape the screwdriver tip before use.
Disengage the 2 claws and remove the room light assembly No.1.
Disconnect the connector.
| 51. REMOVE MAP LIGHT ASSEMBLY |
w/o Sliding roof: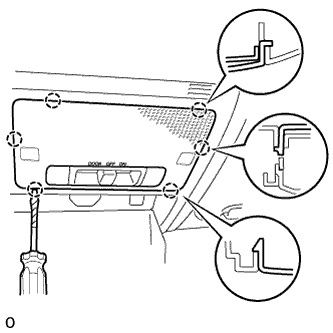
Using a screwdriver, disengage the 6 claws and remove the lens cover.- HINT:
- Tape the screwdriver tip before use.
w/ Sliding roof: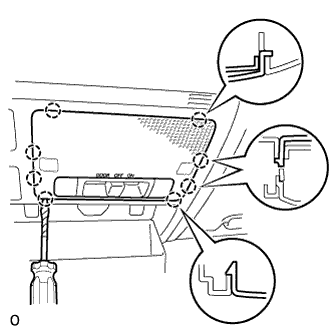
Using a screwdriver, disengage the 8 claws and remove the lens cover.- HINT:
- Tape the screwdriver tip before use.
Using a screwdriver, disengage the claws and open the cover.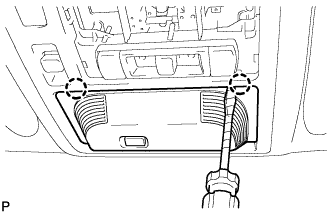
- HINT:
- Tape the screwdriver tip before use.
Using a screwdriver, disengage the claws and open the 2 caps, as shown in the illustration.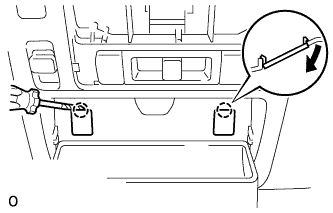
- HINT:
- Tape the screwdriver tip before use.
Remove the 4 screws and map light.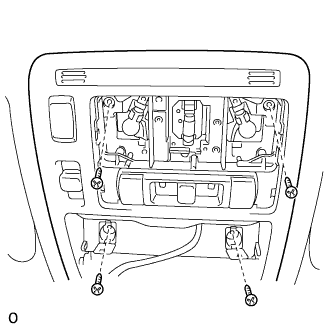
Disconnect the connector.
| 52. REMOVE LH VISOR ASSEMBLY |
Using a moulding remover, disengage the 4 claws and remove the visor bracket cover.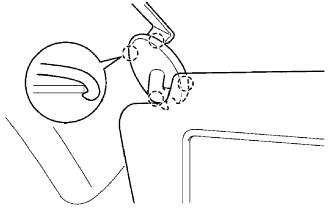
Remove the 2 screws and visor assembly.
Disconnect the connector.
| 53. REMOVE RH VISOR ASSEMBLY |
| 54. REMOVE VISOR HOLDER |
Remove the visor holder by turning it counterclockwise.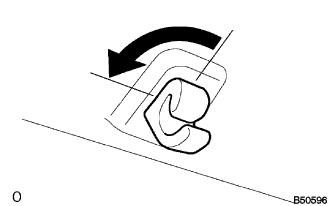
- HINT:
- Use the same procedure to remove the other side.
| 55. REMOVE ROOF HEADLINING ASSEMBLY |
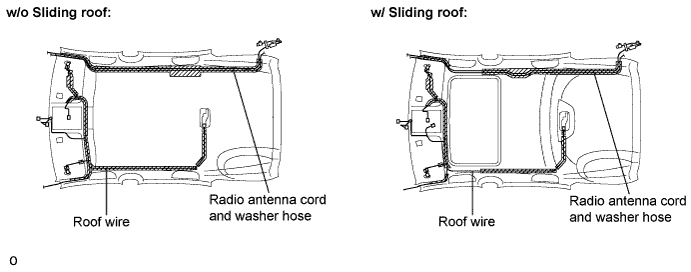
Disconnect the roof wire connector and disengage the clamps from the front pillar LH.
Disconnect the washer hose. Remove the bolt and disconnect the radio antenna cord connector and disengage the clamps from the front pillar RH.
Disconnect the washer hose. Disconnect the radio antenna cord connector and disengage the clamps from the rear quarter pillar RH.
Disconnect the sliding roof drive gear connector. (w/ sliding roof)
Remove the sunroof opening trim moulding. (w/ sliding roof)
Disengage the 2 fasteners and 3 clips. (w/o sliding roof)
Disengage the 3 clips. (w/ sliding roof)
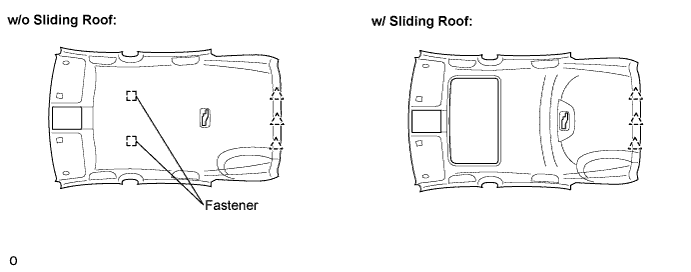
Remove the roof headlining from the vehicle through the back door side.
| 56. REMOVE ROOF WIRE AND RADIO ANTENNA CORD |
Remove the roof wire, radio antenna cord and washer hose from the roof headlining assembly.