REASSEMBLY
Removal / installation
| 1. INSTALL FRONT SEAT ADJUSTER SUB-ASSEMBLY RH (for Front Passenger Seat) |
| 2. INSTALL FRONT SEAT TRACK ASSEMBLY OUTER (for Driver Seat) |
| 3. INSTALL POWER SEAT MOTOR ASSEMBLY (for Driver Seat) |
| 4. INSTALL SEPARATE TYPE FRONT SEAT CUSHION SPRING ASSEMBLY (for Driver Seat) |

Using a "torx" socket wrench (T40), install the separate type front seat cushion spring assembly with the 4 "torx" bolts.
Install the front seat cushion frame sub-assembly with the 4 bolts.
- Torque:
- 19 N*m{ 194 kgf*cm , 14 ft.*lbf }
| 5. INSTALL FRONT SEAT SIDE AIRBAG ASSEMBLY |
Install the front seat side airbag assembly with the 2 nuts.
- Torque:
- 5.5 N*m{ 56 kgf*cm , 49 in.*lbf }
Install the clamps.
| 6. INSTALL FRONT SEAT WIRE |
| 7. INSTALL SEAT POSITION SENSOR (for Driver Seat) |
Check that the ignition switch is off.
Check that the negative battery (-) terminal is disconnected.
- CAUTION:
- After disconnecting the negative battery terminal, wait for at least 90 seconds before starting the operation.
Using a feeler gauge 1 mm (0.039 in.), install the seat position sensor.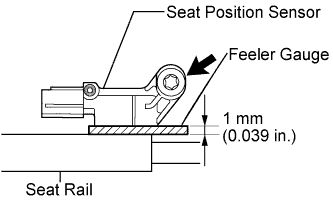

- NOTICE:
- If the seat position sensor has been dropped, or there are any cracks, dents or other defects in the case or connector, replace it with a new one.
- When installing the seat position sensor, be careful that the SRS wiring does not interfere with other parts and that it is not pinched between other parts.
- If the seat position sensor has been dropped, or there are any cracks, dents or other defects in the case or connector, replace it with a new one.
- HINT:
- Be sure that a clearance between the seat position sensor and the seat rail is within 0.6 mm (0.023 in.) to 1.4 mm (0.055 in.).
Using a "torx" socket wrench (T30), tighten the "torx" screw to install the seat position sensor.
- Torque:
- 8.0 N*m{ 82 kgf*cm , 71 in.*lbf }
Make sure that a clearance between the seat position sensor and the seat rail is within 0.6 mm (0.023 in.) to 1.4 mm (0.055 in.).
Check that there is no looseness in the installation parts of the seat position sensor.
Connect the connector to the seat position sensor.
| 8. INSTALL SEAT SLIDE POSITION SENSOR PROTECTOR (for Driver Seat) |
| 9. INSTALL SEAT HEATER CONTROL SUB-ASSEMBLY (w/ Seat Heater System) |
| 10. INSTALL LUMBAR SUPPORT ADJUSTER ASSEMBLY (for Driver Seat) |
| 11. INSTALL FRONT SEAT CUSHION SHIELD LOWER RH |
| 12. INSTALL FRONT SEAT CUSHION SHIELD LOWER LH |
| 13. INSTALL RECLINING ADJUSTER INSIDE COVER RH |
| 14. INSTALL RECLINING ADJUSTER INSIDE COVER LH |
| 15. INSTALL RH SEAT RECLINING ADJUSTER INSIDE COVER |
| 16. INSTALL LH SEAT RECLINING ADJUSTER INSIDE COVER |
| 17. INSTALL SEPARATE TYPE FRONT SEATBACK COVER |
Using hog ring pliers, install the separate type front seatback cover to the separate type front seatback pad with new hog rings.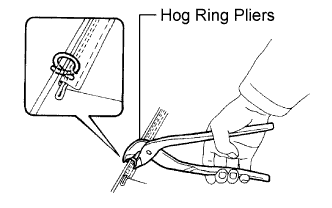
- NOTICE:
- Be careful not to damage the cover.
- When installing the hog rings, take care to minimize wrinkles as much as possible.
- Be careful not to damage the cover.
| 18. INSTALL SEPARATE TYPE FRONT SEATBACK COVER WITH PAD |
Install the separate type front seatback cover with pad to the separate type front seat cushion spring assembly.
Install the separate type front seatback cover bracket with the nut.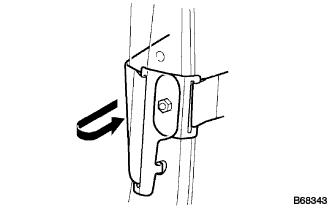
- Torque:
- 5.6 N*m{ 57 kgf*cm , 50 in.*lbf }
- NOTICE:
- For vehicles with side airbags, the side airbags may not be activated normally unless the separate type front seatback cover is securely installed.
- Check that the strap is not twisted after installing the bracket.
- Install the bracket securely.
- For vehicles with side airbags, the side airbags may not be activated normally unless the separate type front seatback cover is securely installed.
Install the hook.
| 19. INSTALL FRONT SEAT HEADREST SUPPORT |
| 20. INSTALL FRONT SEAT HEADREST SUPPORT |
| 21. INSTALL FRONT SEATBACK BOARD SUB-ASSEMBLY |
| 22. INSTALL SEAT ARMREST ASSEMBLY |
Install the seat armrest assembly with the bolt and 2 washers.
- Torque:
- 37 N*m{ 377 kgf*cm , 27 ft.*lbf }
| 23. INSTALL SEAT ARMREST COVER |
| 24. INSTALL FRONT SEAT HEADREST ASSEMBLY |
| 25. INSTALL SEPARATE TYPE FRONT SEAT CUSHION PAD |
| 26. INSTALL SEPARATE TYPE FRONT SEAT CUSHION COVER |
Using hog ring pliers, install the separate type front seat cushion cover to the separate type front seat cushion pad with new hog rings.
- NOTICE:
- Be careful not to damage the cover.
- When installing the hog rings, take care to minimize wrinkles as much as possible.
- Be careful not to damage the cover.
| 27. INSTALL SEPARATE TYPE FRONT SEAT CUSHION COVER WITH PAD |
| 28. INSTALL FRONT SEAT INNER BELT ASSEMBLY |
Install the front seat inner belt assembly with the nut.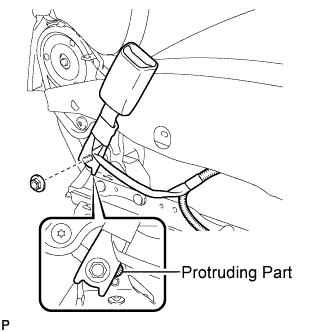
- Torque:
- 42 N*m{ 428 kgf*cm , 31 ft.*lbf }
- NOTICE:
- Do not allow the anchor part of the front seat inner belt assembly and the protruding part of the front seat adjuster to overlap.
Install the 4 clamps.
Connect the connectors.
| 29. INSTALL FRONT POWER SEAT SWITCH |
| 30. INSTALL FRONT SEAT CUSHION SHIELD INNER NO.1 |
| 31. INSTALL FRONT SEAT CUSHION SHIELD INNER |
| 32. INSTALL FRONT SEAT CUSHION SHIELD |
| 33. INSTALL POWER SEAT SWITCH ASSEMBLY (for Driver Seat) |
| 34. INSTALL FRONT SEAT CUSHION SHIELD ASSEMBLY |
| 35. INSTALL SLIDE AND VERTICAL POWER SEAT SWITCH KNOB |
| 36. INSTALL RECLINING POWER SEAT SWITCH KNOB |