INSTALLATION
Removal / installation
| 1. INSTALL REAR SEAT OUTER BELT ASSEMBLY |

Check the degree of tilt when the ELR begins to lock.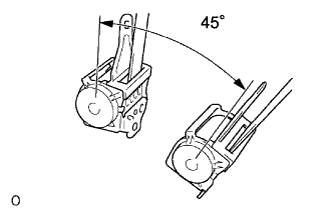

Check that the belt does not lock at less than 15 degrees of tilt in any direction but locks at over 45 degrees of tilt when gently moving the installed retractor.
- NOTICE:
- Do not disassemble the retractor.
Install the rear seat outer belt assembly with the 2 bolts.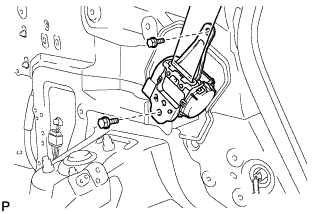
- Torque:
- For upper bolt:
- 7.5 N*m{ 77 kgf*cm , 66 in.*lbf }
- For lower bolt:
- 42 N*m{ 428 kgf*cm , 31 ft.*lbf }
Connect the shoulder side of the rear seat outer belt assembly with the bolt.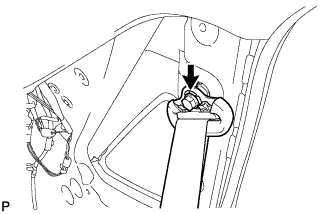
- Torque:
- 42 N*m{ 428 kgf*cm , 31 ft.*lbf }
| 2. INSTALL ROOF SIDE GARNISH ASSEMBLY INNER |
Engage the 7 clips and install the roof side garnish assembly inner.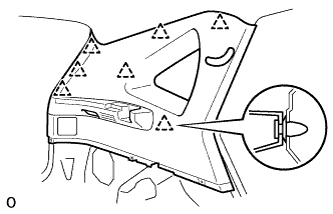
Install the 3 clips.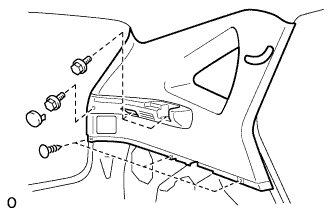
Install the 3 bolts and tonneau cover holder cap.
Engage the 4 claws and install the seat belt bezel.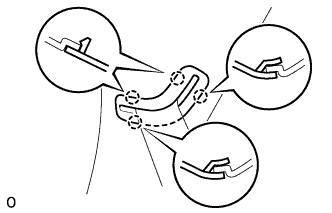
| 3. INSTALL TONNEAU COVER HOLDER CAP NO.1 |
| 4. INSTALL ROOM LIGHT ASSEMBLY NO.2 |
Connect the connector.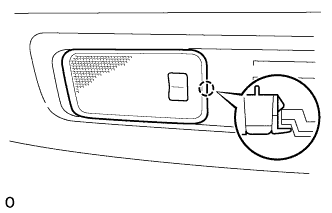
Engage the claw and install the room light assembly No.2.
| 5. INSTALL DECK TRIM SIDE LH PANEL ASSEMBLY |
Engage the 2 clips and install the deck trim side panel assembly.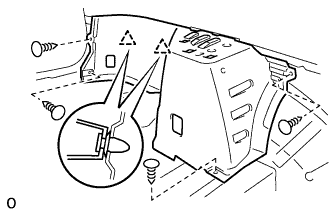
Install the 4 clips.
| 6. INSTALL ROPE HOOK |
Install the 2 rope hooks with the 2 bolts.
- Torque:
- 8.0 N*m{ 80 kgf*cm , 71 in.*lbf }
- HINT:
- Use the same procedure to install the other side.
| 7. INSTALL REAR FLOOR FINISH SIDE LH PLATE |
Engage the 2 clips and install the rear floor finish side plate.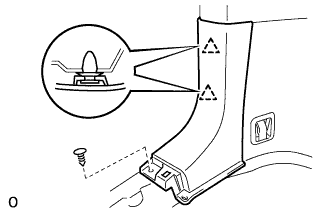
Install the clip.
| 8. INSTALL REAR SEAT SIDE LH COVER |
Engage the 4 clips and install the rear seat side cover.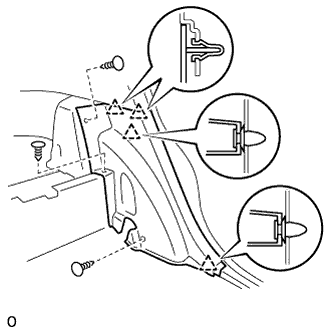
Install the 3 clips.
| 9. CONNECT REAR SEAT OUTER BELT ASSEMBLY |
Connect the floor side of the rear seat outer belt assembly with the bolt.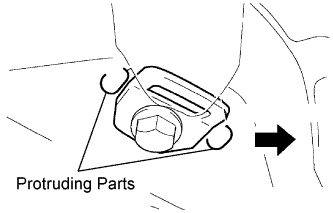
- Torque:
- 42 N*m{ 428 kgf*cm , 31 ft.*lbf }
- NOTICE:
- Do not allow the anchor part of the rear seat outer belt assembly and the protruding parts of the floor panel to overlap.
Check if the ELR locks.
- NOTICE:
- The check should be performed with the outer belt assembly installed.
With the belt assembly installed, check that the belt locks when it is pulled out quickly.
| 10. INSTALL DECK SIDE TRIM LH COVER |
Engage the 5 claws and install the deck side trim cover.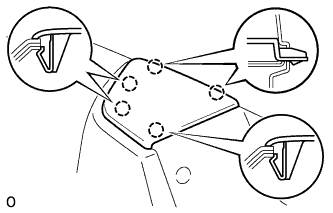
| 11. INSTALL REAR DOOR OPENING TRIM LH WEATHERSTRIP |
| 12. INSTALL REAR DOOR SCUFF LH PLATE |
Connect the connector. (w/ illumination scuff plate)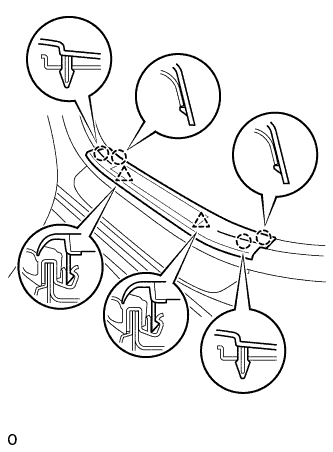
Engage the 4 claws and 2 clips, and install the rear door scuff plate.
| 13. INSTALL DECK SIDE TRIM LH BOX |
Install the deck side trim box with the 2 clips.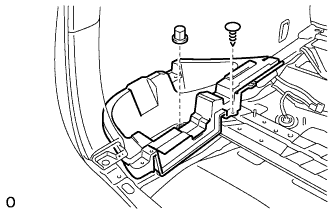
| 14. INSTALL DECK SIDE TRIM RH BOX |
| 15. INSTALL JACK CARRIER ASSEMBLY |
| 16. INSTALL JACK ASSEMBLY |
| 17. INSTALL JACK CARRIER SUPPORT |
| 18. INSTALL REAR FLOOR FINISH PLATE |
Engage the 2 claws and 6 clips, and install the rear floor finish plate.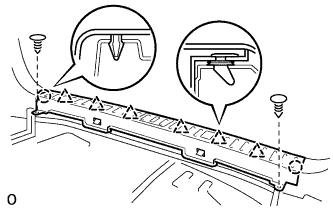
Install the 2 clips.
| 19. INSTALL BACK DOOR WEATHERSTRIP |
| 20. INSTALL DECK NO.2 BOARD SUB-ASSEMBLY |
Install the deck No.2 board sub-assembly with the 4 bolts and 2 nuts.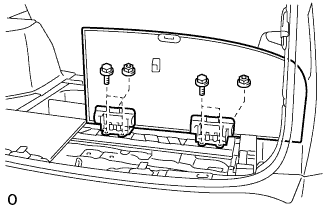
| 21. INSTALL DECK NO.3 BOARD SUB-ASSEMBLY |
Install the deck No.3 board sub-assembly with the 2 bolts and 2 nuts.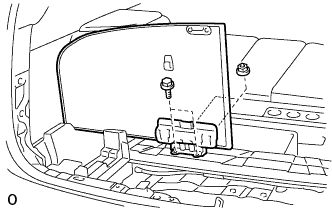
| 22. INSTALL DECK FLOOR BOX REAR |
Install the deck floor box rear with the 2 clips.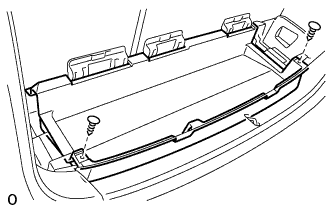
| 23. INSTALL DECK FLOOR BOX FRONT |
Install the deck floor box front with the 2 clips.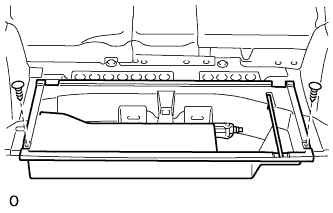
| 24. INSTALL DECK BOARD SUB-ASSEMBLY |
Install the deck board sub-assembly with the 2 bolt.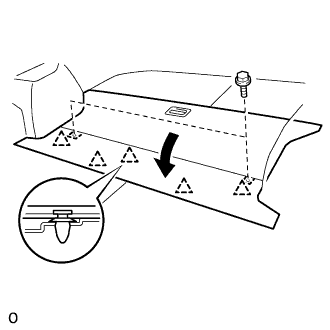
Engage the 5 clips.
| 25. INSTALL TONNEAU COVER ASSEMBLY |
| 26. INSTALL REAR SEAT ASSEMBLY RH |
40/20/40 Split Seat Type (Click here)
| 27. INSTALL REAR SEAT TRACK BRACKET COVER INNER |
| 28. INSPECT SLIDE ADJUSTER LOCK |
40/20/40 Split Seat Type (Click here)
| 29. INSTALL REAR SEAT ASSEMBLY LH |
Place the rear seat assembly LH in the vehicle and align the adjuster pin with the hole on the vehicle side.
Move the rear seat assembly LH to the rearmost position by operating the rear seat track adjusting handle.
- NOTICE:
- Check that the seat is locked.
Temporarily install the front side of the rear seat assembly LH with the 2 bolts.
Recline the separate rear seatback forward by operating the rear seat lock control lever sub-assembly.
Move the rear seat assembly LH fully forward.
- NOTICE:
- Check that the seat is locked.
Temporarily install the rear side of the rear seat assembly LH with the 3 bolts.
Return the separate rear seatback to the upright position.
Move the rear seat assembly LH to the rearmost position by operating the rear seat track adjusting handle.
- NOTICE:
- Check that the seat is locked.
Fully tighten the 2 bolts on the front side of the rear seat assembly LH in the order of the inner side bolt and then the outer side bolt.
- Torque:
- 37 N*m{ 377 kgf*cm , 27 ft.*lbf }
Recline the separate rear seatback forward by operating the rear seat lock control lever sub-assembly.
Move the rear seat assembly LH fully forward.
- NOTICE:
- Check that the seat is locked.
Fully tighten the 3 bolts on the rear side of the rear seat assembly LH in the order of the inner rear side bolt, the inner front side bolt, and then the outer side bolt.
- Torque:
- 37 N*m{ 377 kgf*cm , 27 ft.*lbf }
Return the separate rear seatback to the upright position.
Move the rear seat assembly LH to the rearmost position by operating the rear seat track adjusting handle.
- NOTICE:
- Check that the seat is locked.
Install the floor anchor side of the fold seat stopper band assembly No.2 with the bolt.
- Torque:
- 9.0 N*m{ 92 kgf*cm , 80 in.*lbf }
Install the 3 clips.
| 30. INSTALL REAR SEAT TRACK BRACKET COVER INNER |
| 31. INSPECT SLIDE ADJUSTER LOCK |
Check that the left and right adjusters lock simultaneously when sliding the seat.
If the left and right adjusters do not lock simultaneously, adjust by loosening the bolts securing the seat.