REMOVAL
Removal / installation
- NOTICE:
- If brake fluid spills on any painted surface, wash or otherwise remove it completely.
| 1. PERFORM ACCUMULATOR ZERO DOWN |

- CAUTION:
- Never bleed air from the brake hydraulic system without using the intelligent tester. Failure to use the intelligent tester could cause serious injury or an accident.
- Be sure to perform this procedure before replacement, removal, or installation of the actuator.
- Never bleed air from the brake hydraulic system without using the intelligent tester. Failure to use the intelligent tester could cause serious injury or an accident.
- NOTICE:
- Perform accumulator zero down by following the steps displayed on the intelligent tester.
Connect the intelligent tester to the DLC3 with the ignition switch off
Depressurize the accumulator.
Check that the parking brake is applied and turn the ignition switch to the ON position.
Turn on the intelligent tester and select "DIAGNOSTIC MENU" → "ABS/VSC" → "ECB UTILITY" → "ZERO DOWN" on the intelligent tester.
When the buzzer sounds, turn the ignition switch off.
Circulate the fluid in the accumulator.
Depressurize the accumulator 5 times.
- HINT:
- Accumulator pressure is released and accumulated repeatedly, which circulates the fluid inside the accumulator, when repeating accumulator zero down.
- The pump motor rotates and the accumulator is pressurized every time the ignition switch is turned from off to on.
- Accumulator pressure is released and accumulated repeatedly, which circulates the fluid inside the accumulator, when repeating accumulator zero down.
| 2. REMOVE ABS MOTOR RELAY |
Remove the 2 ABS motor relays with the ignition switch off in order to prohibit brake control.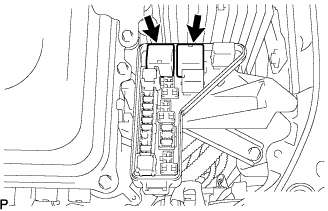

- NOTICE:
- If the pump motor operates while air remains inside the brake actuator hose, the air will enter the actuator, resulting in difficulty in bleeding the brakes.
- After the brake actuator assembly has been replaced, remove the ABS motor relay before bleeding the brakes.
- If the pump motor operates while air remains inside the brake actuator hose, the air will enter the actuator, resulting in difficulty in bleeding the brakes.
| 3. DRAIN BRAKE FLUID |
| 4. REMOVE FRONT FENDER TO COWL SIDE SEAL RH |
| 5. REMOVE FRONT FENDER TO COWL SIDE SEAL LH |
| 6. REMOVE FRONT WIPER ARM AND BLADE ASSEMBLY RH |
Remove the 2 nuts and the front wiper arm and blade assembly RH.
| 7. REMOVE FRONT WIPER ARM AND BLADE ASSEMBLY LH |
Remove the nut and the front wiper arm and blade assembly LH.
| 8. REMOVE COWL TOP VENTILATOR LOUVER SUB-ASSEMBLY |
Remove the 2 clips.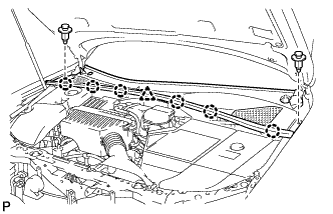
Disengage the 6 claws and the clamp, and remove the cowl top ventilator louver sub-assembly.
| 9. REMOVE WIND SHIELD WIPER MOTOR ASSEMBLY |
Disconnect the connector.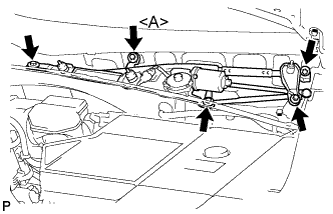
Remove the 5 bolts and the windshield wiper motor and link assembly.
- HINT:
- Bolt <A> cannot be removed because it is integrated into windshield wiper link assembly.
| 10. REMOVE COWL PANEL SUB-ASSEMBLY |
Separate the wire harness clamp and grommet (A).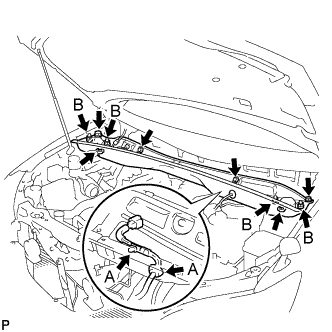
Remove the 4 shock absorber nuts (B).
Remove the 4 bolts, 2 nuts and cowl top panel sub-assembly.
Install the 4 shock absorber nuts.
- Torque:
- 80 N*m{ 815 kgf*cm , 59 ft.*lbf }
| 11. REMOVE BRAKE MASTER CYLINDER RESERVOIR ASSEMBLY |
Disconnect the warning switch connector.
Separate the brake actuator hose from the clamp.
Remove the 2 clips and brake actuator hose.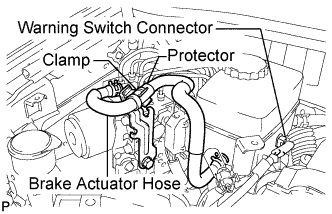
Remove the 2 clips and 2 reservoir tubes from the brake master cylinder reservoir assembly.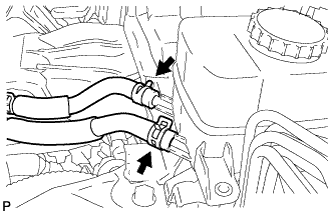
Remove the 2 bolts and the brake master cylinder reservoir assembly.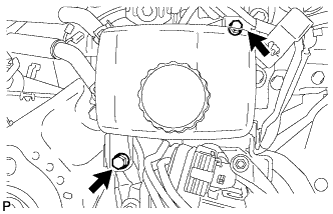
| 12. REMOVE FRONT WHEEL RH |
| 13. REMOVE BRAKE ACTUATOR ASSEMBLY WITH BRAKE ACTUATOR BRACKET ASSEMBLY |
Remove the bolt and the brake actuator bracket No.7 with clamp.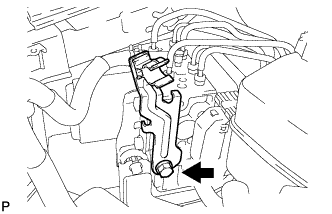
Using SST, disconnect the 6 brake tubes from the actuator assembly with the brake actuator bracket assembly.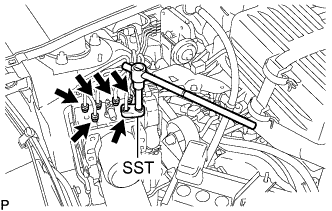
- SST
- 09023-00101
Use tags or make a memo to identify the places to reconnect.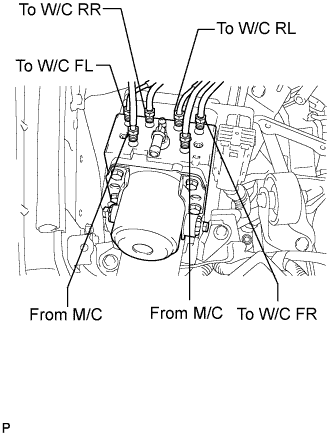
Using SST, disconnect the front brake No.8 tube.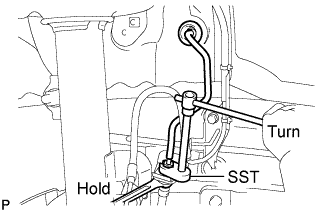
Release the lock lever and disconnect the actuator connector.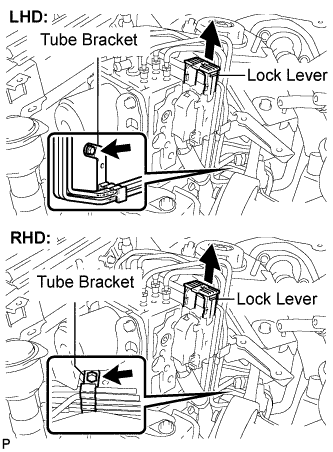
Remove the bolt from the brake tube bracket.
Remove the 3 nuts and brake actuator assembly with the brake actuator bracket assembly.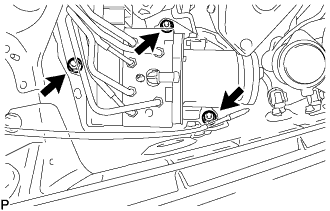
- NOTICE:
- Do not damage the brake tubes.