REASSEMBLY
Removal / installation
| 1. INSTALL FRONT WINDOW FRAME MOULDING REAR |

Remove the tape from the moulding.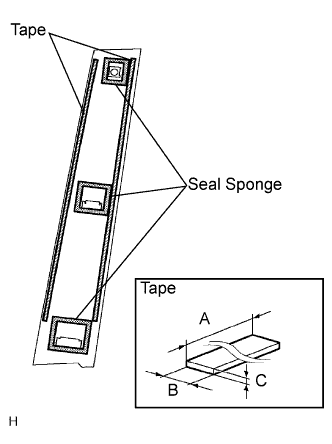

Clean the contact surface of the body with white gasoline.
Clean the outer circumference of the moulding with white gasoline.
Apply new double-sided tape to the moulding, as shown in the illustration.
- Dimension:
A
400.0 mm (15.748 in.)
B
5.0 mm (0.197 in.)
C
1.2 mm (0.047 in.)
Using a heat light, heat the body and moulding.
- Heating temperature:
Body
40 to 60°C (104 to 140°F)
Moulding
20 to 30°C (68 to 86°F)
- NOTICE:
- Do not heat the body and moulding excessively.
Remove the release paper from the moulding face.
- HINT:
- Be careful that dirt or foreign objects do not stick to the adhesive part when removing the release paper.
Engage the 2 claws and install the moulding with the screw.
- NOTICE:
- Do not apply excessive force onto the moulding, but apply steady pressure with your thumbs.
| 2. INSTALL FRONT DOOR BELT MOULDING ASSEMBLY |
| 3. INSTALL FRONT DOOR WEATHERSTRIP |
| 4. INSTALL FRONT DOOR CHECK ASSEMBLY |
Install the front door check assembly with the bolt and the 2 nuts.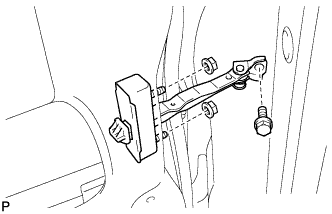
- Torque:
- bolt:
- 27 N*m{ 275 kgf*cm , 20 ft.*lbf }
- Torque:
- nut:
- 8.0 N*m{ 82 kgf*cm , 71 in.*lbf }
| 5. INSTALL FRONT DOOR CHECK COVER |
| 6. INSTALL FRONT DOOR OUTSIDE HANDLE FRAME SUB-ASSEMBLY |
Apply body grease to the sliding parts on the front door outside handle frame sub-assembly.
Install the front door outside handle frame sub-assembly with the claw.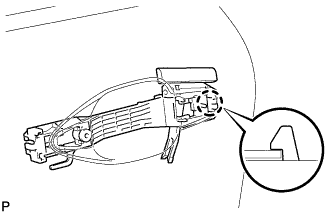
Using a "torx" socket wrench (T30), install the front door outside handle frame sub-assembly with the screw.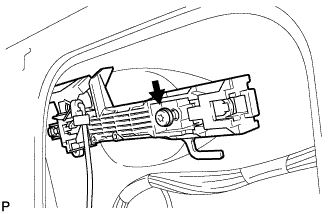
- Torque:
- 4.0 N*m{ 41 kgf*cm , 35 in.*lbf }
| 7. INSTALL FRONT DOOR OUTSIDE HANDLE PAD REAR |
| 8. INSTALL FRONT DOOR OUTSIDE HANDLE PAD |
| 9. INSTALL FRONT DOOR HANDLE ASSEMBLY OUTSIDE |
| 10. INSTALL FRONT DOOR OUTSIDE HANDLE COVER |
Using a "torx" socket wrench (T30), install the front door outside handle cover with the screw.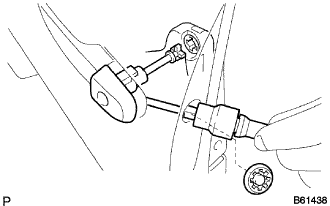
- Torque:
- 4.0 N*m{ 41 kgf*cm , 35 in.*lbf }
Install the hole plug.
| 11. INSTALL DOOR LOCK WIRING HARNESS SEAL |
| 12. INSTALL FRONT DOOR LOCK ASSEMBLY |
- NOTICE:
- When reusing the removed front door lock assembly, replace the door lock wire harness sealing on the connector with a new one.
- Do not allow grease or dust to adhere on the door lock wiring harness sealing surface of the connector.
- Reusing the door lock wiring harness sealing and/or using damaged door lock wiring harness sealing may cause water intrusion to the connection, and result in a malfunction in the front door lock assembly.
- When reusing the removed front door lock assembly, replace the door lock wire harness sealing on the connector with a new one.
Apply body grease to the sliding parts on the front door lock assembly.
Insert the front door outside handle link to the front door lock assembly, and set it to the front door panel.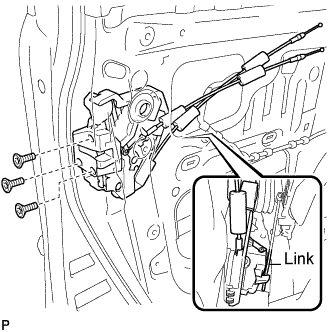
Make sure that the front door outside handle link is securely connected to the front door lock assembly.
Using a "torx" socket wrench (T30), install the front door lock assembly with the 3 screws.
- Torque:
- 5.0 N*m{ 51 kgf*cm , 44 in.*lbf }
Connect the connector.
| 13. INSTALL FRONT DOOR FRAME SUB-ASSEMBLY REAR LOWER |
| 14. INSTALL POWER WINDOW REGULATOR MOTOR SUB-ASSEMBLY FRONT |
- NOTICE:
- The regulator arm must be below the intermediate position when installing the power window regulator motor.
Using a "torx" driver (T25), install the power window regulator motor sub-assembly front with the 3 screws.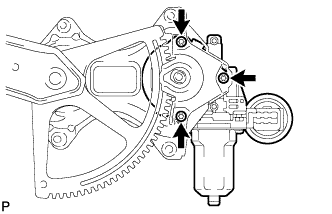
- Torque:
- 5.5 N*m{ 56 kgf*cm , 49 in.*lbf }
- HINT:
- The new front window regulator adopts a self-tapping method. The installation position of regulator will be threaded when the self-tapping screw is inserted.
| 15. INSTALL FRONT DOOR WINDOW REGULATOR SUB-ASSEMBLY |
Apply body grease to the sliding parts on the front door window regulator sub-assembly.
Install the temporary bolt to the front door window regulator sub-assembly.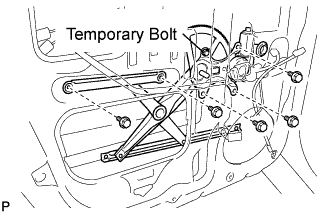
Temporarily install the window regulator.
Install the front door window regulator sub-assembly with the 6 bolts.
- Torque:
- 8.0 N*m{ 82 kgf*cm , 71 in.*lbf }
Connect the connector.
| 16. INSTALL FRONT DOOR GLASS SUB-ASSEMBLY |
Install the front door glass sub-assembly with the 2 bolts.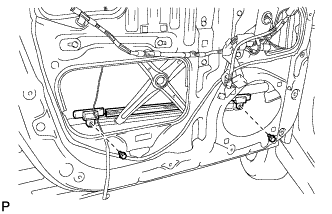
- Torque:
- 5.5 N*m{ 56 kgf*cm , 49 in.*lbf }
| 17. INSTALL FRONT DOOR GLASS RUN |
| 18. INSTALL FRONT DOOR SERVICE HOLE COVER |
Apply butyl tape to the front door panel as shown in the illustration.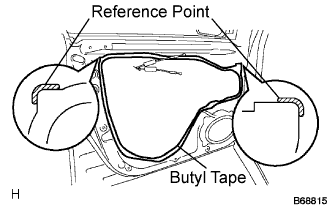
Install a new service hole cover.
| 19. INSTALL OUTER REAR VIEW MIRROR ASSEMBLY |
Install the outer rear view mirror assembly with the 3 bolts.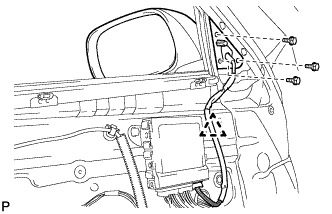
- Torque:
- 8.0 N*m{ 82 kgf*cm , 71 in.*lbf }
Connect the connector and install the clamp.
| 20. INSTALL FRONT NO.1 SPEAKER ASSEMBLY |
Install the front No.1 speaker with the 4 bolts.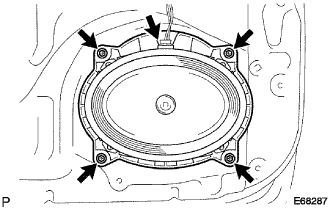
Connect the connector.
| 21. INSTALL FRONT DOOR ARMREST SET BRACKET |
| 22. INSTALL FRONT DOOR GLASS WEATHERSTRIP INNER |
| 23. INSTALL FRONT DOOR TRIM BOARD SUB-ASSEMBLY |
Connect each connector and the cables.
Install the front door trim board sub-assembly with the 15 clips <B>.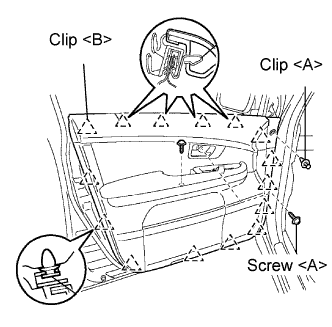
Install the 2 screws and the clip <A>.
- Torque:
- screw <A>:
- 3.5 N*m{ 36 kgf*cm , 31 in.*lbf }
| 24. INSTALL FRONT DOOR LOWER FRAME BRACKET GARNISH |
| 25. INSTALL DOOR ARMREST COVER |
| 26. INSTALL POWER WINDOW REGULATOR MASTER SWITCH ASSEMBLY |
| 27. INSTALL FRONT DOOR INSIDE HANDLE BEZEL PLUG |
| 28. POWER WINDOW CONTROL SYSTEM INITIALIZATION |