B1153/25
Diagnostic trouble codes
DESCRIPTION
The seat position sensor circuit consists of the center airbag sensor assembly and the seat position sensor.DTC B1153/25 is recorded when a malfunction is detected in the seat position sensor circuit.
| DTC No. |
DTC Detecting Condition |
Trouble Area |
| B1153/25 |
|
|
WIRING DIAGRAM
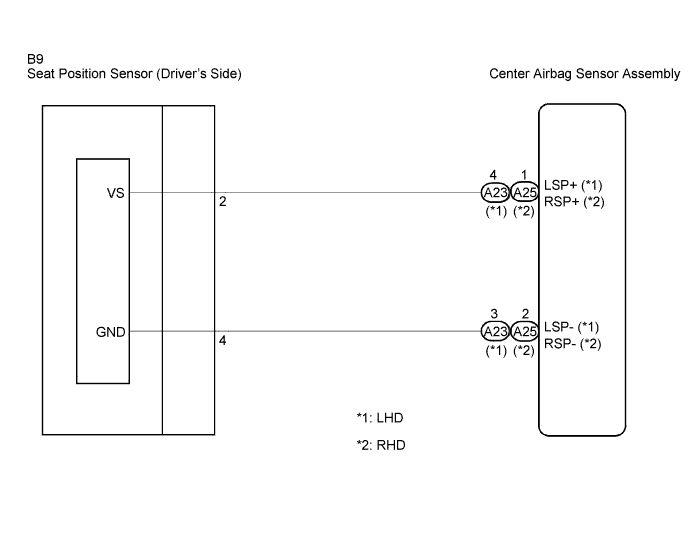

INSPECTION PROCEDURE
| 1. CHECK VEHICLE STEERING POSITION |

Check the vehicle steering position.
- Result:
- A:
- LHD
- B:
- RHD
|
|
||||

| A | |
 |
| 2. CHECK DTC |
Turn the ignition switch to the ON position, and wait for at least 60 seconds.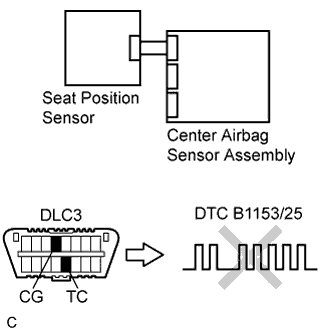
Clear the DTCs stored in memory (Click here).
Turn the ignition switch to the LOCK position.
Turn the ignition switch to the ON position, and wait for at least 60 seconds.
Check the DTCs (Click here).
- OK:
- DTC B1153/25 is not output.
- HINT:
- Codes other than code B1153/25 may be output at this time, but they are not related to this check.
|
|
||||
| OK | ||
 |
||
| ||
| 3. CHECK CONNECTION OF CONNECTORS |
Turn the ignition switch to the LOCK position.
Disconnect the negative (-) terminal cable from the battery, and wait for at least 90 seconds.
Check that the connectors are properly connected to the center airbag sensor assembly and the seat position sensor.
- OK:
- The connectors are connected.
|
|
||||

| OK | |
|
| 4. CHECK FLOOR WIRE NO.2 (OPEN) |
Disconnect the connectors from the center airbag sensor assembly and the seat position sensor.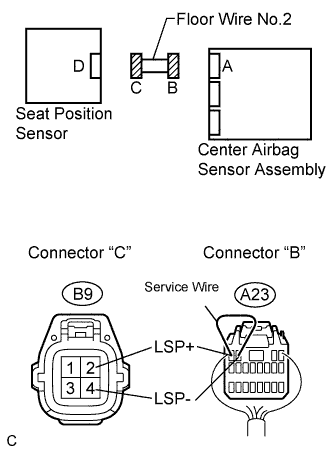
Using a service wire, connect A23-4 (LSP+) and A23-3 (LSP-) of connector "B".
- HINT:
- Do not forcibly insert a service wire into the terminals of the connector when connecting.
Measure the voltage according to the value(s) in the table below.
- Voltage:
Tester connection
Condition
Specified condition
B9-2 (LSP+) -
B9-4 (LSP-)
Always
Below 1 V
|
|
||||
| OK | |
|
| 5. CHECK FLOOR WIRE NO.2 (SHORT TO B+) |
Disconnect the service wire from connector "B".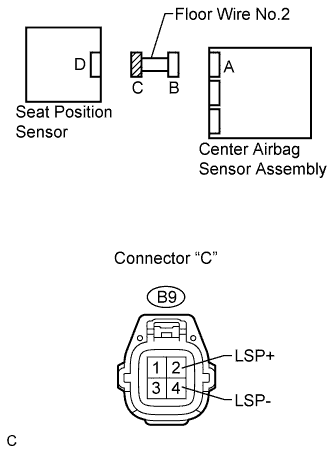
Connect the negative (-) terminal cable to the battery, and wait for at least 2 seconds.
Turn the ignition switch to the ON position.
Measure the voltage according to the value(s) in the table below.
- Voltage:
Tester connection
Condition
Specified condition
B9-2 (LSP+) -
Body ground
Ignition switch ON
Below 1 V
B9-4 (LSP-) -
Body ground
Ignition switch ON
Below 1 V
|
|
||||
| OK | |
|
| 6. CHECK FLOOR WIRE NO.2 (SHORT TO GROUND) |
Turn the ignition switch to the LOCK position.
Disconnect the negative (-) terminal cable from the battery, and wait for at least 90 seconds.
Measure the resistance according to the value(s) in the table below.
- Resistance:
Tester connection
Condition
Specified condition
B9-2 (LSP+) -
Body ground
Always
1 MΩ or higher
B9-4 (LSP-) -
Body ground
Always
1 MΩ or higher
|
|
||||
| OK | |
|
| 7. CHECK SEAT POSITION SENSOR |
Connect the connectors to the seat position sensor and the center airbag sensor assembly.
Connect the negative (-) terminal cable to the battery, and wait for at least 2 seconds.
Turn the ignition switch to the ON position, and wait for at least 60 seconds.
Clear the DTCs stored in memory (Click here).
Turn the ignition switch to the LOCK position.
Turn the ignition switch to the ON position, and wait for at least 60 seconds.
Check the DTCs (Click here).
- OK:
- DTC B1153/25 is not output.
- HINT:
- Codes other than code B1153/25 may be output at this time, but they are not related to this check.
|
|
||||
| OK | ||
|
||
| ||
| 8. REPLACE SEAT POSITION SENSOR |
Turn the ignition switch to the LOCK position.
Disconnect the negative (-) terminal cable from the battery, and wait for at least 90 seconds.
Replace the seat position sensor (Click here).
- HINT:
- Perform the inspection using parts from a normal vehicle if possible.
| NEXT | |
|
| 9. CHECK CENTER AIRBAG SENSOR ASSEMBLY |
Connect the negative (-) terminal cable to the battery, and wait for at least 2 seconds.
Turn the ignition switch to the ON position, and wait for at least 60 seconds.
Clear the DTCs stored in memory (Click here).
Turn the ignition switch to the LOCK position.
Turn the ignition switch to the ON position, and wait for at least 60 seconds.
Check the DTCs (Click here).
- OK:
- DTC B1153/25 is not output.
- HINT:
- Codes other than code B1153/25 may be output at this time, but they are not related to this check.
|
|
||||
| OK | ||
|
||
| ||
| 10. CHECK DTC |
Turn the ignition switch to the ON position, and wait for at least 60 seconds.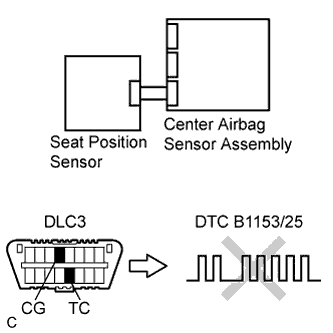
Clear the DTCs stored in memory (Click here).
Turn the ignition switch to the LOCK position.
Turn the ignition switch to the ON position, and wait for at least 60 seconds.
Check the DTCs (Click here).
- OK:
- DTC B1153/25 is not output.
- HINT:
- Codes other than code B1153/25 may be output at this time, but they are not related to this check.
|
|
||||
| OK | ||
|
||
| ||
| 11. CHECK CONNECTION OF CONNECTORS |
Turn the ignition switch to the LOCK position.
Disconnect the negative (-) terminal cable from the battery, and wait for at least 90 seconds.
Check that the connectors are properly connected to the center airbag sensor assembly and the seat position sensor.
- OK:
- The connectors are connected.
|
|
||||
| OK | |
|
| 12. CHECK FLOOR WIRE (OPEN) |
Disconnect the connectors from the center airbag sensor assembly and the seat position sensor.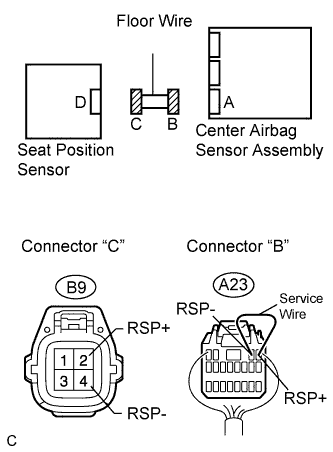
Using a service wire, connect A25-1 (RSP+) and A25-2 (RSP-) of connector "B".
- HINT:
- Do not forcibly insert a service wire into the terminals of the connector when connecting.
Measure the voltage according to the value(s) in the table below.
- Voltage:
Tester connection
Condition
Specified condition
B9-2 (RSP+) -
B9-4 (RSP-)
Always
Below 1 V
|
|
||||
| OK | |
|
| 13. CHECK FLOOR WIRE (SHORT TO B+) |
Disconnect the service wire from connector "B".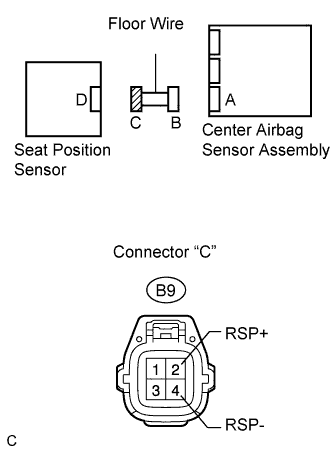
Connect the negative (-) terminal cable to the battery, and wait for at least 2 seconds.
Turn the ignition switch to the ON position.
Measure the voltage according to the value(s) in the table below.
- Voltage:
Tester connection
Condition
Specified condition
B9-2 (RSP+) -
Body ground
Ignition switch ON
Below 1 V
B9-4 (RSP-) -
Body ground
Ignition switch ON
Below 1 V
|
|
||||
| OK | |
|
| 14. CHECK FLOOR WIRE (SHORT TO GROUND) |
Turn the ignition switch to the LOCK position.
Disconnect the negative (-) terminal cable from the battery, and wait for at least 90 seconds.
Measure the resistance according to the value(s) in the table below.
- Resistance:
Tester connection
Condition
Specified condition
B9-2 (RSP+) -
Body ground
Always
1 MΩ or higher
B9-4 (RSP-) -
Body ground
Always
1 MΩ or higher
|
|
||||
| OK | |
|
| 15. CHECK SEAT POSITION SENSOR |
Connect the connectors to the seat position sensor and the center airbag sensor assembly.
Connect the negative (-) terminal cable to the battery, and wait for at least 2 seconds.
Turn the ignition switch to the ON position, and wait for at least 60 seconds.
Clear the DTCs stored in memory (Click here).
Turn the ignition switch to the LOCK position.
Turn the ignition switch to the ON position, and wait for at least 60 seconds.
Check the DTCs (Click here).
- OK:
- DTC B1153/25 is not output.
- HINT:
- Codes other than code B1153/25 may be output at this time, but they are not related to this check.
|
|
||||
| OK | ||
|
||
| ||
| 16. REPLACE SEAT POSITION SENSOR |
Turn the ignition switch to the LOCK position.
Disconnect the negative (-) terminal cable from the battery, and wait for at least 90 seconds.
Replace the seat position sensor (Click here).
- HINT:
- Perform the inspection using parts from a normal vehicle if possible.
| NEXT | |
|
| 17. CHECK CENTER AIRBAG SENSOR ASSEMBLY |
Connect the negative (-) terminal cable to the battery, and wait for at least 2 seconds.
Turn the ignition switch to the ON position, and wait for at least 60 seconds.
Clear the DTCs stored in memory (Click here).
Turn the ignition switch to the LOCK position.
Turn the ignition switch to the ON position, and wait for at least 60 seconds.
Check the DTCs (Click here).
- OK:
- DTC B1153/25 is not output.
- HINT:
- Codes other than code B1153/25 may be output at this time, but they are not related to this check.
|
|
||||
| OK | ||
|
||
| ||