REASSEMBLY
Removal / installation
| 1. INSTALL REAR SEAT TRACK ASSEMBLY INNER |
| 2. INSTALL REAR SEAT TRACK ASSEMBLY OUTER |
| 3. INSTALL REAR SEAT TRACK ADJUSTING HANDLE |
| 4. INSTALL FOLD SEAT CUSHION FRAME NO.1 |

Install the 2 fold seat cushion frame No.1 with the 4 nuts.
- Torque:
- 42 N*m{ 428 kgf*cm , 31 ft.*lbf }
| 5. INSTALL REAR SEATBACK FRAME SUB-ASSEMBLY LOWER |
Using a "torx" socket wrench (T45), install the rear seatback frame sub-assembly lower with the 5 "torx" bolts.
- Torque:
- 42 N*m{ 428 kgf*cm , 31 ft.*lbf }
| 6. INSTALL RECLINING CONTROL LINK SUB-ASSEMBLY |
Install the reclining control link sub-assembly with the 4 nuts.
- Torque:
- 42 N*m{ 428 kgf*cm , 31 ft.*lbf }
Install the spring and a new E-ring.
| 7. INSTALL SEAT TRACK STOP PLATE |
Install the seat track stop plate with the 2 nuts.
- Torque:
- 18 N*m{ 184 kgf*cm , 13 ft.*lbf }
Install the 2 seat track stop plate cables.
Install the clamp.
| 8. INSTALL REAR SEATBACK FRAME SUB-ASSEMBLY |
Using a "torx" socket wrench (T45), install the rear seatback frame sub-assembly with the 4 "torx" bolts.
- Torque:
- 42 N*m{ 428 kgf*cm , 31 ft.*lbf }
| 9. INSTALL REAR SEAT RECLINING CONTROL NO.2 CABLE |
| 10. INSTALL REAR SEAT COVER NO.2 |
| 11. INSTALL REAR SEAT RECLINING COVER INNER LH |
| 12. INSTALL FOLD SEAT STOPPER BAND ASSEMBLY NO.2 |
| 13. INSTALL REAR SEATBACK PAD |
| 14. INSTALL SEPARATE TYPE REAR SEATBACK COVER |
Using hog ring pliers, install the separate type rear seatback cover to the rear seatback pad with new hog rings.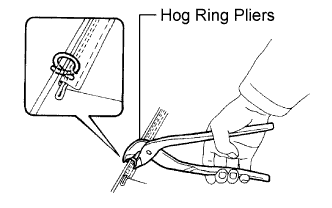

- NOTICE:
- Be careful not to damage the cover.
- When installing the hog rings, take care to minimize wrinkles as much as possible.
- Be careful not to damage the cover.
| 15. INSTALL SEPARATE TYPE REAR SEATBACK COVER WITH PAD |
Install the separate type rear seatback cover with pad to the rear seatback frame sub-assembly.
Install the hook and new hog rings.
Install the rear seat belt hook with the bolt.
- Torque:
- 6.0 N*m{ 61 kgf*cm , 53 in.*lbf }
Install the 2 clips.
| 16. INSTALL REAR SEAT HEADREST SUPPORT |
| 17. INSTALL REAR SEAT HEADREST SUPPORT |
| 18. INSTALL REAR SEAT LOCK CONTROL LEVER SUB-ASSEMBLY |
| 19. INSTALL REAR SEATBACK LOCK STRIKER COVER |
| 20. INSTALL REAR SEATBACK BOARD CARPET ASSEMBLY |
| 21. INSTALL REAR SEATBACK COVER |
| 22. INSTALL REAR SEAT HEADREST ASSEMBLY |
| 23. INSTALL REAR SEAT BELT ASSEMBLY INNER |
Install the rear seat belt assembly inner with the bolt.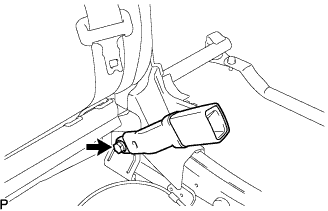
- Torque:
- 42 N*m{ 428 kgf*cm , 31 ft.*lbf }
| 24. INSTALL REAR SEAT CUSHION PAD |
| 25. INSTALL SEPARATE TYPE REAR SEAT CUSHION COVER |
Using hog ring pliers, install the separate type rear seat cushion cover to the rear seat cushion pad with new hog rings.
- NOTICE:
- Be careful not to damage the cover.
- When installing the hog rings, take care to minimize wrinkles as much as possible.
- Be careful not to damage the cover.
| 26. INSTALL REAR SEAT CUSHION FRAME SUB-ASSEMBLY |
| 27. INSTALL SEPARATE TYPE REAR SEAT CUSHION ASSEMBLY |
Install the 2 bolts.
- Torque:
- 18 N*m{ 184 kgf*cm , 13 ft.*lbf }
Install the 2 rubber bands on the backside of the rear seatback board carpet assembly.
Using a "torx" socket wrench (T45), install the separate type rear seat cushion assembly with the 2 "torx" bolts.
- Torque:
- 21 N*m{ 214 kgf*cm , 16 ft.*lbf }
| 28. INSTALL REAR SEAT CUSHION MOULDING REAR LH |
| 29. INSTALL REAR SEAT CUSHION MOULDING LH |