REMOVAL
Removal / installation
| 1. TABLE OF BOLT, SCREW AND NUT |

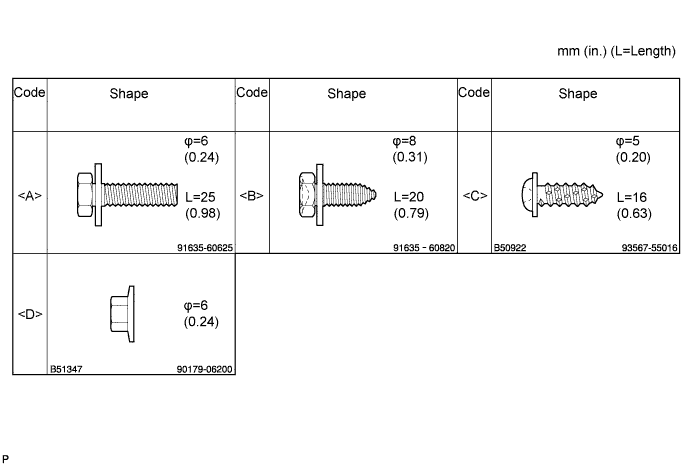
- HINT:
- The bolts, screws and nuts, necessary for installation and removal of the instrument panel, are shown in the illustration below with alphabet code.

| 2. DISCONNECT CABLE FROM NEGATIVE BATTERY TERMINAL |
- CAUTION:
- Wait for 90 seconds after disconnecting the cable to prevent the airbag working. (Click here)
| 3. REMOVE SHIFT LEVER KNOB SUB-ASSEMBLY |
Turn the shift lever knob counterclockwise and remove the shift lever knob sub-assembly.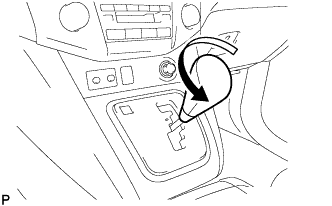
| 4. REMOVE CONSOLE PANEL UPPER FRONT |
Disengage the 4 clips and remove the console panel upper front.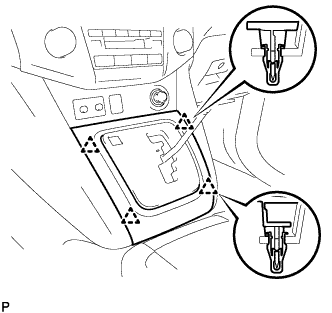
| 5. REMOVE INSTRUMENT PANEL FINISH PANEL LOWER |
Disengage the 2 clips.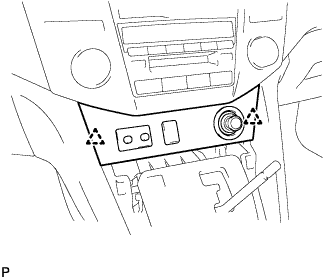
Disconnect the connectors and remove the instrument panel finish panel lower.
| 6. REMOVE RADIO RECEIVER |
Remove the 4 bolts.
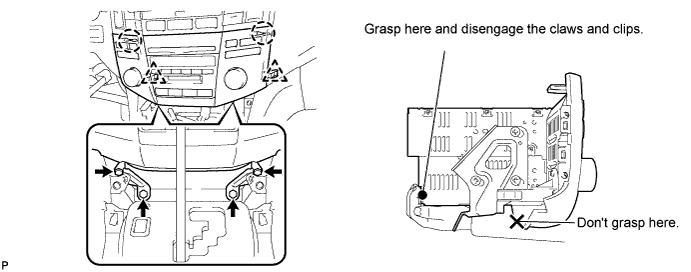
Disengage the 2 claws and the 2 clips.
Disconnect the connectors.
Remove the radio receiver with bracket.
Remove the 3 screws and the No.1 radio bracket.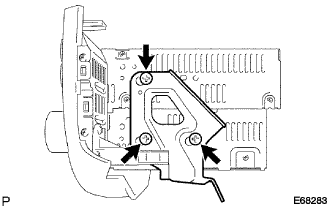
Remove the 3 screws and the No.2 radio bracket.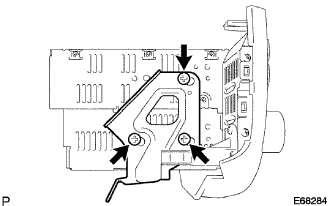
| 7. REMOVE CENTER CLUSTER INTEGRATION SWITCH (w/o Navigation System) |
Remove the 2 bolts.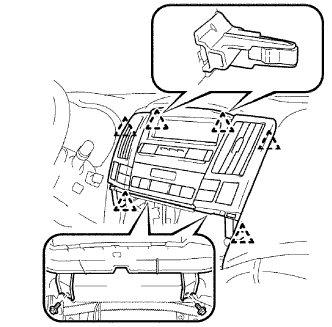
Release the 6 clips.
Disconnect the connector and remove center cluster integration switch.
| 8. REMOVE MULTI-DISPLAY (w/ Navigation System) |
Remove the 2 bolts and disengage the 4 clips.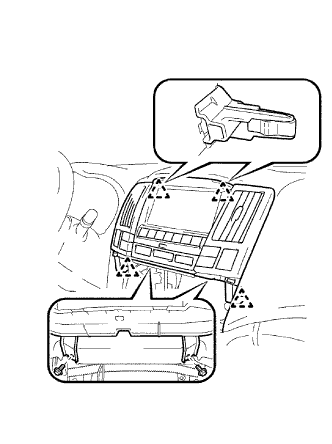
Disconnect the connectors and remove the multi-display.
| 9. REMOVE STEERING WHEEL NO.2 COVER LOWER |
Using a screwdriver, remove the steering wheel No.2 cover lower.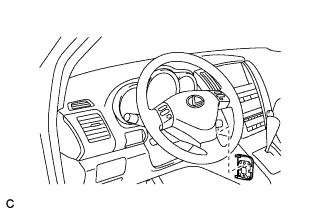
- HINT:
- Tape up the screwdriver tip before use.
| 10. REMOVE STEERING WHEEL NO.3 COVER LOWER |
Using a screwdriver, remove the steering wheel No.3 cover lower.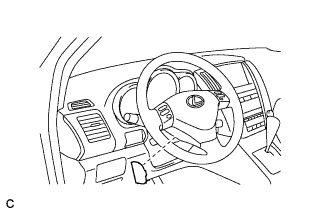
- HINT:
- Tape up the screwdriver tip before use.
| 11. REMOVE STEERING PAD |
Using a "torx" socket wrench (T30), loosen the 2 "torx" screws until the groove along the screw circumference catches on the screw case.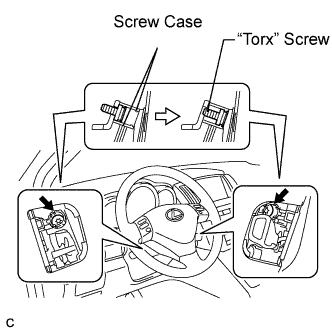
Pull out the steering pad from the steering wheel assembly and support the steering pad with one hand as shown in the illustration.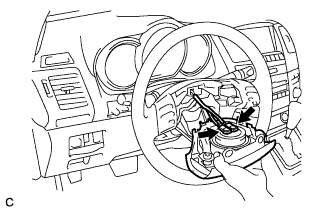
- NOTICE:
- When removing the steering pad, do not pull the airbag wire harness.
Disconnect the horn connector.
Disconnect the 2 connectors from the steering pad.
- NOTICE:
- When handling the airbag connector, take care not to damage the airbag wire harness.
Remove the steering pad.
| 12. REMOVE STEERING WHEEL ASSEMBLY |
Remove the steering wheel assembly set nut.
Put matchmarks on the steering wheel assembly and main shaft assembly.
Using SST, remove the steering wheel assembly.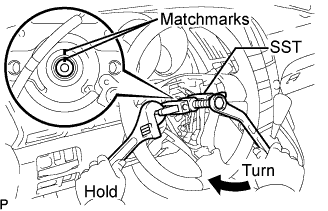
- SST
- 09950-50013
(09951-05010, 09952-05010, 09953-05020, 09954-05021)
| 13. REMOVE STEERING COLUMN COVER |
Remove the steering column cover lower No.2.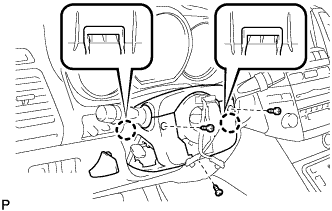
Remove the 3 screws.
Disengage the 2 claws and remove the steering column cover lower.
Disengage the claw and remove the steering column cover upper.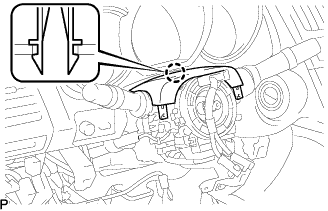
| 14. REMOVE TILT AND TELESCOPIC SWITCH (w/ Power Tilt and Power Telescopic) |
Disconnect the connector.
Using a screwdriver, disengage the claw and pull out the tilt and telescopic switch.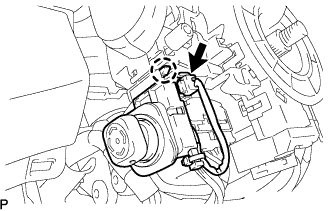
- NOTICE:
- Pushing on the claw too hard will break the claw.
- HINT:
- Tape the screwdriver tip before use.
| 15. REMOVE TURN SIGNAL SWITCH ASSEMBLY WITH SPIRAL CABLE SUB-ASSEMBLY |
Disconnect the connectors from the turn signal switch assembly with spiral cable sub-assembly.
Using pliers, grip the claws of the clip and remove the turn signal switch assembly with spiral cable sub-assembly from the steering column assembly.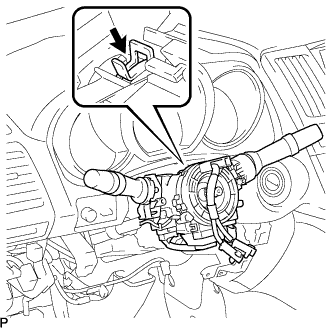
| 16. REMOVE FRONT DOOR SCUFF PLATE LH |
Disengage the 6 claws and 4 clips, and remove the front door scuff plate.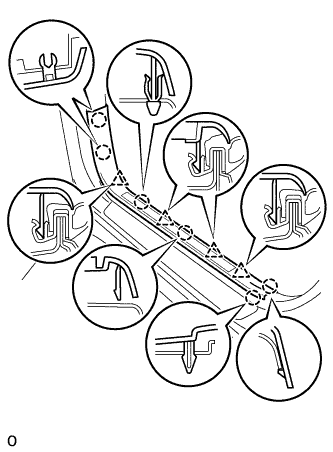
Disconnect the connector. (w/ illumination scuff plate)
| 17. REMOVE COWL SIDE TRIM SUB-ASSEMBLY LH |
Remove the 2 clips and the cowl side trim sub-assembly LH.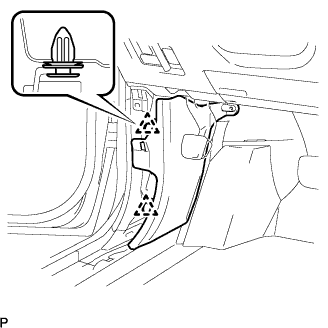
| 18. REMOVE INSTRUMENT PANEL FINISH PANEL SUB-ASSEMBLY LOWER |
Using a screwdriver, open the instrument panel finish panel sub-assembly lower cover.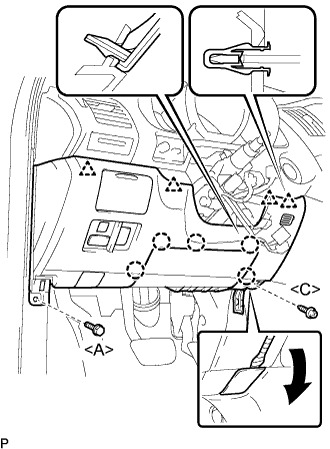
- HINT:
- Tape the screwdriver tip before use.
Remove the bolt <A> and the screw <C>.
Disconnect the hood lock control cable assembly.
Disengage the 5 claws and the 4 clips.
Disconnect the connectors and then remove the instrument panel finish panel sub-assembly lower.
| 19. REMOVE DRIVER SIDE KNEE AIRBAG ASSEMBLY |
Disconnect the connector from the driver side knee airbag assembly.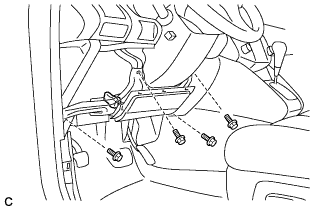
- NOTICE:
- When handling the airbag connector, take care not to damage the airbag wire harness.
Remove the 4 bolts and the driver side knee airbag assembly.
| 20. REMOVE INSTRUMENT CLUSTER FINISH PANEL SUB-ASSEMBLY |
Disengage the 4 clips and remove the instrument cluster finish panel sub-assembly.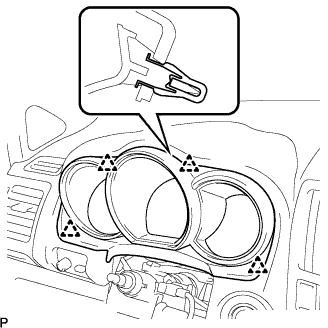
| 21. REMOVE COMBINATION METER ASSEMBLY |
Remove the 4 screws <C>.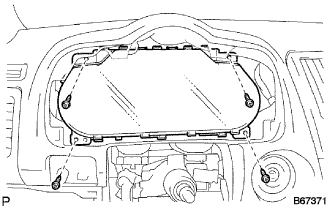
Pull out the combination meter assembly, then disconnect the connectors.
| 22. REMOVE FRONT DOOR SCUFF PLATE RH |
- HINT:
- Use the same procedures for the RH side and the LH side.
| 23. REMOVE COWL SIDE TRIM SUB-ASSEMBLY RH |
- HINT:
- Use the same procedures for the RH side and the LH side.
| 24. REMOVE INSTRUMENT PANEL NO.2 UNDER COVER SUB-ASSEMBLY |
Using a screwdriver, push the 3 claws in the direction indicated by the arrow to disengage and remove the guide on the front of the vehicle.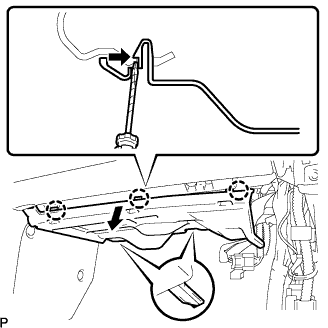
- HINT:
- Tape the screwdriver tip before use.
Disconnect the connectors and remove the instrument panel No.2 under cover sub-assembly.
| 25. REMOVE GLOVE COMPARTMENT DOOR ASSEMBLY |
Remove the 2 bolts <A> and the 2 screws <C>.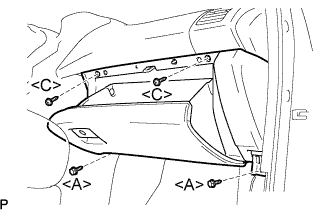
Pull the glove compartment door assembly to the rear to remove it.
Disconnect the connector.
| 26. REMOVE FLOOR CARPET COVER CENTER LH |
Remove the 2 clips from the floor carpet cover center LH.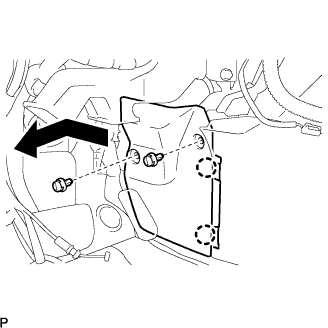
Depress the edge of the floor carpet cover center LH around the claws to disengage the 2 claws below the floor carpet cover center LH.
Slide the floor carpet cover center LH to the front of the vehicle, and disengage the 2 claws from the instrument panel finish panel lower center at the floor carpet center LH.
Remove the floor carpet cover center LH.
| 27. REMOVE FLOOR CARPET COVER CENTER RH |
- HINT:
- Use the same procedures for the RH side and the LH side.
| 28. REMOVE INSTRUMENT PANEL FINISH PANEL LOWER CENTER |
Remove the 7 screws <C>.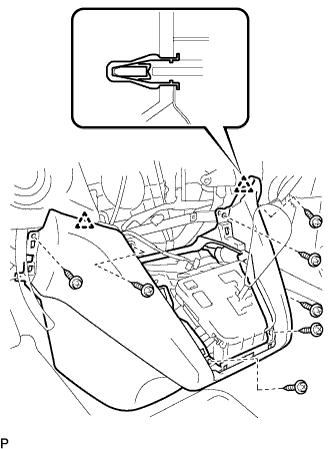
Disengage the 2 clips and remove the instrument panel finish panel lower center.
| 29. REMOVE FRONT PILLAR GARNISH LH |
Detach clip (A) from the vehicle body. Pull the pillar garnish so that the tip of clip (B) locks in the pillar garnish hole.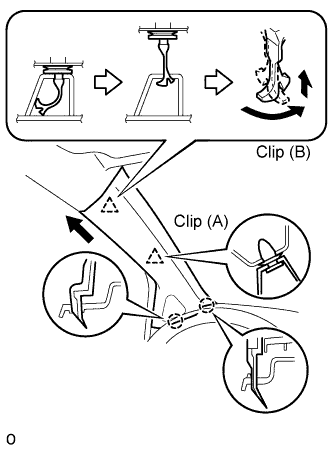
Using needle-nose pliers, rotate clip (B) 90°.
Disengage the 2 claws and remove the front pillar garnish.
Remove clip (B).
Protect the curtain shield airbag assembly.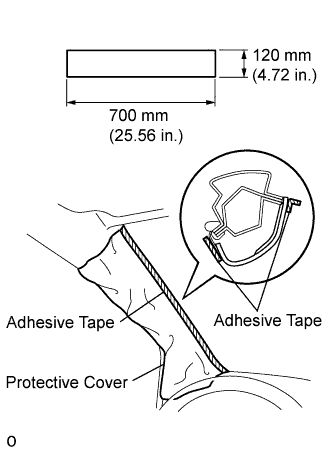
Thoroughly cover the airbag with a cloth or nylon sheet that is 700 mm (27.56 in.) x 120 mm (4.72 in.) and fix the ends of the cover with adhesive tape, as shown in the illustration.
- NOTICE:
- Cover the curtain shield airbag with a protective cover as soon as the front pillar garnish is removed.
| 30. REMOVE FRONT PILLAR GARNISH RH |
- HINT:
- Use the same procedures for the RH side and the LH side.
| 31. REMOVE INSTRUMENT PANEL FINISH PLATE |
| 32. REMOVE INSTRUMENT PANEL NO.1 REGISTER ASSEMBLY |
Remove the screw <C> and nut <D>.
Using a screwdriver, lever up the 2 claws on the body from inside of the register.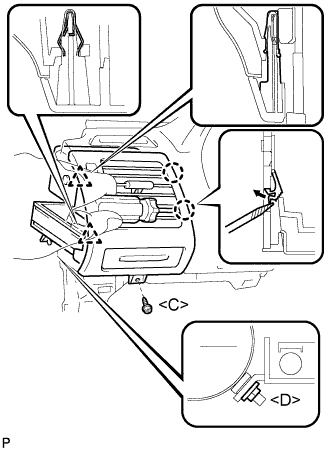
- HINT:
- Tape the screwdriver tip before use.
Disengage the 2 clips and remove the instrument panel No.1 register assembly.
| 33. REMOVE INSTRUMENT PANEL NO.1 REGISTER ASSEMBLY LOWER |
Using a screwdriver, lever up the 2 claws on the body from inside of the register.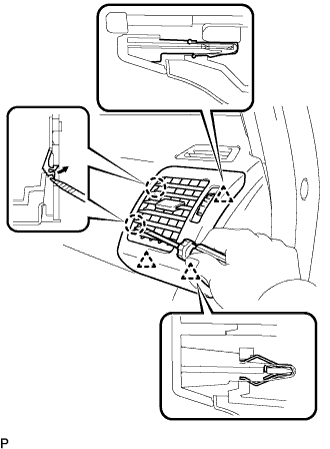
- HINT:
- Tape the screwdriver tip before use.
Disengage the 3 clips and remove the instrument panel No.1 register assembly lower.
| 34. REMOVE INSTRUMENT PANEL ASSEMBLY |
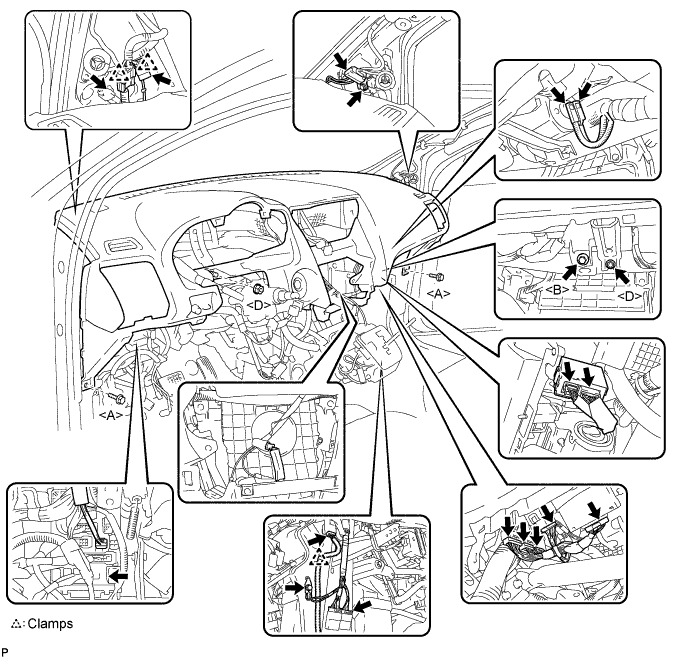
Remove the 2 bolts <A>, bolt <B>, and 2 nuts <D> as shown in the illustration.
Disconnect each of the clamps and the connectors.
Pull the instrument panel assembly to the rear and check that none of the wire harness is stuck in the body.