REMOVAL
Removal / installation
- HINT:
- Do not use a dropped or damaged yaw rate sensor.
- Prevent foreign matter from attaching between the yaw rate sensor bracket and body.
- Confirm that the sensor direction is correct.
- Do not use a dropped or damaged yaw rate sensor.
| 1. REMOVE SEAT TRACK BRACKET COVER OUTER FRONT |

Move the front seat assembly to the rearmost position by operating the slide and vertical power seat switch knob.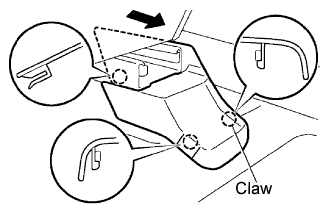

Using a screwdriver, disengage the 3 claws and remove the seat track bracket cover outer front LH.
- HINT:
- Tape the screwdriver tip before use.
| 2. REMOVE SEAT TRACK BRACKET COVER INNER FRONT |
Using a screwdriver, disengage the 2 claws and remove the seat track bracket cover inner front LH.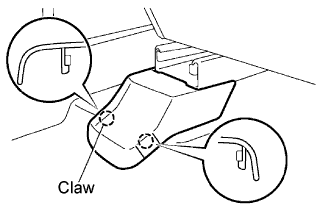
- HINT:
- Tape the screwdriver tip before use.
| 3. REMOVE SEAT TRACK COVER |
Move the front seat assembly fully forward by operating the slide and vertical power seat switch knob.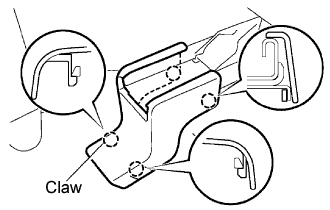
Using a screwdriver, disengage the 4 claws and remove the seat track cover LH.
- HINT:
- Tape the screwdriver tip before use.
| 4. REMOVE SEAT TRACK BRACKET COVER INNER |
Using a screwdriver, disengage the 4 claws and remove the seat track cover RH.
- HINT:
- Tape the screwdriver tip before use.
| 5. REMOVE FRONT SEAT ASSEMBLY |
Move the front seat assembly to the rearmost position by operating the slide and vertical power seat switch knob.
Remove the 2 bolts on the front side.
Move the front seat assembly fully forward by operating the slide and vertical power seat switch knob.
Remove the 2 bolts on the rear side.
Move the front seat assembly to the center position and adjust the seatback to the vertical position by operating the slide and vertical power seat switch knob and the reclining power seat switch knob.
Turn the ignition switch to the LOCK position.
Disconnect the negative battery cable from the battery, and wait 90 seconds or more.
- CAUTION:
- Wait 90 seconds or more after disconnecting the negative terminal cable to prevent the airbag from working (Click here ).
Disconnect the connectors and clamp.
Remove the front seat assembly.
- NOTICE:
- When removing the passenger side front seat assembly, be careful not to step on the yaw rate sensor mounted on the floor under the seat.
| 6. REMOVE SHIFT LEVER KNOB |
Turn the shift lever knob counterclockwise and remove the shift lever knob sub-assembly.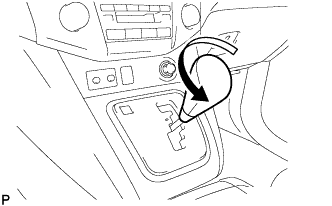
| 7. REMOVE CONSOLE PANEL UPPER FRONT |
Disengage the 4 clips and remove the console panel upper front.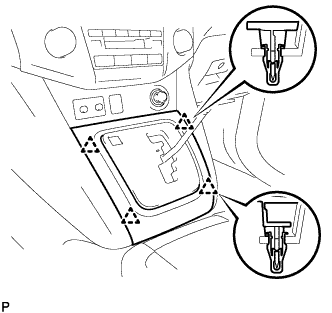
| 8. REMOVE INSTRUMENT PANEL FINISH PANEL LOWER |
Disengage the 2 clips.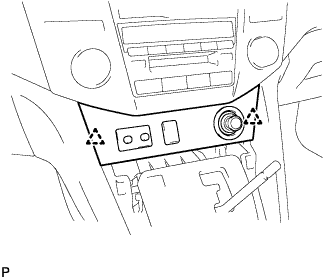
Disconnect the connectors and remove the instrument panel finish panel lower.
| 9. REMOVE FRONT DOOR SCUFF PLATE RH |
- HINT:
- Use the same procedures for the RH side and the LH side.
| 10. REMOVE FRONT DOOR SCUFF PLATE LH |
Disengage the 6 claws and 4 clips, and remove the front door scuff plate.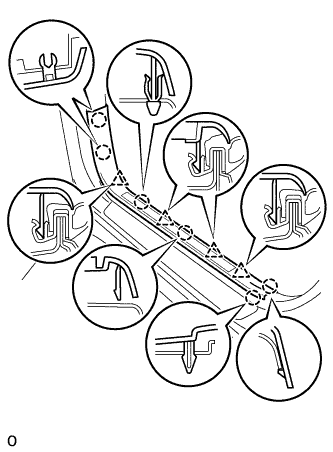
Disconnect the connector. (w/ illumination scuff plate)
| 11. REMOVE REAR DOOR SCUFF PLATE RH |
| 12. REMOVE CENTER PILLAR GARNISH LOWER RH |
| 13. REMOVE COWL SIDE TRIM SUB-ASSEMBLY RH |
- HINT:
- Use the same procedures for the RH side and the LH side.
| 14. REMOVE COWL SIDE TRIM SUB-ASSEMBLY LH |
Remove the 2 clips and the cowl side trim sub-assembly LH.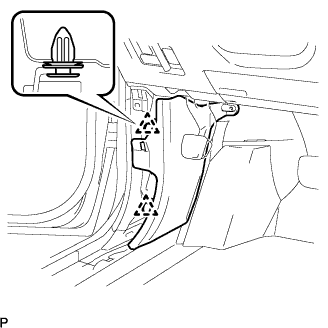
| 15. REMOVE INSTRUMENT PANEL FINISH PANEL SUB-ASSEMBLY LOWER |
Using a screwdriver, open the instrument panel finish panel sub-assembly lower cover.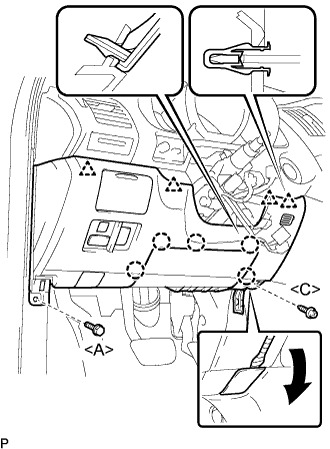
- HINT:
- Tape the screwdriver tip before use.
Remove the bolt <A> and the screw <C>.
Disconnect the hood lock control cable assembly.
Disengage the 5 claws and the 4 clips.
Disconnect the connectors and then remove the instrument panel finish panel sub-assembly lower.
| 16. REMOVE INSTRUMENT PANEL UNDER COVER NO.2 SUB-ASSEMBLY |
Using a screwdriver, push the 3 claws in the direction indicated by the arrow to disengage and remove the guide on the front of the vehicle.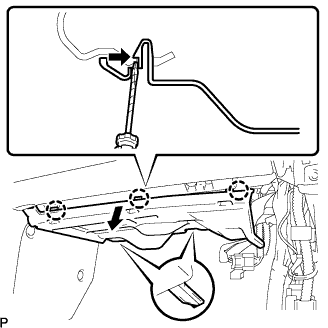
- HINT:
- Tape the screwdriver tip before use.
Disconnect the connectors and remove the instrument panel No.2 under cover sub-assembly.
| 17. REMOVE GLOVE COMPARTMENT DOOR ASSEMBLY |
Remove the 2 bolts <A> and the 2 screws <C>.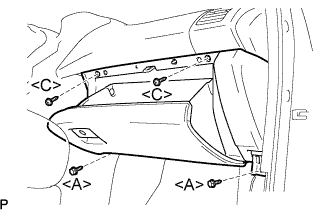
Pull the glove compartment door assembly to the rear to remove it.
Disconnect the connector.
| 18. REMOVE FLOOR CARPET COVER CENTER LH |
Remove the 2 clips from the floor carpet cover center LH.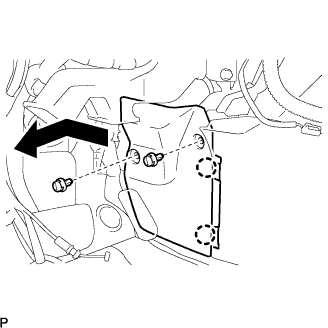
Depress the edge of the floor carpet cover center LH around the claws to disengage the 2 claws below the floor carpet cover center LH.
Slide the floor carpet cover center LH to the front of the vehicle, and disengage the 2 claws from the instrument panel finish panel lower center at the floor carpet center LH.
Remove the floor carpet cover center LH.
| 19. REMOVE FLOOR CARPET COVER CENTER RH |
- HINT:
- Use the same procedures for the RH side and the LH side.
| 20. REMOVE INSTRUMENT PANEL FINISH PANEL LOWER CENTER |
Remove the 7 screws <C>.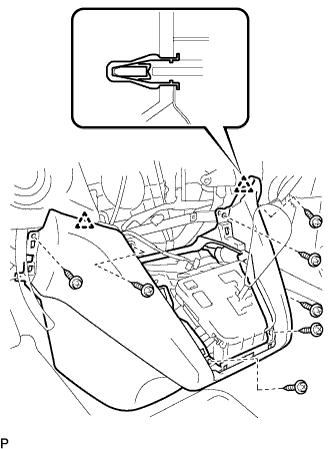
Disengage the 2 clips and remove the instrument panel finish panel lower center.
| 21. REMOVE CONSOLE BOX HOLE COVER |
Slide the front seat assemblies RH and LH forward.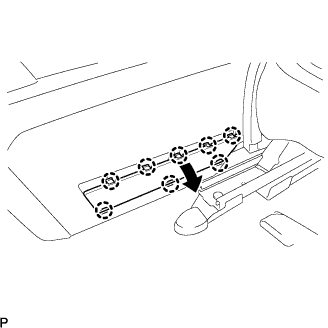
Slide the console box assembly fully to the back end and remove the console box hole cover.
| 22. REMOVE CONSOLE BOX HOLE NO.2 COVER |
- HINT:
- Use the same procedures for the console box No.2 hole cover and the console box hole cover.
| 23. REMOVE CONSOLE BOX ASSEMBLY |
Separate the console box lock control cable assembly from the rear console box.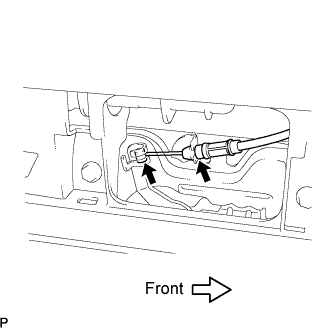
Keeping the rear console box pulled in the rear direction of the vehicle, remove the 6 bolts from the left and right sides.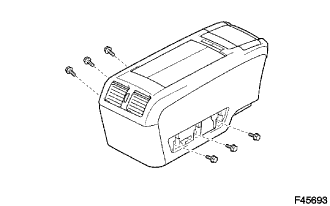
Disconnect each of the clamp and connector.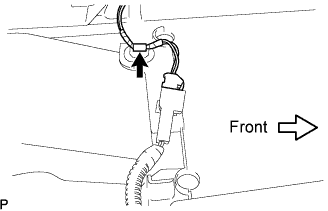
Remove the rear console box.
| 24. REMOVE CONSOLE COVER LOWER |
Remove the 2 screws.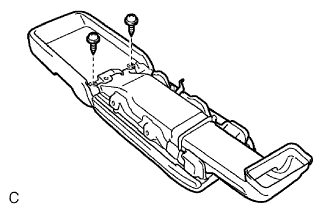
Disconnect the connector and remove the console cover lower.
| 25. REMOVE YAW RATE SENSOR |
Turn back the floor carpet, and remove the bolt, nut, clamp and yaw rate sensor assembly.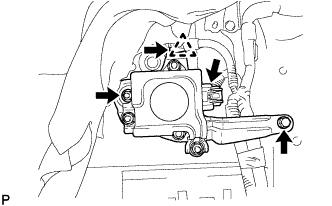
Disconnect the yaw rate sensor assembly connector.
- NOTICE:
- Do not remove the yaw rate sensor assembly from the yaw rate sensor bracket.