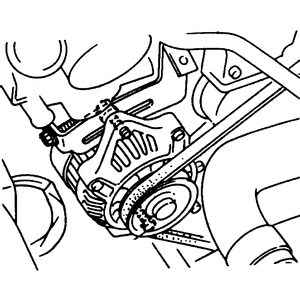
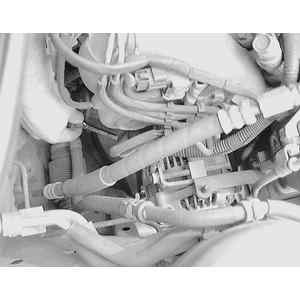
| Fig. 1: Typical alternator mounting and drive belt adjustment
points
|
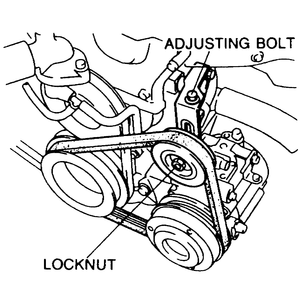
| Fig. 2: Typical power steering and A/C compressor mounting
and drive belt adjustment points

|
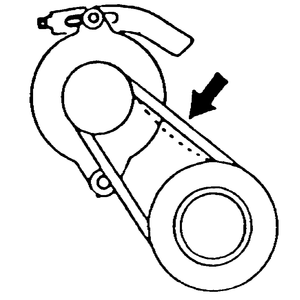
| Fig. 3: Single accessory drive belt adjustment points
with idler pulley
|
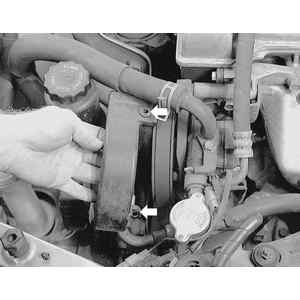
| Fig. 4: Measure the belt deflection between two pulleys
along the longest span
|
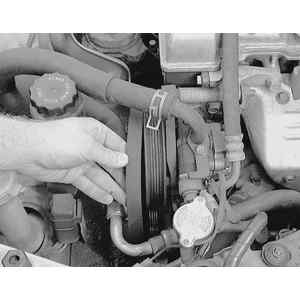
- Position a ruler perpendicular to the drive belt midway between the pulleys
on the longest accessible belt span. Press firmly on the belt with your thumb
to test the belt tension. The belt should deflect 0.31–0.35 in. (8–9mm)
if it is new or 0.35–0.39 in. (9–10mm) for a used belt.
- If the belt tension is not as specified in Step 1, loosen the alternator
adjustment bolt and the through bolt. Turn the alternator adjustment screw
to adjust the belt tension.
- After adjustment, tighten the through bolt to 27–38 ft. lbs. (37–52
Nm) and the adjusting bolt to 14–19 ft. lbs. (19–25 Nm).
- Position a ruler perpendicular to the drive belt midway between the pulleys
on the longest accessible belt span. Press firmly on the belt with your thumb
to test the belt tension. The belt should deflect 0.31–0.35 in. (8–9mm)
if it is new or 0.35–0.39 in. (9–10mm) if it is used.
- If the belt tension is not as specified in Step 1, loosen the upper and
lower air conditioning compressor through bolts.
- Using a suitable prybar against the compressor body, move the compressor
until the belt tension is as specified in Step 1.
- After adjustment, tighten the upper and lower air conditioning compressor
through bolts.
NOTE: This belt includes the air conditioner compressor, if
equipped.
- Turn the ignition OFF and remove the key. Allow the engine
to cool.
- Remove the power steering pump belt shield.
- Without A/C, loosen the adjusting bolt, lockbolt, and through-bolt. With
A/C, loosen the adjusting bolt and the locknut.
- Remove the power steering belt.
To install:
- Install the power steering belt and make sure it is correctly lined up on
the pulley.
- Adjust the power steering belt tension/deflection by turning the adjusting
bolt. A new belt should deflect 0.32–0.35 inch (8–9mm), and a
used belt should deflect 0.36–0.39 inch (9–10mm).
- Without A/C, tighten the lockbolt to 24–33 ft. lbs. (32–46 Nm).
Tighten the through-bolt to 14–18 ft. lbs. (19–25 Nm). With A/C,
tighten the locknut to 24–25 ft. lbs. (32–34 Nm).
- Install the belt shield and tighten the attaching bolts to 61–86 inch
lbs. (7–9 Nm).
- Turn the ignition OFF and remove the key. Allow the engine
to cool.
- Remove the power steering belt.
- Loosen the alternator adjusting bolt and upper mounting bolt.
- Raise and safely support the vehicle.
- Remove the right splash shield.
- Loosen the lower through-bolt.
- Lower the vehicle and remove the alternator belt.
To install:
- Install the alternator belt and make sure it is correctly lined up on the
pulley.
- Adjust the alternator belt deflection by turning the adjusting bolt. A new
belt should deflect 0.22–0.27 inch (6–7mm), and a used belt should
deflect 0.24–0.29 inch (6–8mm).
- Tighten the upper mounting bolt to 14–18 ft. lbs. (19–25 Nm).
- Raise and safely support the vehicle.
- Tighten the lower through-bolt to 28–38 ft. lbs. (38–51 Nm).
- Install the right splash shield and tighten the bolts to 71–88 inch
lbs. (8–10 Nm).
- Lower the vehicle.
- Install the power steering belt.
NOTE: This belt includes the air conditioner compressor, if
equipped.
- Disconnect the negative battery cable.
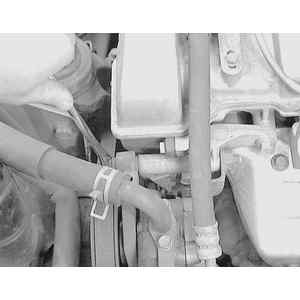
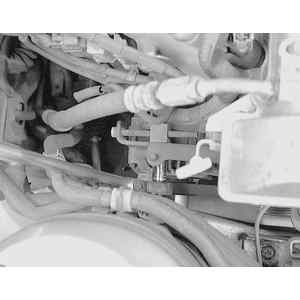
| Fig. 5: To remove the power steering/A/C compressor
belt, first remove the belt shield attaching bolts (arrows) and shield
|
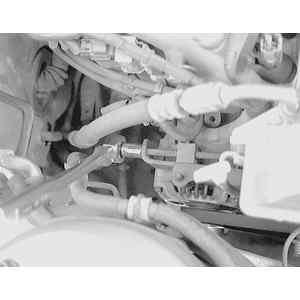
| Fig. 6: Next, loosen the power steering pump through
or upper pivot bolt . . .
|
| Fig. 7: . . . and the adjuster lockbolt (arrow)
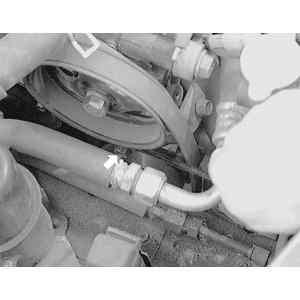
|
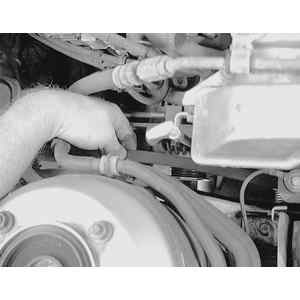
| Fig. 8: Loosen the adjuster bolt and relieve the
tension from the drive belt
|
| Fig. 9: Remove the power steering/A/C compressor
drive belt by disengaging it from all related engine pulleys
|
- Remove the power steering pump belt shield.
- Loosen the through-bolt, lockbolt and adjusting bolt.
- Remove the power steering belt.
To install:
- Install the power steering belt and make sure it is correctly lined up on
the pulley.
- Adjust the power steering belt tension/deflection. A new belt should deflect
0.30–0.35 inch (8–9 mm), and a used belt should deflect 0.32–0.37
inch (8–10 mm).
- Tighten the lockbolt to 24–34 ft. lbs. (32–46 Nm).
- Tighten the through-bolt to 32–44 ft. lbs. (44–60 Nm).
- Install the belt shield and tighten the attaching bolts to 61–86 inch
lbs. (7–9 Nm).
- Connect the negative battery cable.
- Disconnect the negative battery cable.
- Remove the power steering belt.
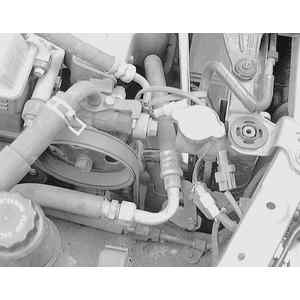
| Fig. 10: To remove the alternator belt, first remove
the power steering belt, then loosen the lower alternator pivot bolt
|
| Fig. 11: Next loosen the adjuster lockbolt . . .
|
| Fig. 12: . . . then the adjuster bolt and relieve
the tension from the alternator drive belt
|
| Fig. 13: Remove the alternator drive belt by disengaging
it from all related engine pulleys
|
- Loosen the alternator adjusting bolt and upper mounting bolt.
- Raise and safely support the vehicle.
- Remove the RH splash shield.
- Loosen the lower through-bolt.
- Lower the vehicle and remove the alternator belt.
To install:
- Install the alternator belt and make sure it is correctly lined up on the
pulley.
- Adjust the alternator belt tension/deflection by turning the adjusting bolt.
A new belt should deflect 0.26–0.27 inch (6.5–7.0 mm), and a used
belt should deflect 0.27–0.35 inch (7–9 mm).
- Tighten the upper mounting bolt to 14–18 ft. lbs. (19–25 Nm).
- Raise and safely support the vehicle.
- Tighten the lower through-bolt to 28–38 ft. lbs. (38–51 Nm).
- Install the RH splash shield and tighten the bolts to 71–88 inch lbs.
(8–10 Nm).
- Lower the vehicle.
- Install the power steering belt.
- Connect the negative battery cable.
- Position a ruler perpendicular to the drive belt midway between the pulleys
on the longest accessible belt span. Press firmly on the belt with your thumb
to test the belt tension. The belt should deflect 0.24–0.31 in. (6–8mm)
if it is new or 0.27–0.35 in. (7–9mm) if it is used.
- If the belt tension is not as specified in Step 1, loosen the alternator
adjustment bolt and the through bolt. Turn the alternator adjustment screw
to adjust the belt tension.
- After adjustment, tighten the through bolt to 27–38 ft. lbs. (37–52
Nm) and the adjusting bolt to 13–18 ft. lbs. (18–25 Nm).
- Position a ruler perpendicular to the drive belt midway between the pulleys
on the longest accessible belt span. Press firmly on the belt with your thumb
to test the belt tension. The belt should deflect 0.27–0.35 in. (7–9mm)
if it is new or 0.31–0.39 in. (8–10mm) if it is used.
- If the belt tension is not as specified in Step 1, loosen the upper and
lower air conditioning compressor through bolts.
- Using a suitable prybar against the compressor body, move the compressor
until the belt tension is as specified in Step 1.
- After adjustment, tighten the upper and lower air conditioning compressor
through bolts.
- Position a ruler perpendicular to the drive belt midway between the pulleys
on the longest accessible belt span. Press firmly on the belt with your thumb
to test the belt tension. The belt should deflect 0.24–0.28 in. (6–7mm)
if it is new or 0.28–0.31 in. (7–8mm) if it is used.
- If the belt tension is not as specified in Step 1, loosen the idler pulley
locknut. Turn the alternator adjustment bolt to adjust the belt tension.
- After adjustment, tighten the idler pulley locknut to 23–41 ft. lbs.
(31–46 Nm).
- Position a ruler perpendicular to the drive belt midway between the pulleys
on the longest accessible belt span. Press firmly on the belt with your thumb
to test the belt tension. The belt should deflect 0.22–0.26 in. (5.5–6.5mm)
if it is new or 0.26–0.30 in. (6.5–7.5mm) if it is used.
- If the belt tension is not as specified in Step 1, loosen the idler pulley
locknut. Turn the adjustment bolt to adjust the belt tension.
- After adjustment, tighten the idler pulley locknut to 23–34 ft. lbs.
(31–46 Nm).
NOTE: If the belt is to be reused, mark the direction of normal
belt rotation.
- Switch the ignition OFF and remove the key. Allow the engine
to cool.
- Disconnect the negative battery cable.
- Remove the right-hand splash shield and dust cover.
- Using a wrench, turn the tensioner pulley locknut clockwise to remove tension
on the belt.
- Remove the belt from each of the pulleys, remove from the vehicle and inspect
the belt.
To install:
- Route the alternator belt around the pulleys.
- Install the right-hand splash shield and dust cover.
- Connect the negative battery cable.
NOTE: If the belt is to be reused, mark the direction of normal
belt rotation.
- Disconnect the negative battery cable.
- Switch the ignition OFF and remove the key. Allow the engine
to cool.
- Remove the right-hand splash shield and dust cover.
- Remove the alternator belt.
- Using a wrench, turn the tensioner pulley locknut clockwise to remove tension
on the belt.
- Remove the belt from each of the pulleys, remove from the vehicle and inspect
the belt.
To install:
- Route the power steering drive belt around the pulleys.
- Install the alternator belt.
- Install the right-hand splash shield and dust cover.
- Connect the negative battery cable.

