CAUTION
Brake pads and shoes may contain asbestos, which has been determined to
be a cancer causing agent. Never clean the brake surfaces with compressed
air! Avoid inhaling any dust from brake surfaces! When cleaning brakes,
use commercially available brake cleaning fluids.
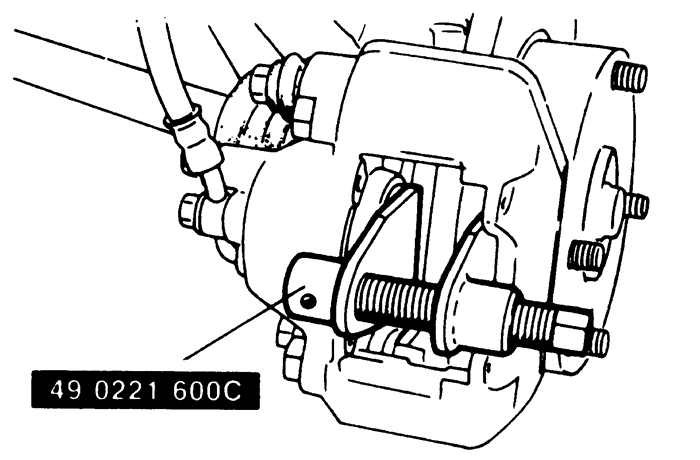
| Fig. 1:Compressing the brake caliper
|
- Disconnect the negative battery cable.
- Remove some of the brake fluid from the master cylinder
reservoir. The reservoir should be no more than 1⁄2 full. When the pistons are depressed
into the calipers, excess fluid will flow up into the reservoir.
- Raise the vehicle and support safely.
- Remove the appropriate tire and wheel assemblies.
- If equipped with 1 lower caliper mounting bolt, remove
the caliper lower mounting bolt and pivot the caliper up and support it.
If equipped with 2 caliper mounting bolts, remove both and support the
caliper with mechanics wire. Do not kink the brake line or allow the caliper
to hang by the brake line.
- Remove the brake pads, shims and if so equipped,
pins. Take note of positioning to aid installation.
-
If the caliper is single piston design, push the caliper back into
the bore with a C-clamp or other suitable tool. If the caliper is a 4
piston type caliper, use Mazda tool 49-0221-600C or equivalent and the
old inner brake pad, push the caliper piston(s) into the caliper bore.
To install:
-
Install the brake pads and shims to the caliper support. Install the
caliper over the brake pads.
NOTE: Be careful that the piston boot does not become
caught when lowering the caliper onto the support. Do not twist the brake
hose during caliper installation.
- Install the caliper mounting bolt(s).
- Install the tire and wheel assemblies. Connect the
negative battery cable.
- Lower the vehicle and test the brakes for proper
operation.
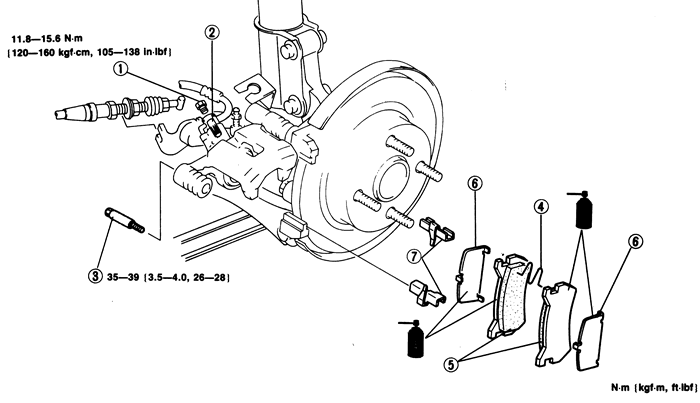
| Fig. 2:Brake pads, rear - 1993-94 323, 626, 929,
MX3, MX6, Miata, Protege and 1995 MX3
|
- Disconnect the battery negative cable.
- Remove some of the brake fluid from the master cylinder
reservoir. The reservoir should be no more than 1⁄2 full. When the pistons are depressed
into the calipers, excess fluid will flow up into the reservoir.
- Raise the vehicle and support safely.
- Remove the appropriate tire and wheel assemblies.
Loosen the parking brake cable adjustment from inside the vehicle.
- Disconnect the parking brake cable from the cable
bracket and the operating lever.
- Remove the upper caliper mounting bolt and pivot
the caliper downward off of the pads. Do not allow the caliper to hang
by the brake line.
-
Remove the brake pads and spring clips from the caliper support. Take
note of positioning of each to aid in installation.
To install:
-
Install the brake pads, shims and spring clips to the caliper support.
Pivot the caliper over the brake pads.
NOTE: Be careful that the piston boot does not become
caught when pivoting the caliper onto the support. Do not twist the brake
hose during caliper installation.
- Lubricate and install the top caliper mounting bolt.
Tighten the bolt to 12-17 ft. lbs. (16-23 Nm). Attach the parking brake
cable to the operating lever and tighten the locknut to 12-17 ft. lbs.
(16-23 Nm).
- Start the engine and forcefully depress the brake
pedal 5-6 times. Apply the parking brake and make sure the adjustment
is within specifications. Adjust the parking brake cable, as required.
- Check the disc brake drag by applying the brakes
several times and then rotating the wheels to check for excessive dragging.
- Install the tire and wheel assemblies. Lower the
vehicle.
- Test the brakes for proper operation.
CAUTION
Brake pads and shoes may contain asbestos, which has been determined to
be a cancer causing agent. Never clean the brake surfaces with compressed
air. Avoid inhaling any dust from brake surfaces. When cleaning brakes,
use a commercially available brake cleaning fluids.
- Remove some of the brake fluid from the master cylinder
reservoir. The reservoir should be no more than 1⁄2 full. When the pistons are depressed
into the calipers, excess fluid will flow up into the reservoir.
- Raise the vehicle and support safely.
- Remove the appropriate tire and wheel assemblies.
- Remove the M-spring and the W-pin.
- Remove the two pad pins from the brake pads.
- Remove the brake pads and shim. Take note of positioning
to aid installation.
-
Push the caliper piston into the caliper bore.
To install:
- Install the brake pads and shims to the caliper.
- Insert the pad pins, W-pin and M-spring.
- Install the tire and wheel assemblies.
- Lower the vehicle and test the brakes for proper
operation.
- Remove some of the brake fluid from the master cylinder
reservoir. The reservoir should be no more than 1⁄2 full. When the pistons are depressed
into the calipers, excess fluid will flow up into the reservoir.
- Raise the vehicle and support safely.
- Remove the wheels. Loosen the parking brake cable
adjustment from inside the vehicle.
- Disconnect the parking brake cable from the cable
bracket and the operating lever. Remove the screw plug. Turn the manual
adjustment gear counterclockwise with an Allen wrench to pull the brake
caliper piston inward (turn until it stops).
- Remove the upper caliper mounting bolt and pivot
the caliper upward off of the pads.
-
Remove the brake pads and spring clips from the caliper support. Take
note of positioning of each to aid in installation.
To install:
-
Install the brake pads, shims and spring clips to the caliper support.
Pivot the caliper over the brake pads.
NOTE: Be careful that the piston boot does not become
caught when pivoting the caliper onto the support. Do not twist the brake
hose during caliper installation.
- Lubricate and install the bottom caliper mounting
bolt. Tighten the bolt to 33-44 ft. lbs. (46-60 Nm). Attach the parking
brake cable to the operating lever and tighten the screw plug to 9-11
ft. lbs. (12-15 Nm).
- Start the engine and forcefully depress the brake
pedal 5-6 times. Apply the parking brake and make sure the adjustment
is within specifications. Adjust the parking brake cable, as required.
- Check the disc brake drag by applying the brakes
several times and then rotating the wheels to check for excessive dragging.
- Install the tire and wheel assemblies. Lower the
vehicle.
- Test the brakes for proper operation.
CAUTION
Brake pads and shoes may contain asbestos, which has been determined to
be a cancer causing agent. Never clean the brake surfaces with compressed
air. Avoid inhaling any dust from brake surfaces. When cleaning brakes,
use commercially available brake cleaning fluids.
- Disconnect the negative battery cable.
- Remove some of the brake fluid from the master cylinder
reservoir. The reservoir should be no more than 1⁄2 full. When the pistons are depressed
into the calipers, excess fluid will flow up into the reservoir.
- Raise the vehicle and support safely.
- Remove the appropriate tire and wheel assemblies.
- Remove the M-spring and the W-pin.
- Remove the two pad pins from the brake pads.
- Remove the brake pads and shim. Take note of positioning
to aid installation.
-
Using Mazda tool 49-0221-600C or equivalent and the old inner brake
pad, push the caliper piston into the caliper bore.
To install:
- Install the brake pads and shims to the caliper.
- Insert the pad pins, W-pin and M-spring.
- Install the tire and wheel assemblies. Connect the
negative battery cable.
- Lower the vehicle and test the brakes for proper
operation.
- Disconnect the battery negative cable.
- Remove some of the brake fluid from the master cylinder
reservoir. The reservoir should be no more than 1⁄2 full. When the pistons are depressed
into the calipers, excess fluid will flow up into the reservoir.
- Raise the vehicle and support safely.
- Remove the wheels. Loosen the parking brake cable
adjustment from inside the vehicle.
- Disconnect the parking brake cable from the cable
bracket and the operating lever. Remove the screw plug.
- Remove the upper caliper mounting bolt and pivot
the caliper downward off of the pads. Do not allow the caliper to hang
by the brake line.
-
Remove the brake pads and spring clips from the caliper support. Take
note of positioning of each to aid in installation.
To install:
-
Install the brake pads, shims and spring clips to the caliper support.
Pivot the caliper over the brake pads.
NOTE: Be careful that the piston boot does not become
caught when pivoting the caliper onto the support. Do not twist the brake
hose during caliper installation.
- Lubricate and install the top caliper mounting bolt.
Tighten the bolt to 12-17 ft. lbs. (16-24 Nm). Attach the parking brake
cable to the operating lever and tighten the screw plug to 105-138 inch
lbs. (12-16 Nm).
- Start the engine and forcefully depress the brake
pedal 5-6 times. Apply the parking brake and make sure the adjustment
is within specifications. Adjust the parking brake cable, as required.
- Check the disc brake drag by applying the brakes
several times and then rotating the wheels to check for excessive dragging.
- Install the tire and wheel assemblies. Lower the
vehicle.
- Test the brakes for proper operation.
CAUTION
Brake pads and shoes may contain asbestos, which has been determined to
be a cancer causing agent. Never clean the brake surfaces with compressed
air. Avoid inhaling any dust from brake surfaces. When cleaning brakes,
use commercially available brake cleaning fluids.
- Remove some of the brake fluid from the master cylinder
reservoir. The reservoir should be no more than 1⁄2 full. When the pistons are depressed
into the calipers, excess fluid will flow up into the reservoir.
- Raise the vehicle and support safely.
- Remove the appropriate wheel assemblies.
- Remove the caliper lower mounting bolt and pivot
the caliper up and support it. Do not kink the brake line.
- Remove the brake pads, shims and pin. Take note of
positioning to aid installation.
-
Using Mazda tool 49-0221-600C or equivalent and the old inner brake
pad, push the caliper piston into the caliper bore.
To install:
-
Install the brake pads and shims to the caliper support. Install the
caliper over the brake pads.
NOTE: Be careful that the piston boot does not become
caught when lowering the caliper onto the support. Do not twist the brake
hose during caliper installation.
- Install the caliper mounting bolt and torque to 22-29
ft. lbs. (30-40 Nm).
- Install the tire and wheel assemblies.
- Lower the vehicle and test the brakes for proper
operation.
- Remove some of the brake fluid from the master cylinder
reservoir. The reservoir should be no more than 1⁄2 full. When the pistons are depressed
into the calipers, excess fluid will flow up into the reservoir.
- Raise the vehicle and support safely.
- Remove the appropriate tire and wheel assemblies.
Loosen the parking brake cable adjustment from inside the vehicle.
- Disconnect the parking brake cable from the cable
bracket and the operating lever. Remove the screw plug.
- Remove the upper caliper mounting bolt and pivot
the caliper downward off of the pads. Do not allow the caliper to hang
by the brake line.
-
Remove the brake pads and spring clips from the caliper support. Take
note of positioning of each to aid in installation.
To install:
-
Install the brake pads, shims and spring clips to the caliper support.
Pivot the caliper over the brake pads.
NOTE: Be careful that the piston boot does not become
caught when pivoting the caliper onto the support. Do not twist the brake
hose during caliper installation.
- Lubricate and install the top caliper mounting bolt.
Tighten the bolt to 26-28 ft. lbs. (35-39 Nm). Attach the parking brake
cable to the operating lever and tighten the screw plug to 105-138 inch
lbs. (11.8-15.6 Nm).
- Start the engine and forcefully depress the brake
pedal 5-6 times. Apply the parking brake and make sure the adjustment
is within specifications. Adjust the parking brake cable, as required.
- Check the disc brake drag by applying the brakes
several times and then rotating the wheels to check for excessive dragging.
- Install the tire and wheel assemblies. Lower the
vehicle.
- Test the brakes for proper operation.
CAUTION
Brake pads and shoes may contain asbestos, which has been determined to
be a cancer causing agent. Never clean the brake surfaces with compressed
air. Avoid inhaling any dust from brake surfaces. When cleaning brakes,
use commercially available brake cleaning fluids.
- Disconnect the negative battery cable.
- Remove some of the brake fluid from the master cylinder
reservoir. The reservoir should be no more than 1⁄2 full. When the pistons are depressed
into the calipers, excess fluid will flow up into the reservoir.
- Raise the vehicle and support safely.
- Remove the appropriate tire and wheel assemblies.
- Remove the lower lockbolt, and pivot the brake caliper
upwards. Secure the caliper with a piece of rope.
- Remove the brake pads and shim. Take note of positioning
to aid installation.
-
Using Mazda tool 49-0221-600C or equivalent and the old inner brake
pad, push the caliper piston into the caliper bore.
To install:
- Install the brake pads and shims onto the caliper.
- Remove the piece of rope, and pivot the caliper into
position. Install the lockbolt and tighten to 47-62 ft. lbs. (63-84 Nm).
- Install the tire and wheel assemblies. Connect the
negative battery cable.
- Lower the vehicle and test the brakes for proper
operation.
- Disconnect the battery negative cable.
- Remove some of the brake fluid from the master cylinder
reservoir. The reservoir should be no more than 1⁄2 full. When the pistons are depressed
into the calipers, excess fluid will flow up into the reservoir.
- Raise the vehicle and support safely.
- Remove the wheels.
- Remove the upper caliper mounting bolt and pivot
the caliper downward off of the pads. Do not allow the caliper to hang
by the brake line.
- Remove the brake pads and spring clips from the caliper
support. Take note of positioning of each to aid in installation.
-
Using Mazda tool 49-0221-600C or equivalent and the old inner brake
pad, push the caliper piston into the caliper bore.
To install:
-
Install the brake pads, shims and spring clips to the caliper support.
Pivot the caliper over the brake pads.
NOTE: Be careful that the piston boot does not become
caught when pivoting the caliper onto the support. Do not twist the brake
hose during caliper installation.
- Lubricate and install the upper caliper mounting
bolt. Tighten the bolt to 28-36 ft. lbs. (38-49 Nm).
- Check the disc brake drag by applying the brakes
several times and then rotating the wheels to check for excessive dragging.
- Install the tire and wheel assemblies. Lower the
vehicle.
- Test the brakes for proper operation.
CAUTION
Brake pads and shoes may contain asbestos, which has been determined to
be a cancer causing agent. Never clean the brake surfaces with compressed
air. Avoid inhaling any dust from brake surfaces. When cleaning brakes,
use commercially available brake cleaning fluids.
- Remove some of the brake fluid from the master cylinder
reservoir. The reservoir should be no more than 1⁄2 full. When the pistons are depressed
into the calipers, excess fluid will flow up into the reservoir.
- Raise the vehicle and support safely.
- Remove the appropriate tire and wheel assemblies.
- Remove the lower lockbolt, and pivot the brake caliper
upwards. Secure the caliper with a piece of rope.
- Remove the brake pads and shim. Take note of positioning
to aid installation.
-
Using Mazda tool 49-0221-600C or equivalent and the old inner brake
pad, push the caliper piston into the caliper bore.
To install:
- Install the brake pads and shims onto the caliper.
- Remove the piece of rope, and pivot the caliper into
position. Install the lockbolt and tighten to 58-65 ft. lbs. (78-88 Nm).
- Install the tire and wheel assemblies. Connect the
negative battery cable.
- Lower the vehicle and test the brakes for proper
operation.
- Disconnect the battery negative cable.
- Remove some of the brake fluid from the master cylinder
reservoir. The reservoir should be no more than 1⁄2 full. When the pistons are depressed
into the calipers, excess fluid will flow up into the reservoir.
- Raise the vehicle and support safely.
- Remove the wheels.
- Remove the plug for the manual adjustment gear. Using
an Allen wrench turn the gear counterclockwise to retract the caliper
piston.
- Remove the lower caliper mounting bolt and pivot
the caliper upward off of the pads. Do not allow the caliper to hang by
the brake line.
-
Remove the brake pads and spring clips from the caliper support. Take
note of positioning of each to aid in installation.
To install:
-
Install the brake pads, shims and spring clips to the caliper support.
Pivot the caliper over the brake pads.
NOTE: Be careful that the piston boot does not become
caught when pivoting the caliper onto the support. Do not twist the brake
hose during caliper installation.
- Lubricate and install the lower caliper mounting
bolt. Tighten the bolt to 25-29 ft. lbs. (34-39 Nm).
- Turn the manual adjusting gear clockwise until the
piston contacts the brake disc, then turn it clockwise 1⁄3 turn. Replace the plug.
- Check the disc brake drag by applying the brakes
several times and then rotating the wheels to check for excessive dragging.
- Install the tire and wheel assemblies. Lower the
vehicle.
- Test the brakes for proper operation.
- Raise and safely support the vehicle.
- Remove the wheels.
- Remove the bottom caliper lock pin and swing the
caliper upwards.
- Remove the V-springs and remove the pads and shims.
- Press the caliper pistons back into their cylinders.
Installation is the reverse of removal. Torque the lock pin to 47-62 ft.
lbs. (63-84 Nm). Bleed the brake system if necessary.
- Raise and safely support the vehicle.
- Remove the wheels.
- Remove the lock pin and rotate the caliper upwards.
- Remove the V-springs and remove the pads. Remove
the shims from the pads.
- Press the caliper piston back into the cylinder.
Installation is the reverse of removal. Torque the lock pin to 37-50 ft.
lbs. (50-68 Nm). Bleed the brake system if necessary.
- Raise and safely support the vehicle.
- Remove the wheels.
- Remove the M-clip, the pad pins, and the M-spring.
Remove the disc pads. Remove the shims from the pads.
- Installation is the reverse of removal. Align the
outer and inner shim arrows with the disc plate rotation. Bleed the brake
system if necessary.
- Raise and safely support the vehicle.
- Remove the wheels.
- Remove the lock pin and rotate the caliper upwards.
- Remove the V-spring and remove the pads. Remove the
shims from the pads.
- Installation is the reverse of removal. Before placing
the caliper over the pads, rotate the piston clockwise and align the piston
grooves to be perpendicular to the lock pin. Bleed the brake system if
necessary.