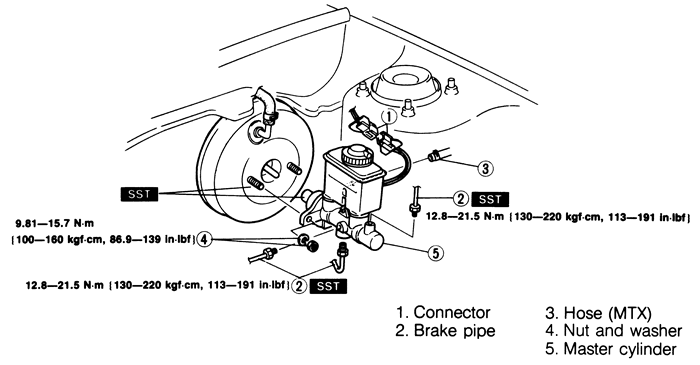
Fig. 1:Master cylinder removal and installation --
1993-94 323, 626, 929, MX3, MX6, Miata, Protege and 1995 MX3
Disconnect the negative battery cable.
Disconnect the fluid level sensor connector.
Disconnect the brake lines from the master cylinder.
Wrap the lines with a rag and plug the lines to prevent drainage.
Remove the 2 nuts securing the master cylinder to
the brake booster.
Remove the proportioning bypass valve and bracket.
Remove the master cylinder, and on ABS equipped vehicles remove the
O-ring.
To install:
Replace the O-ring, if equipped.
Position the master cylinder and the proportioning bypass valve onto
the mounting studs and install the mounting nuts. Tighten mounting nuts
to specifications as follows;
1993-94 323, 626, 929, MX3, MX6, Miata and Protege;
7-12 ft. lbs. (10-16 Nm).
1995 MX3 ; 9-12 ft. lbs. (12-16 Nm).
1995 929 and 1995-97 Protege; 7-11 ft. lbs. (10-16
Nm).
1995-97 Millenia, 626 and MX6; 87-138 in. lbs.
(9-15 Nm)
1995-97 Miata; 7-11 ft. lbs. (10-16 Nm).
Fill the reservoir to the proper level with clean
DOT 3 brake fluid. Bleed the master cylinder.
Replace the brake line washers. Install the brake lines to the master
cylinder and tighten to specifications as follows;
1993-94 323, 626, 929, MX3, MX6, Miata and Protege;
9-16 ft. lbs. (13-22 Nm).
1995 MX3 1.8L engine; 15-21 ft. lbs. (20-29 Nm).
1995 MX3 1.6L engine; 10-16 ft. lbs. (13-21 Nm).
1995 929 and 1995-97 Protege; 9-15 ft. lbs. (13-21
Nm).
1995-97 626 and MX6; 113-190 in. lbs. (9-15 Nm).
1995-97 Miata; 15-21 ft. lbs. (20-29 Nm).
Apply the brake pedal and check for firmness. If
the pedal is spongy, air is present in the system. If air remains in the
system, the entire system must be bled.
Connect the negative battery cable and the fluid
level sensor connector. Check the brakes for proper operation and leaks.
Disconnect the clutch master cylinder hose at the
brake master cylinder.
Disconnect the brake fluid level sensor connector.
Disconnect the brake pipes. Remove the pipe joint
and bracket.
Remove the mounting nuts and master cylinder bracket.
Remove the master cylinder. Remove and discard the O-ring.
Installation is the reverse of removal. Properly
bench bleed NEW master cylinder and check the piston to pushrod clearance
before installation. Torque the master cylinder mounting nuts to 87-138
in. lbs. (9.9-15.6 Nm). Torque the pipe joint mounting bolt to 70-104
in. lbs. (7.9-11.7 Nm).