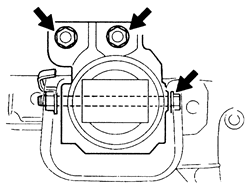
- Raise and support the vehicle safely.
- Attach a hoist to the engine and lift until the slack
in the chain is taken up.
-
Remove the nuts from the engine mounts.
NOTE: Inspect the engine compartment for components
that may bind when the engine is raised. Disconnect these components.
- Lift the engine the exact amount needed to remove
the engine mount. Do not lift any higher.
-
Remove the engine mounts.
To install:
- Install the engine mounts.
- Lower the engine and tighten the engine mount-to-engine
nuts to 32-41 ft. lbs. (43-55 Nm). Tighten the engine mount-to-frame nuts
to 41-49 ft. lbs. (55-67 Nm).
- Remove the engine hoist and lower the vehicle.
NOTE: The number 1 and 2 engine mounts are located on
the crossmember.
- Disconnect the negative battery cable.
- Raise and support the vehicle safely.
- Using an engine lifting device, attach it to the
engine and support it's weight.
- Remove the four crossmember mounting bolts, and remove
the crossmember.
-
Remove the two engine mount-to-engine nuts and the through-bolt. Remove
the mount.
To install:
| Fig. 1: Crossmember and engine mounts No, 1 and 2 --
1993-94 MX3 1.8L engine

|
- Install the engine mount on the crossmember, and
hand tighten the nuts.
- Install the crossmember on the chassis, and tighten
the bolts to 48-65 ft. lbs. (64-89 Nm).
- Tighten the engine mount nuts to 27-38 ft. lbs. (38-52
Nm).
- Install the engine mount through-bolt and tighten
to 49-68 ft. lbs. (67-93 Nm).
- Remove the lifting device and lower the vehicle.
- Connect the negative battery cable.
- Disconnect the negative battery cable.
- Raise and support the vehicle safely.
- Using an engine lifting device, attach it to the
engine and support it's weight.
-
Remove the two engine mount-to-engine nuts and through-bolt. Remove
the mount.
| Fig. 2: Engine mount No. 3 -- 1993-94 MX3 1.8L
engine
|
To install:
- Position the engine mount making sure to align the
holes.
- Install the mounting nuts and tighten to 54-76 ft.
lbs. (74-103 Nm). Install the through-bolt and tighten to 49-68 ft. lbs.
(67-93 Nm).
- Remove the lifting device and lower the vehicle.
- Connect the negative battery cable.
- Disconnect the negative battery cable.
- Raise and support the vehicle safely.
- Using an engine lifting device, attach it to the
engine and support it's weight.
- Remove the mounting bolts for the engine mount rubber,
and remove the engine mount rubber.
-
Remove the mounting bolts for the engine mount bracket, and remove
the bracket.
To install:
-
Position the bracket and engine mount rubber. Hand tighten the "A"
nuts.
| Fig. 3: Engine mount No.4 bracket -- 1993-94
MX3 1.8L engine

|
- Tighten the mounting bolts ("B"), in two
to three steps, to 32-44 ft. lbs. (44-60 Nm) using a crossing pattern.
Tighten the mounting nuts ("A") to 49-68 ft. lbs. (67-93 Nm).
- Remove the lifting device and lower the vehicle.
- Connect the negative battery cable.
- Disconnect the negative battery cable.
- Raise and support the vehicle safely.
- Using an engine lifting device, attach it to the
engine and support it's weight.
- Remove the three engine mount bracket bolts from
the engine, and remove the through-bolt. Remove the mount bracket.
-
Remove the two mounting bolts, and remove the engine mount from the
body.
To install:
- Position the engine mount making sure to align the
holes. Install the mounting bolts.
- Position the bracket. Install the mounting bolts
and tighten to 50-68 ft. lbs. (67-93 Nm). Install the through-bolt and
tighten to 48-65 ft. lbs. (64-89 Nm).
- Remove the lifting device and lower the vehicle.
- Connect the negative battery cable.
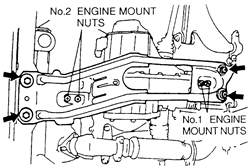
NOTE: The number 2 engine mount is located on the crossmember.
- Disconnect the negative battery cable.
- Raise and support the vehicle safely.
- Using an engine lifting device, attach it to the
engine and support its weight.
- Remove the four crossmember mounting bolts, and remove
the crossmember.
- Remove the two engine mount-to-engine nuts and the
through-bolt. Remove the mount.
-
Remove the engine mount bracket bolts and remove the engine mount bracket.
| Fig. 4: Engine mount number 2 bracket -- 1995-97
Protege 1.5L (Z5D) and 1.8L (BPD) engines
|
To install:
- Install the engine mount bracket, and tighten the
mounting bolts to 28-38 ft. lbs. (38-51 Nm).
- Install the engine mount on the crossmember, and
hand tighten the nuts.
- Install the crossmember on the chassis, and tighten
the bolts to 50-65 ft. lbs. (67-89 Nm).
- Tighten the engine mount nuts to 28-38 ft. lbs. (38-51
Nm).
- Install the engine mount through-bolt and tighten
to 63-86 ft. lbs. (86-116 Nm).
- Remove the lifting device and lower the vehicle.
- Connect the negative battery cable.
- Disconnect the negative battery cable.
- Raise and support the vehicle safely.
- Using an engine lifting device, attach it to the
engine and support it's weight.
-
Remove the engine mount-to-engine nuts and through-bolt. Remove the
mount.
To install:
- Position the engine mount making sure to align the
holes.
- Install the mounting nuts and tighten to 55-76 ft.
lbs. (74-102 Nm). Install the through-bolt and tighten to 63-86 ft. lbs.
(86-116 Nm).
- Remove the lifting device and lower the vehicle.
- Connect the negative battery cable.
- Disconnect the negative battery cable.
- Raise and support the vehicle safely.
- Using an engine lifting device, attach it to the
engine and support its weight.
- Remove the through-bolt. Remove the mounting bolts
for the engine mount rubber, and remove the engine mount rubber.
-
Remove the mounting bolts for the engine mount bracket, and remove
the bracket.
To install:
- Position the bracket and engine mount rubber. Hand
tighten the nuts. Tighten the bolts, in two to three steps, to a torque
of 32-44 ft. lbs. (44-60 Nm) in a crossing pattern. Tighten the nuts to
50-68 ft. lbs. (67-93 Nm).
- Remove the lifting device and lower the vehicle.
- Connect the negative battery cable.
NOTE: The number 1 and 2 engine mounts are located on
the crossmember.
- Disconnect the negative battery cable.
- Raise and support the vehicle safely.
- Using an engine lifting device, attach it to the
engine and support its weight.
- Remove the four crossmember mounting bolts, and remove
the crossmember.
-
Remove the two engine mount-to-engine nuts and the through-bolt. Remove
the mount(s).
To install:
| Fig. 5: Crossmember and engine mount numbers 1 and
2 -- 1995 MX3 1.6L (B6-ZE) engine
|
- Install the engine mount(s) on the crossmember, and
hand tighten the nuts.
- Install the crossmember on the chassis, and tighten
the bolts to 48-65 ft. lbs. (64-89 Nm).
- On the 1.6L engine, tighten the engine mount nuts
to 28-38 ft. lbs. (38-51 Nm).
- On the 1.8L engine, install the engine mount through-bolt
and tighten to 49-68 ft. lbs. (67-93 Nm).
- Install the engine mount through-bolt and tighten
to 63-86 ft. lbs. (86-116 Nm).
- Remove the lifting device and lower the vehicle.
- Connect the negative battery cable.
- Disconnect the negative battery cable.
- Raise and support the vehicle safely.
- Using an engine lifting device, attach it to the
engine and support it's weight.
-
Remove the two engine mount-to-engine nuts and through-bolt. Remove
the mount.
To install:
- Position the engine mount making sure to align the
holes.
- Install the mounting nuts and tighten to 55-76 ft.
lbs. (74-102 Nm). Install the through-bolt and tighten on the 1.6L engine
to 63-86 ft. lbs. (86-116 Nm) and the 1.8L engine, 49-68 ft. lbs. (67-93
Nm).
- Remove the lifting device and lower the vehicle.
- Connect the negative battery cable.
- Disconnect the negative battery cable.
- Raise and support the vehicle safely.
- Using an engine lifting device, attach it to the
engine and support its weight.
- Remove the through-bolt. Remove the mounting bolts
for the engine mount rubber, and remove the engine mount rubber.
-
Remove the mounting bolts for the engine mount bracket, and remove
the bracket.
To install:
- Position the bracket and engine mount rubber. Hand
tighten the A nuts. Tighten the B bolts, in two to three steps, to a torque
of 32-44 ft. lbs. (44-60 Nm) in a crossing pattern. Tighten nuts A to
50-68 ft. lbs. (67-93 Nm).
- Remove the lifting device and lower the vehicle.
- Connect the negative battery cable.
- Disconnect the negative battery cable.
- Raise and support the vehicle safely.
- Using an engine lifting device, attach it to the
engine and support it's weight.
-
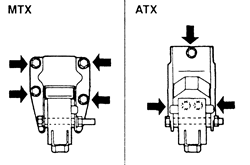
Remove the engine mount-to-engine bolts, through-bolt and the engine
mount-to-chassis bolts. Remove the mount.
To install:
- Position the engine mount making sure to align the
holes.
- On manual transaxles, torque the bolts to 50-68 ft.
lbs. (67-93 Nm). On automatic transaxles, tighten the three bolts "A"
to 50-77 ft. lbs. (67-104 Nm), through-bolt "B" to 63-86 ft.
lbs. (86-116 Nm) and the three bolts "C" to 50-68 ft. lbs. (67-93
Nm).
- Remove the lifting device and lower the vehicle.
- Connect the negative battery cable.
NOTE: The number 2 engine mount is located on the crossmember.
- Disconnect the negative battery cable.
- Raise and support the vehicle safely.
- Using an engine lifting device, attach it to the
engine and support it's weight.
- Remove the four crossmember mounting bolts, and remove
the crossmember.
-
Remove the two engine mount-to-engine nuts and the through-bolt. Remove
the mount.
To install:
- Install the engine mount on the crossmember, and
hand tighten the nuts ("B").
- Install the crossmember on the chassis, and tighten
the bolts ("A") to 50-68 ft. lbs. (67-93 Nm).
- Tighten the engine mount nuts ("B") to
55-77 ft. lbs. (75-104 Nm).
- Install the engine mount through-bolt and tighten
to 63-86 ft. lbs. (86-116 Nm).
- Remove the lifting device and lower the vehicle.
- Connect the negative battery cable.
- Disconnect the negative battery cable.
- Raise and support the vehicle safely.
- Using an engine lifting device, attach it to the
engine and support it's weight.
-
Remove the two engine mount-to-engine nuts and through-bolt. Remove
the mount.
To install:
- Position the engine mount making sure to align the
holes.
- Install the mounting nuts and tighten to 55-77 ft.
lbs. (75-104 Nm). Install the through-bolt and tighten to 63-86 ft. lbs.
(86-116 Nm).
- Remove the lifting device and lower the vehicle.
- Connect the negative battery cable.
- Disconnect the negative battery cable.
- Raise and support the vehicle safely.
- Using an engine lifting device, attach it to the
engine and support it's weight.
- Remove the through-bolt. Remove the mounting bolts
for the engine mount rubber, and remove the engine mount rubber.
-
Remove the mounting bolts for the engine mount bracket, and remove
the bracket.
To install:
- Position the bracket, and tighten the "B"
bolts first and then the "A" bolts to the same torque of 44-59
ft. lbs. (59-80 Nm).
- Install the engine mount rubber. On manual transaxles,
tighten the mounting bolts ("A") to 50-68 ft. lbs. (67-93 Nm),
and the through-bolt ("B") to 63-86 ft. lbs. (86-116 Nm). On
automatic transaxles, tighten the through-bolt ("B") to 63-86
ft. lbs. (86-116 Nm) and the mounting bolts ("C") to 28-38 ft.
lbs. (38-51 Nm).
- Remove the lifting device and lower the vehicle.
-
Connect the negative battery cable.
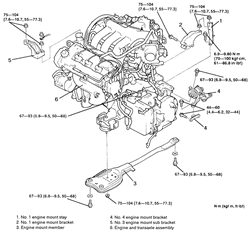
| Fig. 6: Engine mount torque values -- 2.0L (FS)
and 2.5L (KL) engines

|
| Fig. 7: Engine mount locations - 1995-97 Millenia
2.5L (KLD) engine
|
- Raise and support the vehicle safely.
- Attach a hoist to the engine and lift until the slack
in the chain is taken up.
-
Remove the nuts from the engine mounts.
NOTE: Inspect the engine compartment for components
that may bind when the engine is raised. Disconnect these components.
- Lift the engine the exact amount needed to remove
the engine mount. Do not lift any higher.
-
Remove the engine mounts.
To install:
- Install the engine mounts.
- Lower the engine and tighten the engine mount-to-engine
nuts to 29-42 ft. lbs. (39-57 Nm). Tighten the engine mount-to-frame nuts
to 41-49 ft. lbs. (55-67 Nm).
- Remove the engine hoist and lower the vehicle.
- Disconnect the negative battery cable.
- Raise and support the vehicle safely.
- Using an engine lifting device, attach it to the
engine and support it's weight.
- Remove the engine mount bracket.
-
Remove the engine mount bolts and the through-bolt. Remove the mount.
To install:
- Position the engine mount making sure to align the
holes. Tighten the four bolts to 55-77 ft. lbs. (75-104 Nm).
- Install the engine mount bracket. Tighten the upper
bolt to 55-77 ft. lbs. (75-104 Nm), and the lower bolt to 61-87 inch lbs.
(7-10 Nm).
- Remove the lifting device and lower the vehicle.
- Connect the negative battery cable.
NOTE: The number 2 engine mount is located on the crossmember.
- Disconnect the negative battery cable.
- Raise and support the vehicle safely.
- Using an engine lifting device, attach it to the
engine and support it's weight.
- Remove the three crossmember mounting bolts, and
remove the crossmember.
-
Remove the two engine mount-to-engine nuts and the through-bolt. Remove
the mount.
To install:
- Install the engine mount on the crossmember, and
hand tighten the A nuts.
- Install the crossmember on the chassis, and tighten
the B bolts to 50-68 ft. lbs. (67-93 Nm).
- Tighten the engine mount A nuts to 55-77 ft.
lbs. (75-104 Nm).
- Install the engine mount through-bolt and tighten
to 63-86 ft. lbs. (86-116 Nm).
- Remove the lifting device and lower the vehicle.
- Connect the negative battery cable.
- Disconnect the negative battery cable.
- Raise and support the vehicle safely.
- Using an engine lifting device, attach it to the
engine and support it's weight.
-
Remove the three mounting nuts. Remove the sub bracket mount.
To install:
- Position the engine mount sub bracket making sure
to align the holes.
- Install the mounting nuts and tighten to 55-77 ft.
lbs. (75-104 Nm).
- Remove the lifting device and lower the vehicle.
- Connect the negative battery cable.
- Disconnect the negative battery cable.
- Raise and support the vehicle safely.
- Using an engine lifting device, attach it to the
engine and support it's weight.
- Remove the mounting bolts for the engine mount, and
remove the engine mount.
-
Remove the mounting bolts for the engine mount bracket, and remove
the bracket.
To install:
- Position the bracket, and tighten the E bolts
to 32-44 ft. lbs. (44-60 Nm), and hand tighten the F bolts.
- Install the engine mount. Tighten the C and
F mounting bolts to 50-68 ft. lbs. (67-93 Nm)
- Remove the lifting device and lower the vehicle.
- Connect the negative battery cable.
- Raise and support the vehicle safely.
- Attach a hoist to the engine and lift until the slack
in the chain is taken up.
-
Remove the nuts from the engine mounts.
NOTE: Inspect the engine compartment for components
that may bind when the engine is raised. Disconnect these components.
- Lift the engine the exact amount needed to remove
the engine mount. Do not lift any higher.
-
Remove the engine mounts.
To install:
- Install the engine mounts.
- Lower the engine and tighten the engine mount-to-engine
nuts to 27-41 ft. lbs. (37-55 Nm). Tighten the engine mount-to-frame nuts
to 41-57 ft. lbs. (55-78 Nm).
- Remove the engine hoist and lower the vehicle.


