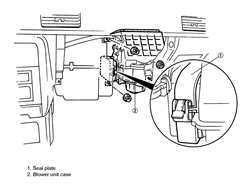
| Fig. 1: Blower motor removal and installation --
1993-94 323, MX3 and Protege
|
- Disconnect the negative battery cable.
- Open the glove box and remove the glove box retaining
screws. Remove the glove box assembly.
- Remove the inner glove box assembly screws and remove
the inner glove box.
- Unclip and remove the heater blower seal plate.
- Remove the 3 heater blower mounting nuts and remove
the blower unit case.
- Remove the screws and separate the two halves of
the blower unit case.
-
Remove the blower fan from the blower motor. Remove the mounting screws
and separate the blower motor from the case.
To install:
- Install the blower motor to the case and install
the screws.
- Install the blower fan to the blower motor.
- Connect the 2 halves of the blower unit case and
install the screws.
- Install the heater blower unit case to the vehicle
and tighten the mounting nuts.
- Install the heater blower seal plate.
- Install the inner glove box assembly.
- Install the glove box door.
- Connect the negative battery cable.
| Fig. 2: Blower motor, exploded view -- 1995-97 Protege
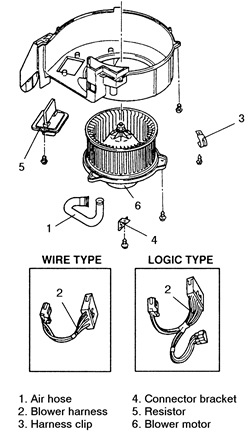
|
NOTE: The blower motor is located on the right side of
the vehicle underneath the dashboard.
- Disconnect the negative battery cable.
- Disconnect the air hose from the unit.
- Remove the mounting screws and remove the blower
motor.
- Disconnect the electrical connections.
- Installation is the reverse of removal.
- Disconnect the negative battery cable.
- Remove the two instrument panel insulator screws.
- Disconnect the courtesy lamp electrical connector.
- Remove the instrument panel insulator.
- Disconnect the blower motor electrical connector.
-
Remove the four attaching screws from the housing and remove the blower
motor and wheel assembly from the vehicle.
To install:
- Position the blower motor and wheel assembly in the
housing and install the four attaching screws and the electrical connector.
- Install the instrument panel insulator, courtesy
light and panel screws.
- Connect the negative battery cable.
CAUTION
The air bag system must be disarmed before removing the steering wheel.
Failure to do so may cause accidental deployment, property damage or personal
injury.
- Disconnect the negative battery cable.
- Properly recover the refrigerant from the A/C system.
- Remove the A-pillar, and front side trim.
-
Disarm and remove the driver-side air bag module.
CAUTION
Always carry an air bag assembly, with the bag and trim cover, away
from your body. Store the assembly facing upward; never place the assembly
face down on any surface.
- Remove the steering wheel.
- Remove the steering column covers and the combination
switch.
- Remove the steering column.
- Remove the side panel by pulling it forward to disengage
the clips.
- Remove the hood release knob.
- Pull the lap duct from the rear of the lower panel.
Remove the mounting screws, and pull the panel to disengage the clips.
- Remove the front console by pulling it forward to
disengage the clips.
- Remove the rear console mounting screws, and remove
the console.
- Remove the side wall mounting screws and fasteners,
and remove the panel.
- Remove the undercover mounting fasteners, and remove
the cover.
- Remove the glove compartment mounting screws, and
remove the compartment.
- Remove the switch panel mounting screws. Remove the
panel by pulling it forward to disengage the clips.
- Remove the passenger-side air bag module.
- Remove the meter hood mounting screws. Remove the
hood by pulling it forward to disengage the clips.
- Pull the upper garnish upwards to disengage the clips,
and remove the garnish.
- Remove the instrument cluster.
- Remove the dashboard.
- Remove the A/C duct, and disconnect the A/C amplifier
connector.
- Disconnect and plug the inlet and outlet pipes. Remove
the cooling unit.
- Disconnect the blower motor electrical connector.
-
Remove the three attaching nuts from the housing, and remove the blower
motor and wheel assembly from the vehicle.
To install:
- Position the blower motor and wheel assembly in the
housing and install the three attaching nuts and the electrical connector.
- Position the cooling unit so the connections match
those of the heater and blower units. Apply clean compressor oil to the
O-rings, and connect the inlet and outlet pipes. Tighten the inlet pipe
fitting to 8-14 ft. lbs. (10-19 Nm), and the outlet pipe fitting to 15-21
ft. lbs. (20-29 Nm). Install the cooling unit mounting nuts.
- Connect the A/C amplifier, and the A/C duct.
- Install the dashboard and instrument cluster.
- Install the upper garnish and meter hood.
- Install the passenger-side air bag.
- Install the switch panel, glove compartment, undercover
and side wall.
- Install the rear and front consoles.
- Install the lower panel, hood release knob and side
panel.
- Install the steering column, combination switch,
column cover and steering wheel.
- Install the driver-side air bag.
- Install the front side and A-pillar trim.
- Properly evacuate and recharge the A/C system. Perform
a leak test.
- Connect the negative battery cable.
- Verify proper operation of the blower motors.
- Disconnect the negative battery cable.
- Remove the passenger sound deadening panel.
- Remove the glove compartment assembly and brace.
- Remove the air duct from between the heater unit
and the blower unit.
- Remove the cooling hose from the blower motor assembly.
- Disconnect the blower motor electrical connector
at the housing.
- Remove the three attaching screws from the housing
and remove the blower motor from the vehicle.
- Remove the retaining clip from the blower wheel assembly.
-
Remove the blower wheel by pulling it straight off the blower motor
shaft.
To install:
- Install the blower wheel and retaining clip.
- Position the blower motor in the housing and install
the three attaching screws and the electrical connector.
- Install the cooling hose, air duct, glove compartment
and brace.
- Install the passenger sound deadening panel.
- Connect the negative battery cable.
CAUTION
The air bag system must be disarmed before removing the dashboard. Failure
to do so may cause accidental deployment, property damage or personal
injury.
- Disconnect the negative battery cable.
- Disarm the driver and passenger air bags.
- Properly recover the refrigerant from the A/C system.
- Remove the steering column covers.
- Insert a flat-bladed tool into the switch panel holes,
and pry out the front edge of the panel. Remove the panel by pulling it
upward to disengage the clips. Disconnect the solar ventilation switch
electrical harness, if equipped.
- Remove the rear console mounting screws, and remove
the console.
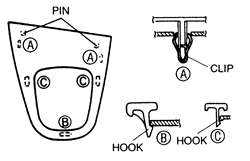
-
Insert a flat bladed tool between the boot panel and the front console,
and pry out the front edge of the panel. Remove the panel by pulling it
upward to disengage the clips, hooks and pins.
| Fig. 3: Boot panel clip locations -- 1995-97
929
|
- Remove the ashtray and center panel.
- Remove the radio.
- Remove the front console.
- Remove the undercover, and lower panel.
- Remove the lap duct.
- Remove the parking brake lever, and hood release
knob.
- Remove the side panel by pulling the rear edge forward
to disengage the clips. Pull the panel backward to remove the clips and
hooks.
- Remove the steering column mounting bolts, and lower
the column.
- Remove the dashboard.
- Remove the main air duct from the vehicle.
- Disconnect and plug the cooler hose and cooler pipe.
Remove the cooling unit mounting nuts, and remove the cooling unit.
- Remove the air duct from between the heater unit
and the blower unit.
- Remove the cooling hose from the blower motor assembly.
- Disconnect the blower motor electrical connector
at the housing.
- Remove the three attaching screws from the housing
and remove the blower motor from the vehicle.
- Remove the retaining clip from the blower wheel assembly.
-
Remove the blower wheel by pulling it straight off the blower motor
shaft.
To install:
- Install the blower wheel and retaining clip.
- Position the blower motor in the housing and install
the three attaching screws and the electrical connector.
- Install the cooling hose, and the air duct.
- Position the cooling unit so the connections match
those of the heater and blower units. Apply clean compressor oil to the
O-rings, and connect the inlet and outlet pipes. Tighten the inlet pipe
fitting to 8-14 ft. lbs. (10-19 Nm), and the outlet pipe fitting to 15-21
ft. lbs. (20-29 Nm). Install the cooling unit mounting nuts.
- Install the main air duct into the vehicle.
- Install the dashboard.
- Raise the steering column, and install the mounting
bolts. Tighten the bolts to 12-16 ft. lbs. (16-22 Nm).
- Install the side panel.
- Install the hood release knob and parking brake lever.
- Install the lap duct, lower panel and undercover.
- Install the front console and radio.
- Install the center panel and the ashtray.
- Install the boot panel and rear console.
- Install the switch panel and steering column covers.
- Rearm the air bags.
- Recharge the A/C system. Perform a leak test.
- Connect the negative battery cable.
- Disconnect the negative battery cable.
- Remove the dash undercover which is located on the
passenger side of the vehicle, if equipped. Remove the glove box. Disconnect
the multi-connector to the blower motor.
- Remove the air duct in between the blower unit and
the heater unit.
- Remove the nuts and the blower unit. Disassemble
the unit and remove the blower motor.
- Installation is the reverse of removal.
- Disconnect the negative battery cable.
- Open the glove box and remove the glove box retaining
screws. Remove the glove box assembly.
- Remove the inner glove box assembly screws and remove
the inner glove box.
- Remove the air duct.
- Unclip and remove the heater blower seal plate.
- Remove the three heater blower mounting nuts and
remove the blower unit case.
- Remove the screws and separate the two halves of
the blower unit case.
-
Remove the blower fan from the blower motor. Remove the mounting screws,
and separate the blower motor from the case.
To install:
- Install the blower motor into the case and install
the screws.
- Install the blower fan to the blower motor.
- Connect the two halves of the blower unit case and
install the screws.
- Install the heater blower unit case to the vehicle
and tighten the mounting nuts.
- Install the heater blower seal plate.
- Install the air duct.
- Install the inner glove box assembly.
- Install the glove box door.
- Connect the negative battery cable.


