| Fig. 1: Camshaft, rocker arm and shaft assemblies — 1.5L
engine

|
| Fig. 2: Camshaft, rocker arm and shaft assemblies — 1.8L
engine

|
- Disconnect the negative battery cable.
- For 1.8L engines, label and disconnect the spark plug cables.
- Disconnect the accelerator cable, breather hose and PCV hose connections.
- Remove the rocker cover.
- Loosen both rocker arm shaft assemblies gradually and evenly and remove
the rocket shafts from the vehicle.
- If disassembly is required, keep all parts in the exact order of removal.
To install:
- Lubricate the rocker shaft with clean engine oil and install the rockers
and springs.
- Install the rocker arm and shaft assemblies. Tighten the rocker arm shaft
retainer bolts to 23 ft. lbs. (32 Nm).
- Check valve adjustment and install the valve cover. Tighten the valve cover
bolts to 16 inch lbs. (1.8 Nm) for the 1.5L engine or to 29 inch lbs. (3.3
Nm) for the 1.8L engine.
- If detached, connect the spark plug cables.
- Connect the accelerator cable, breather hose and PCV hose.
- Connect the negative battery cable.
| Fig. 3: Camshaft, rocker arm and shaft assemblies — 2.0L
SOHC engine
|
On this engine, the hydraulic lifters are built into the rocker arms. If lifter
service is required, simply remove the lifter from the bore in the rocker arm.
It is recommended that all of the rocker arms and lash adjusters be replaced
at the same time.
- Disconnect the negative battery cable.
- Remove the valve cover.
- Matchmark the distributor to the cylinder head and remove the distributor.
- Remove camshaft timing belt.
- Working in a crisscross pattern from the center outward, loosen the camshaft
bearing caps in gradual steps.
- Remove the rocker arms, shafts and bearing caps as an assembly.
NOTE: It is essential that all parts be kept in the same
order and orientation for reinstallation. Be sure to mark and separate parts,
so parts will not be mixed during reassembly.
- Disassemble rocker shaft assembly. Starting at rear bearing cap, slide each
piece off shafts.
NOTE: Inspect the roller surfaces of the rockers. Replace
if there are any signs of damage or if the roller does not turn smoothly.
Check the inside bore of the rockers and lifter for wear.
To install:
- Apply a drop of sealant to the rear edges of the end caps.
- Install the assembly into the front bearing cap, making sure the notches
in the rocker shafts are facing up. Insert the installation bolt, but do not
tighten at this point.
- Install the remaining cap bolts. Tighten all bolts evenly and gradually
to 15 ft. lbs. (20 Nm). Remove the lash adjuster retainers.
- Install the timing belt as required.
- Align the matchmarks and install the distributor.
- Remove the lash adjuster retaining tools.
- Install the valve cover, with a new gasket and semi-circular packing in
place.
- Connect the negative battery cable.
- Run the engine and check ignition timing.
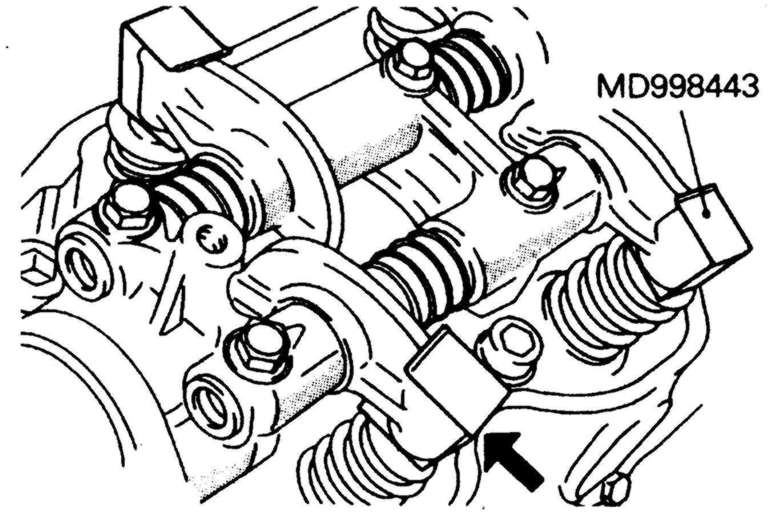
| Fig. 4: Camshaft, rocker arm and shaft assemblies — 1.6L
and 2.0L DOHC engines
|
- Disconnect the negative battery cable.
- Remove the valve cover and discard the gasket.
- Install lash adjuster retainer tools MD998443 or equivalent, to the rocker
arm.
- Remove the rocker shaft hold-down bolts gradually and evenly and remove
the rocker shaft/arm assemblies.
- If disassembly is required, keep all parts in the exact order of removal.
Inspect the roller surfaces of the rockers. Replace if there are any signs
of damage or if the roller does not turn smoothly. Check the inside bore of
the rockers and the adjuster tip for wear.
To install:
- Lubricate the rocker shaft with clean engine oil and install the rockers
and springs in their proper places.
- Install the rocker shaft assemblies on the engine. Tighten the bolts gradually
and evenly to 21–25 ft. lbs. (29–35 Nm).
NOTE: When installing the rocker arm shaft, make certain
the notch is properly located.
- Remove the lash adjuster retaining tools.
- Install the valve cover with a new gasket.
- Connect the negative battery cable.
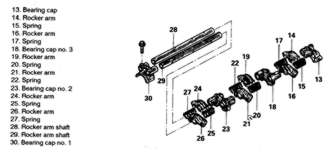
| Fig. 5: Rocker arm shafts and components — 2.4L
engine
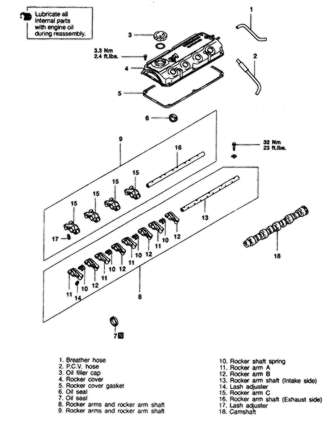
|
- Disconnect the negative battery cable.
- Remove the accelerator cable from the retaining clamps and position the
accelerator cable out of the way.
- Remove the air intake hose.
- Disconnect the breather hose and the PCV hose.
- Disconnect the spark plug cables from the spark plugs.
- Remove the rocker cover and gasket.
- Install lash adjuster retainer tools MD998443 or equivalent, to the rocker
arm.
- Remove the rocker shaft hold-down bolts gradually and evenly and remove
the rocker shaft/arm assemblies.
- Disassemble the rockers and the rocker shaft springs from the rocker shafts.
If they are to be reused, note the location and positioning of all rocker
shaft components. It is recommended that all lash adjusters and rockers be
replaced as a complete set.
To install:
| Fig. 6: Installing the rocker shaft springs — 2.4L
(4G64) engines
|
- Immerse the lash adjusters in clean diesel fuel, and using a small wire,
move the plunger up and down four or five times. while pushing down lightly
on the check ball in order to bleed the air from the adjuster.
- Install the lash adjusters to the rocker arms and attach the special holding
tool.
- Lubricate the rocker shaft with clean engine oil and install the rocker
arms.
- Temporarily tighten the rocker shaft assembly with the mounting bolts so
that all rocker arms on the inlet valve side do not push on the valves.
- Fit the rocker shaft springs from above and position them so that they are
at right angles to the plug side. Install the rocker springs before installing
the exhaust side rocker shaft and rocker arm assembly.
- Install the exhaust side rocker shaft assembly in the engine. Tighten the
rocker shaft mounting bolts gradually and evenly to 23 ft. lbs. (32 Nm).
- Remove the lash adjuster retaining tools.
- Install the rocker cover and tighten the mounting bolts to 30 inch lbs.
(3 Nm).
- Reinstall the spark plug wires to the spark plugs.
- Reconnect the PCV and breather hoses.
- Install the air intake hose.
- Reattach the accelerator cable brackets and reconnect the accelerator cable.
- Connect the negative battery cable.
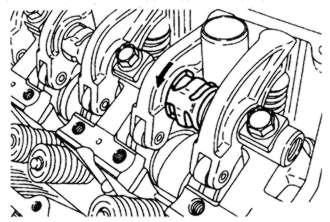
| Fig. 7: Install the auto lash adjuster holder to
prevent them from falling out — 2.4L (4G64) engines

|
On this engine, the hydraulic lash adjusters are built into the rocker arms.
- Disconnect the negative battery cable.
- Remove the valve cover. Install lash adjuster retainer tools MD998443 or
equivalent, to prevent the auto-lash adjuster from falling out of the rocker
arm.
- Loosen rocker arm and shaft assembly evenly in several steps. Remove the
rocker arm and shaft assembly as a complete unit.
- Remove the rear camshaft bearing cap and slide the rocker arms, springs
and washers from the shaft. If they are to be reused, note the location and
positioning of all rocker shaft components. It is recommended that all lash
adjusters and rockers be replaced as a complete set.
To install:
- Immerse the lash adjusters in clean diesel fuel. Using a small wire, move
the plunger of the lash adjuster up and down 4 or 5 times while pushing down
lightly on the check ball in order to bleed out the air. Install the lash
adjusters in the rocker arms.
- Using a light coat of engine oil, assemble the rocker arms to the shaft.
Install the rear camshaft bearing cap.
- Lubricate the camshaft and rocker shaft with clean engine oil and position
on the cylinder head.
- Apply a drop of sealant to the rear edges of the end caps.
- Install the assembly making sure the notches in the rocker shafts are facing
up.
- Install the cap bolts and tighten evenly and gradually to 14 ft. lbs. (20
Nm). Remove the lash adjuster retainers.
- Install the valve cover.
- Connect the negative battery cable.
| Fig. 8: Rocker arm assembly — 3.0L
SOHC engine
|
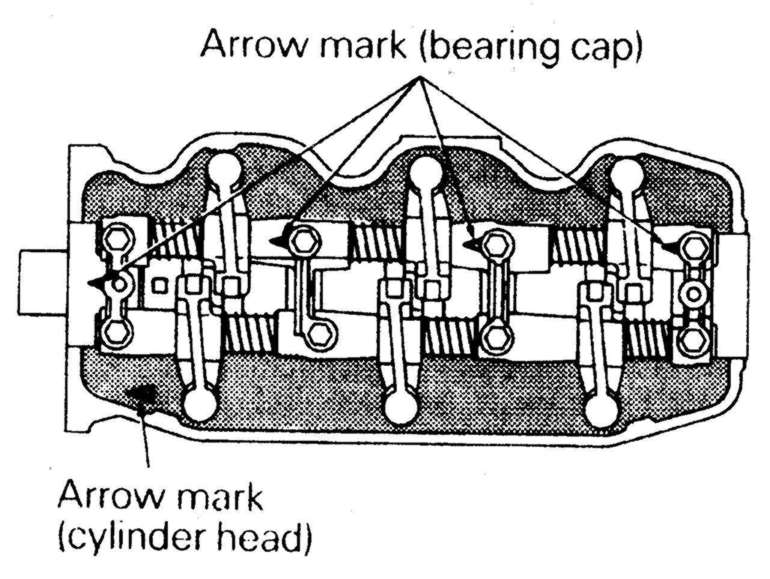
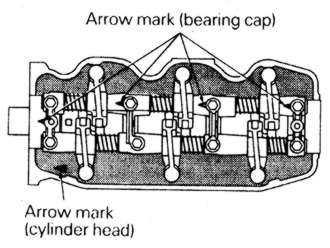
| Fig. 9: When installing the rocker arm/shaft assemblies,
ensure that the arrow marks point in the same direction as the arrow
stamped into the cylinder head — 3.0L SOHC engine
|
| Fig. 10: The rocker arms sit beneath the camshaft and
are supported on one end by the valve stem and on the other end by the
hydraulic lash adjuster — Diamante with 3.0L DOHC engine

|
- Relieve the fuel system pressure.
CAUTION
Observe all applicable safety precautions when working around fuel. Whenever
servicing the fuel system, always work in a well ventilated area. Do not
allow fuel spray or vapors to come in contact with a spark or open flame.
Keep a dry chemical fire extinguisher near the work area. Always keep fuel
in a container specifically designed for fuel storage; also, always properly
seal fuel containers to avoid the possibility of fire or explosion.
- Disconnect battery negative cable.
- Remove the timing belt cover and timing belt. Refer to the timing belt procedure
in this section.
- Remove the center cover, breather and PCV hoses, and spark plug cables.
- Remove the rocker cover.
- Remove the throttle body stay, both camshaft sprockets, and oil seals.
- Remove the Camshaft Position (CMP) sensor and adapter from the rear of the
camshaft.
- Remove the intake and exhaust camshafts.
- Remove rocker arms and lash adjusters from the head. It is recommended that
all lash adjusters and rockers be replaced as a complete set.
To install:
- Immerse the lash adjusters in clean diesel fuel. Using a small wire, move
the plunger of the lash adjuster up and down four or five times while pushing
down lightly on the check ball in order to bleed out the air. Lubricate and
install the lash adjusters in the cylinder head.
- Lubricate the camshafts with clean engine oil and position the camshafts
on the cylinder head.
- Install the bearing caps. Tighten the caps in sequence, in 2 or 3 steps.
Caps 2, 3 and 4 have a front mark. Install with the mark aligned with the
front mark on the cylinder head. Intake caps have I stamped
on the cap and exhaust caps have E. Also, be sure the rocker arm
is correctly mounted on the lash adjuster and the valve stem end. Torque the
front and rear retaining cap bolts to 14 ft. lbs. (20 Nm) and tighten the
center 3 retaining cap bolts to 8 ft. lbs. (11 Nm).
- Apply a coating of engine oil to the oil seals and install.
- Install the timing belt, valve cover and all related parts. Refer to the
timing belt procedure in this section.
- Connect the negative battery cable and check for leaks.
| Fig. 11: Camshaft, rocker arm and shaft assemblies — 3.5L
engine
|
- Disconnect the negative battery cable.
- Remove the rocker arm cover.
- Install the lash adjuster clips on the rocker arms, then loosen the bearing
cap bolts. Do not remove the bolts from the bearing caps.
- Remove the rocker arms, shafts and bearing caps as an assembly.
To install:
- Install the bearing caps/rocker arm assemblies. Tighten the bolts to 23
ft. lbs. (31 Nm).
- Remove the lash adjuster clips.
- Install the rocker arm cover using a new gasket.
- Connect the negative battery cable.