CAUTION
Fuel injection systems remain under pressure after the engine has been turned
OFF. Properly relieve fuel pressure before disconnecting any fuel lines. Failure
to do so may result in fire or personal injury.
NOTE: Cover all fuel hose connections with a shop towel, prior to disconnecting, to prevent splash of fuel that could be caused by residual pressure remaining in the fuel line.
CAUTION
Observe all applicable safety precautions when working around fuel. Whenever
servicing the fuel system, always work in a well ventilated area. Do not
allow fuel spray or vapors to come in contact with a spark or open flame.
Keep a dry chemical fire extinguisher near the work area. Always keep fuel
in a container specifically designed for fuel storage; also, always properly
seal fuel containers to avoid the possibility of fire or explosion.
To install:
| Fig. 1: Loosen self-locking nuts on tank support straps
to the end of the stud bolts — 1990–93 FWD Galant
|
| Fig. 2: Remove the six retaining bolts and gasket from
the base of the tank — 1990–93 FWD Galant
|
| Fig. 3: Align the 3 projections on packing with the holes
on the fuel pump and the nipples on the pump facing the same direction
as before removal — 1990–93 FWD Galant
|
CAUTION
Observe all applicable safety precautions when working around fuel. Whenever
servicing the fuel system, always work in a well ventilated area. Do not
allow fuel spray or vapors to come in contact with a spark or open flame.
Keep a dry chemical fire extinguisher near the work area. Always keep fuel
in a container specifically designed for fuel storage; also, always properly
seal fuel containers to avoid the possibility of fire or explosion.
To install:
NOTE: If the packing material is damaged or deformed, replace it with new packing.
| Fig. 4: The fuel pump is located in the fuel tank. Remove
the access cover located in the rear floor pan — 1990–93
AWD Galant
|
| Fig. 5: Remove the six pump retaining bolts and remove
the fuel pump and gauge assembly from the tank — 1990–93
AWD Galant
|
| Fig. 6: Install 3M ATD Part No. 8625 or equivalent, to
the rear floor pan and install the access cover into place — 1990–93
AWD Galant
|
CAUTION
Observe all applicable safety precautions when working around fuel. Whenever
servicing the fuel system, always work in a well ventilated area. Do not
allow fuel spray or vapors to come in contact with a spark or open flame.
Keep a dry chemical fire extinguisher near the work area. Always keep fuel
in a container specifically designed for fuel storage; also, always properly
seal fuel containers to avoid the possibility of fire or explosion.
To install:
NOTE: If the packing material is damaged or deformed, replace it with new packing.
| Fig. 7: After the seat cushion is removed, the access
cover for the fuel pump is visible
|
| Fig. 8: Remove the four access cover retaining screws
. . .
|
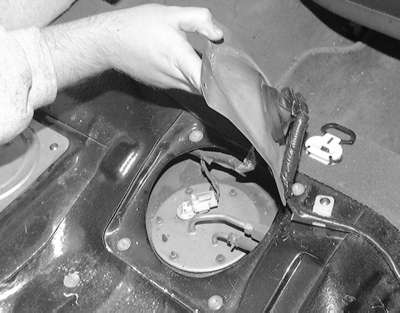
| Fig. 9: . . . then lift the cover from the floorpan
|
| Fig. 10: On Mirage models there is a plug rather than
an access cover
|
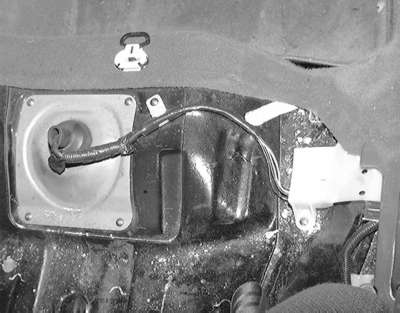
| Fig. 11: Detach the electrical connector from the fuel
pump
|
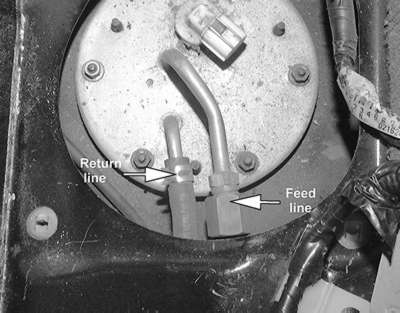
| Fig. 12: Remove the return and feed lines from the fuel
pump
|
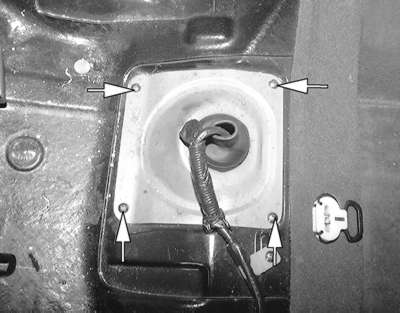
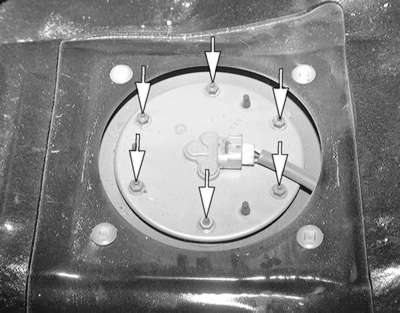
| Fig. 13: The fuel pump, just like the sending unit (shown
here), is held by six retaining nuts; remove them and lift the pump out
of the fuel tank
|
| Fig. 14: Install 3M ATD Part No. 8625 or equivalent,
to the rear floor pan and install the access cover or plug into place
|
CAUTION
Observe all applicable safety precautions when working around fuel. Whenever
servicing the fuel system, always work in a well ventilated area. Do not
allow fuel spray or vapors to come in contact with a spark or open flame.
Keep a dry chemical fire extinguisher near the work area. Always keep fuel
in a container specifically designed for fuel storage; also, always properly
seal fuel containers to avoid the possibility of fire or explosion.
To install:
NOTE: If the packing material is damaged or deformed, replace it with new packing.
NOTE: Tilt the float to the left of the vehicle, when installing the pump assembly.
| Fig. 15: Using special tool MB991480 or equivalent, remove
the fuel pump retaining cap and remove the pump assembly — 1999–00
Galant
|
| Fig. 16: Install the packing to the fuel tank — 1999–00
Galant
|
| Fig. 17: Install the fuel pump assembly to the tank and
align the mating marks on the pump and the floorpan — 1999–00
Galant
|
CAUTION
Observe all applicable safety precautions when working around fuel. Whenever
servicing the fuel system, always work in a well ventilated area. Do not
allow fuel spray or vapors to come in contact with a spark or open flame.
Keep a dry chemical fire extinguisher near the work area. Always keep fuel
in a container specifically designed for fuel storage; also, always properly
seal fuel containers to avoid the possibility of fire or explosion.
To install:
NOTE: If the packing material is damaged or deformed, replace it with new packing.