

- Disconnect the negative battery cable.
- Raise and properly support vehicle.
- Remove both rear wheels.
- Support the lower control arm with a jack.
- Matchmark the positioning of the upper spring plate to the vehicle for reinstallation
purposes.
- If equipped with Active Electronic Control Suspension (Active-ECS), perform
the following:
- Loosen the nut that secures the air line to the to the top of the strut
and discard the O-ring.
- Remove the bolts that secure the actuator to the top of the strut and
remove the component. Disconnect the wiring harness.
- Remove the shock absorber lower mounting bolt and remove the two nuts that
secure the shock upper plate to the vehicle.
- Lower the support jack and remove the shock from the vehicle.
To install
- Position the upper spring plate and install the strut. Use the support jack
to assist with installation.
- Tighten the upper strut mounting nuts to 33 ft. lbs. (45 Nm).
- Tighten the lower strut mounting bolt to 71 ft. lbs. (98 Nm).
- If equipped with Active-ECS perform the following:
- Using a new O-ring, tighten the nut that secures the air line to the
to the top of the strut to 84 inch lbs. (9 Nm).
- Install the actuator to the top of the shock absorber and secure with
mounting bolts. Connect the wiring harness.
- Remove the support jack, install wheels and lower vehicle.
- Connect the negative battery cable.
NOTE: The strut assembly is a load bearing component, therefore
the vehicle chassis and axle weight must be supported separately, requiring
the use of two separate lifting devices.
- Disconnect the negative battery cable.
- Raise and support vehicle chassis.
- Raise and support torsion axle and arm assembly slightly. Make sure the
jack does not contact the lateral rod.
NOTE: Always use a wooden block between the jack receptacle
and the axle beam. Place the jack at the center of the axle beam.
- Remove the trunk interior trim to gain access to the top mounting nuts.
- If equipped with Active-ECS, perform the following steps:
- Label and disconnect the air tubes from the shock absorber.
NOTE: Immediately plug or cap the lines with tape or
similar product to prevent the entry of dirt into the system. Do NOT
bend or crimp the air tubes. Plug or cover the air ports on the joint
and actuator.
- Remove the O-ring and bushing.
- Remove the actuator assembly.
- Remove the top cap and upper shock mounting nuts.
- Remove the strut lower mounting bolt and remove the assembly from the vehicle.
To install
- Position the strut assembly so that the lower mounting bolt can be installed
and lightly tightened.
- Use the jack to raise or lower the axle assembly so that the top strut plate
studs aligns through the body. Raise the jack to hold the strut assembly in
position.
- Install the top plate nuts on the studs. Tighten the upper shock mounting
nuts to 29 ft. lbs. (40 Nm).
- With the car on the ground, tighten the lower mounting bolt to 72 ft. lbs.
(100 Nm).
- If equipped with Active-ECS, assemble the actuator components in the following
order:
- Install the adapter to the mounting bracket.
- Using new O-rings, connect the air line to the actuator. Tighten the
locknuts to 6 ft. lbs. (9 Nm).
- Swab the air connectors with a solution of soapy water. Start the engine,
cycle the suspension controls and observe the joints for any sign of air
leaks.
- Install top cap and interior trim.
- Disconnect the negative battery cable.
- Raise and support vehicle chassis.
- Raise and support trailing arm assembly slightly.
- Remove the trunk interior trim to gain access to the top mounting nuts.
- Remove the top cap and upper shock mounting nuts.
- Remove the brake tube bracket bolt.
- Remove the shock lower mounting bolt and remove the assembly from the vehicle.
To install
- Position the strut assembly so that the lower mounting bolt can be installed
and lightly tightened.
- Use a jack to raise or lower the trailing arm, so that the top strut plate
studs aligns through the body. Raise the jack to hold the strut assembly in
position.
- Install the top plate nuts on the studs. Tighten the upper shock mounting
nuts to 29 ft. lbs. (40 Nm).
- With the car on the ground, tighten the lower mounting bolt to 65–80
ft. lbs. (90–110 Nm).
- Connect the brake bracket and tighten the mounting bolt to 12 ft. lbs. (17
Nm).
- Install the top cap and interior trim.
| Fig. 1: Remove the two top mounting nuts
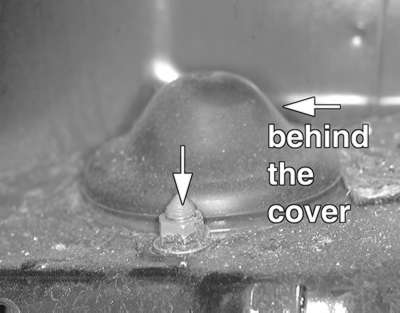
|
| Fig. 2: Remove the shock lower mounting bolt
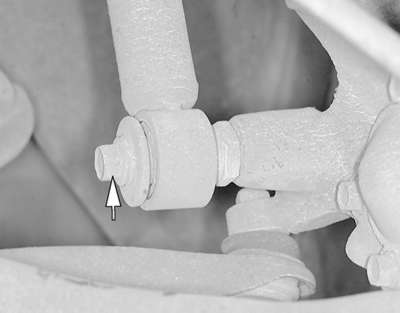
|
- Raise and support the vehicle chassis.
- Raise and support the lower control arm assembly slightly.
- In order to gain access to the top mounting nuts, remove the rear seat as
follows:
- While pulling the rear seat stopper outward, lift the lower cushion
upward. Remove the lower cushion.
- Remove the seat back mounting bolts.
- Lift the seat back upward and remove the seat.
- Remove the shock upper mounting nuts.
- Remove the shock lower mounting bolt and remove the assembly from the vehicle.
To install:
- Position the shock assembly so that the lower mounting bolt can be installed
and lightly tightened.
- Use a jack to raise or lower the lower control arm, so that the top shock
plate studs align through the body. Raise the jack to hold the shock assembly
in position.
- Install the top plate nuts on the studs and tighten the mounting nuts to
32 ft. lbs. (44 Nm).
- With the vehicle on the ground, tighten the lower mounting bolt to 71 ft.
lbs. (98 Nm).
- Install the rear seat back and cushion.
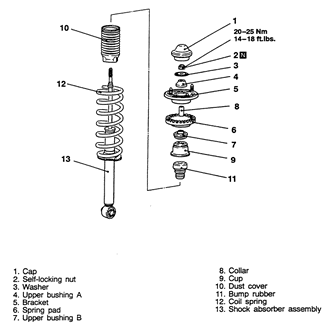
| Fig. 3: Exploded view of the rear shock absorber
assembly — Galant and Mirage
|
- Remove the trunk interior trim to gain access to the top mounting nuts.
- Remove the top cap and upper shock mounting nuts.
- Raise and support vehicle chassis.
- Support the trailing arm assembly with a jack.
- Matchmark the upper spring plate to the vehicle chassis for reassembly and
remove the upper spring plate mounting nuts.
- Remove the strut lower mounting bolt and remove the assembly from the vehicle.
To install
- Position the strut assembly so that the lower mounting bolt can be installed
and lightly tightened.
- Use a jack to raise or lower the axle assembly so that the top shock plate
studs aligns through body. Raise the jack to hold the strut assembly in position.
- Install the top plate nuts and tighten them to 20 ft. lbs. (27 Nm).
- Lower the vehicle and tighten the lower mounting bolt to 65 ft. lbs. (90
Nm).
- Install the top cap and interior trim.
