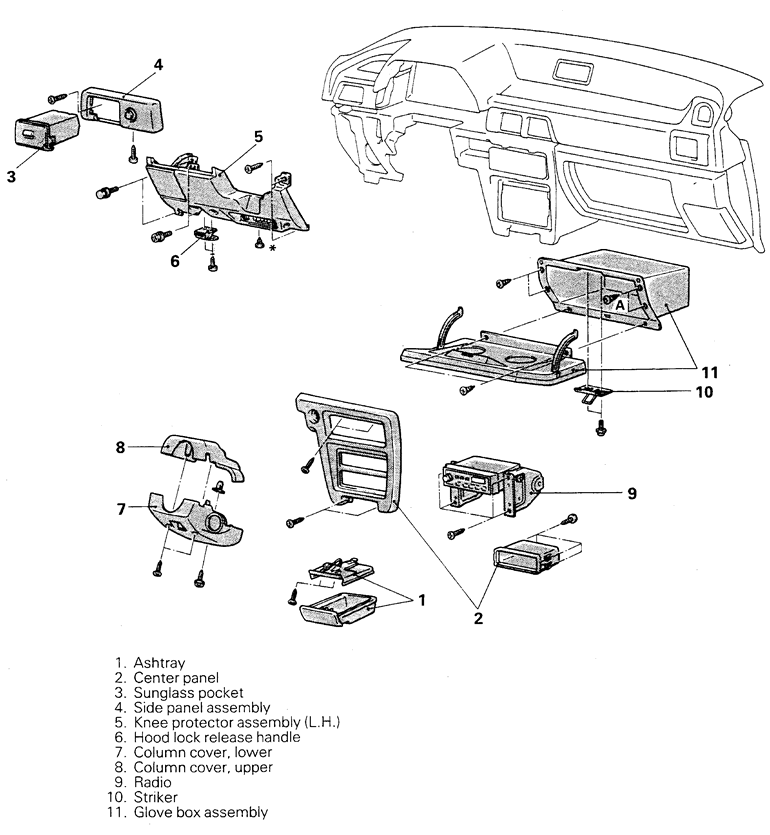
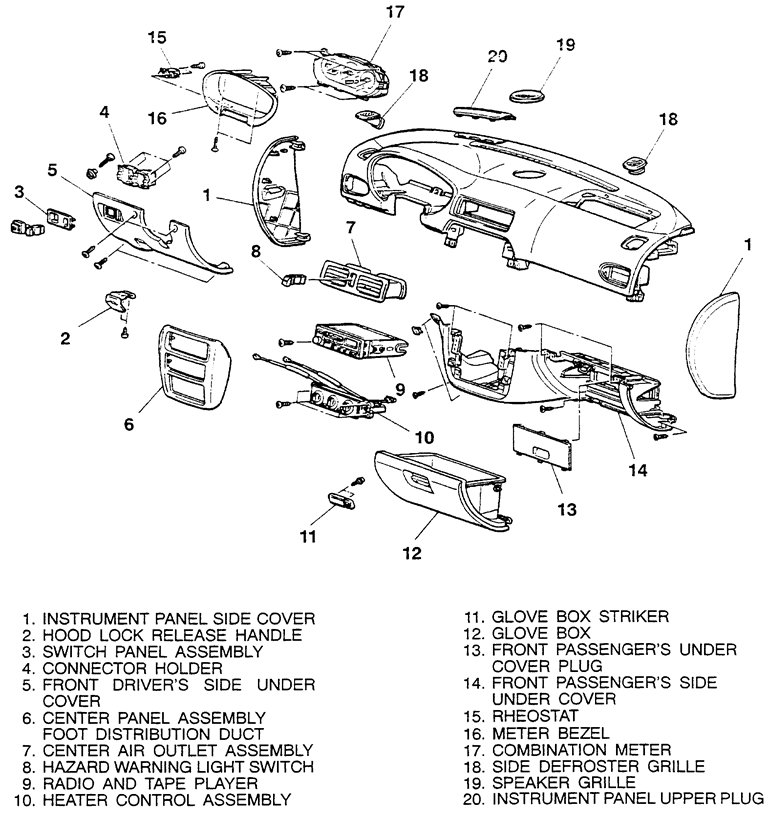
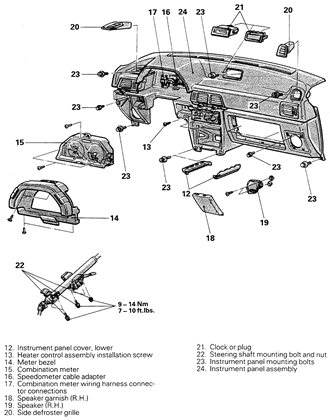
| Fig. 1: Exploded view of the instrument panel (1 of 2) — 1990–92
Mirage
|
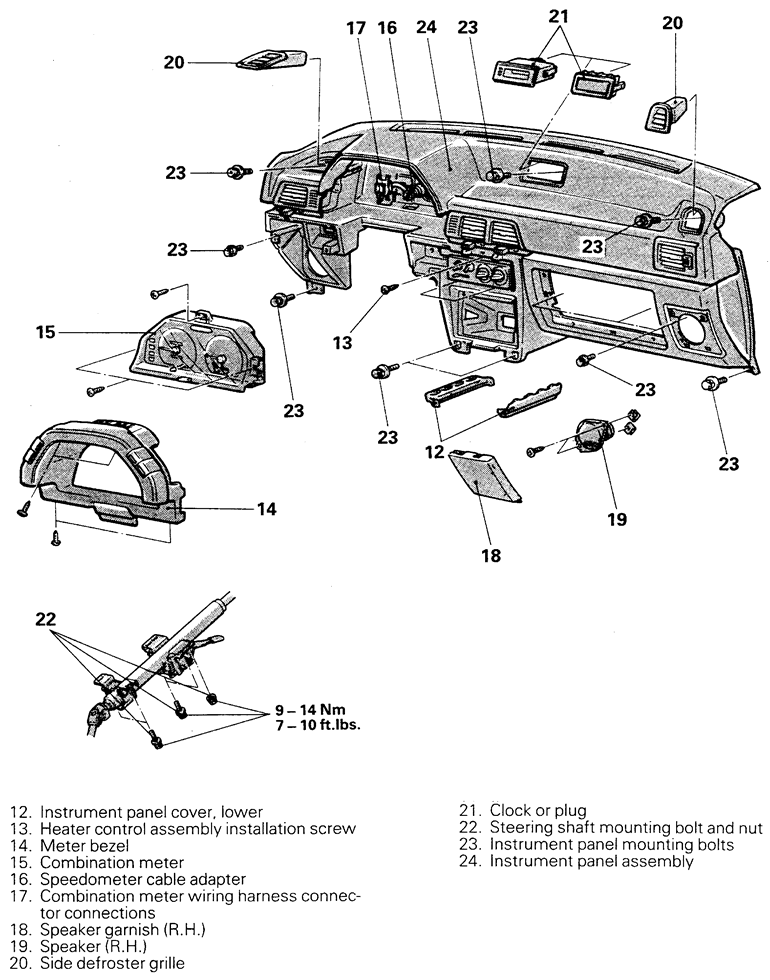
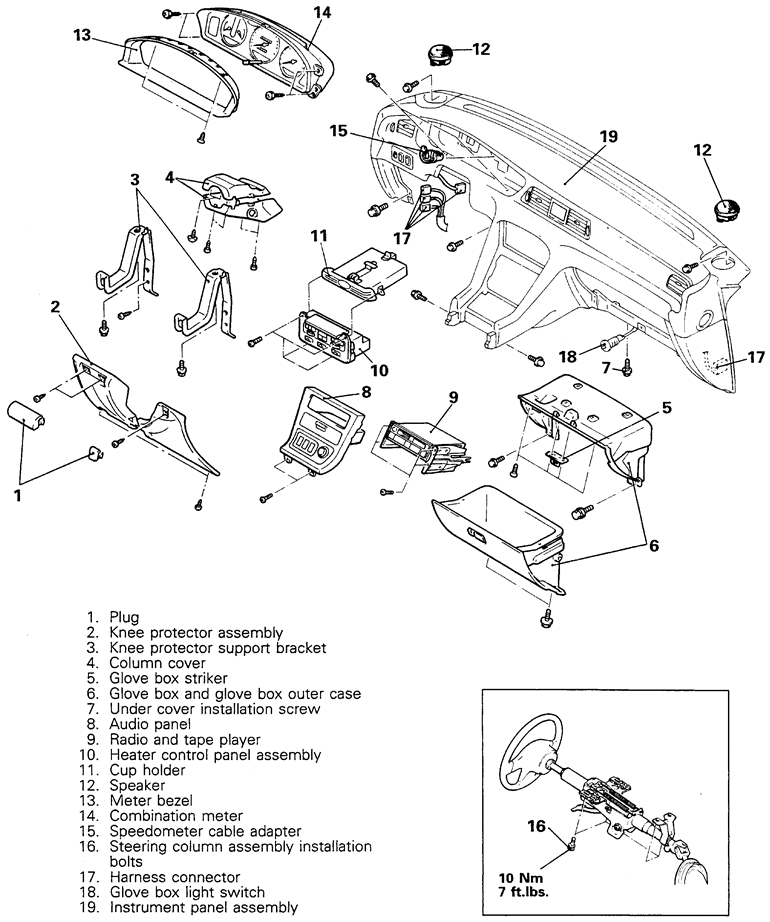
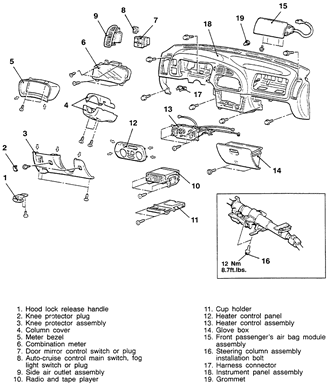
| Fig. 2: Exploded view of the instrument panel (2 of 2) — 1990–92
Mirage
|
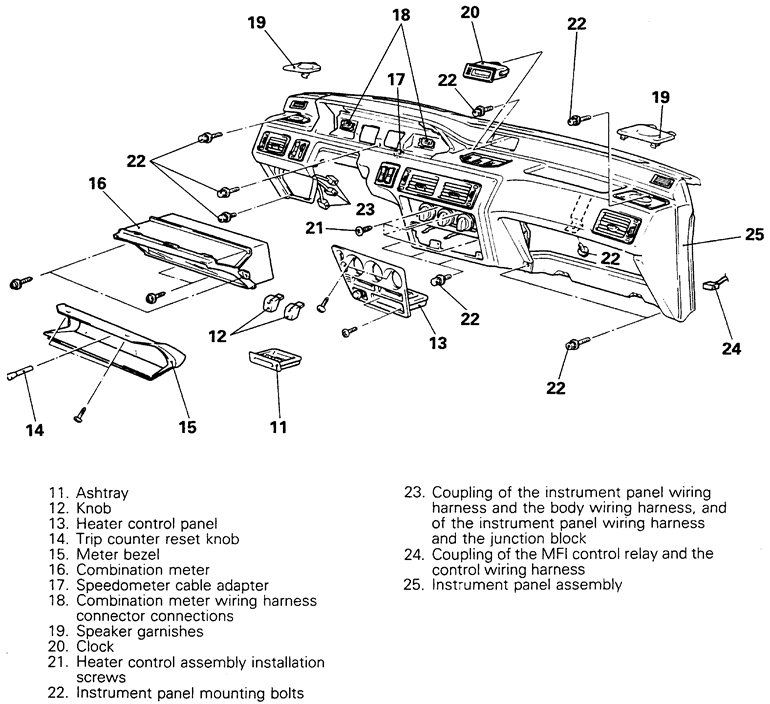
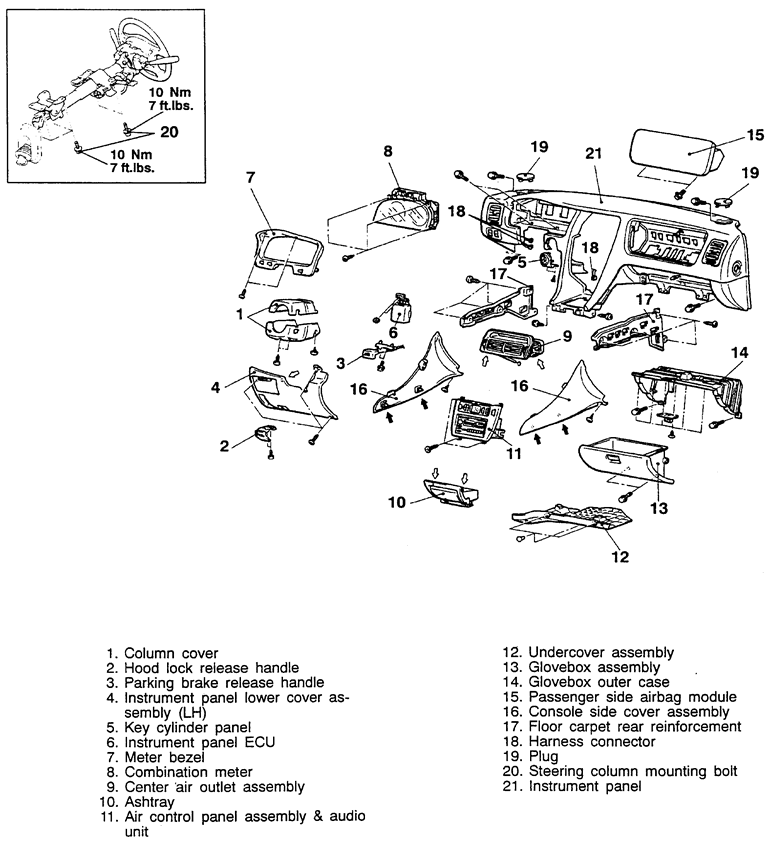
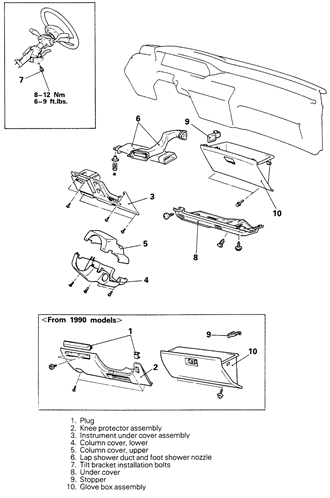
| Fig. 3: Exploded view of the instrument panel — 1993–94
Mirage shown, 1995–95 similar

|
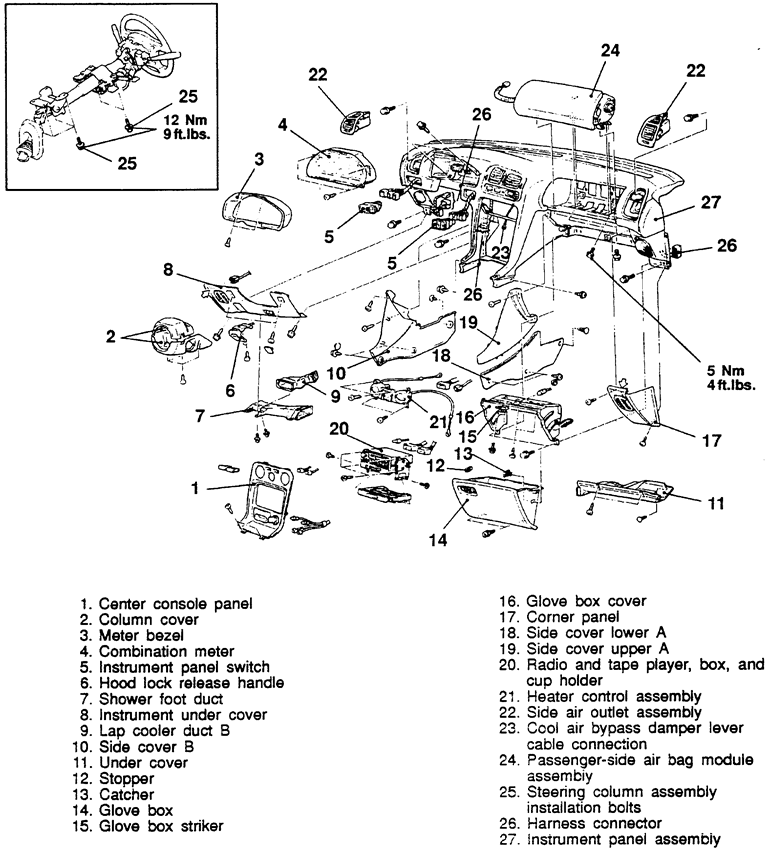
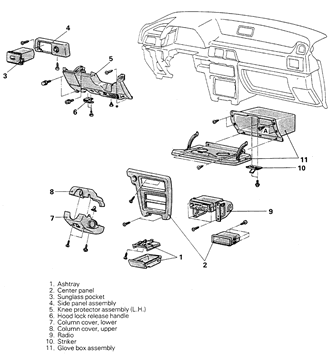
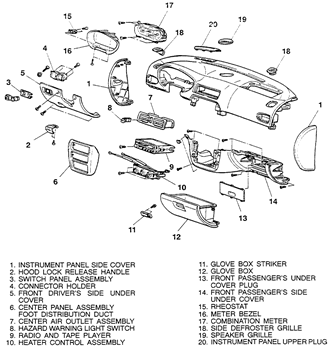
| Fig. 4: Exploded view of the instrument panel — 1997–00
Mirage
|
| Fig. 5: Exploded view of the instrument panel (1 of 2) — 1990–93
Galant
|
| Fig. 6: Exploded view of the instrument panel (2 of 2) — 1990–93
Galant

|
| Fig. 7: Exploded view of the instrument panel — 1994–98
Galant

|
| Fig. 8: Exploded view of the instrument panel (1 of 2) — 1999–00
Galant
|
| Fig. 9: Exploded view of the instrument panel (2 of 2) — 1999–00
Galant
|
| Fig. 10: Exploded view of the instrument panel — 1992–93
Diamante shown, 1994–96 similar

|
| Fig. 11: Exploded view of the instrument panel — 1997–00
Diamante

|
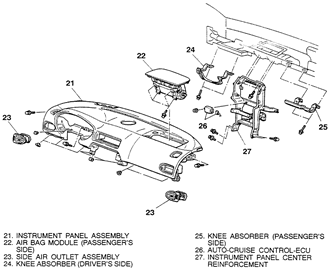
For installation of the instrument panel, different types of fasteners were
used. During installation, it is important that these fasteners are installed
in their original locations. To aid in this, the specific fasteners and their
positions are referenced by letters in the exploded views of the instrument
panel which follow.
- Disconnect the negative battery cable.
- Remove the floor console(s).
- Remove the plugs and the screws from the knee protector assembly. Remove
the assembly from the vehicle.
- Remove the retainer and the hood lock release handle from the vehicle.
- Remove the steering column upper and lower covers.
- Unfasten the retaining screws, then remove the combination meter (instrument
cluster) bezel. Detach the harness connectors as required.
- Remove the mounting screws, then remove the combination meter (instrument
cluster). On some models it is necessary to pull the meter out slightly and
detach the electrical connections from the rear of the combination meter.
- If equipped, disconnect the speedometer cable from the combination meter
as follows:
- Detach the speedometer cable from the transaxle assembly.
- Pull the speedometer cable slightly toward the vehicle interior.
- Release the cable lock by turning the adapter to the left or right,
and then remove the adapter.
- Remove the radio trim plate.
- Remove the radio retainers and the radio from the console. Disconnect the
electrical harness and the antenna lead from the radio and remove it from
the vehicle.
- Remove the center air outlet assembly.
- If equipped, remove the screw retainers from each dial knob on the center
cluster. Gently pull the dial knobs from the center cluster panel assembly.
- Remove the glove compartment by pushing the stoppers toward the rear of
the vehicle to unlock them, then remove the glove compartment assembly.
- Remove the right and left speaker covers. Disconnect and remove the speakers
from the instrument panel assembly.
- Remove the heater control assembly retaining screws and detach the harness
connectors and cables. Remove the heater control assembly from the vehicle.
- Remove any necessary ducts taking note of their orientation.
- Remove the steering shaft mounting bolts and allow the steering wheel to
rest on the front seat cushion. Make sure no harness wires or connections
are being pulled or stretched.
- Remove the instrument panel retaining bolts, label and detach all electrical
harness connectors.
- Remove the instrument panel from the vehicle. Disassemble components as
required.
- Install the instrument panel into the vehicle, reattach all harness connections
and install retaining bolts. Before installing bolts, make sure the electrical
harness wires were not pinched during instrument panel installation.
- The installation is the reverse of removal.