Previous Next

Oil Pan

REMOVAL & INSTALLATION

3000GT
  1. Before servicing the vehicle, refer to the precautions in the beginning of this section.
  2. Remove or disconnect the following:
  3. Separate and remove the engine oil pan.

    To install:

  4. Thoroughly clean the oil pan, cylinder block bolts and bolt holes.
  5. Apply a thin bead of sealer around the surface of the oil pan.
  6. Assemble the oil pan to the cylinder block within 15 minutes after applying the sealant.
  7. Install the oil pan mounting bolts and tighten to 48–72 inch lbs. (6–8 Nm).
  8. Fill the engine with the proper amount of oil.
  9. Connect the negative battery cable and check for leaks.
Diamante
3.0L ENGINES
  1. Before servicing the vehicle, refer to the precautions in the beginning of this section.
  2. Remove or disconnect the following:

    To install:

  3. Apply a 0.16 in. (4mm) continuous bead of sealer around the surface of the oil pan.

    NOTE: Assemble the oil pan to the cylinder block within 15 minutes after applying the sealant.

  4. Install the oil pan mounting bolts. Following proper sequence, tighten mounting bolts to 48 inch lbs. (6 Nm).

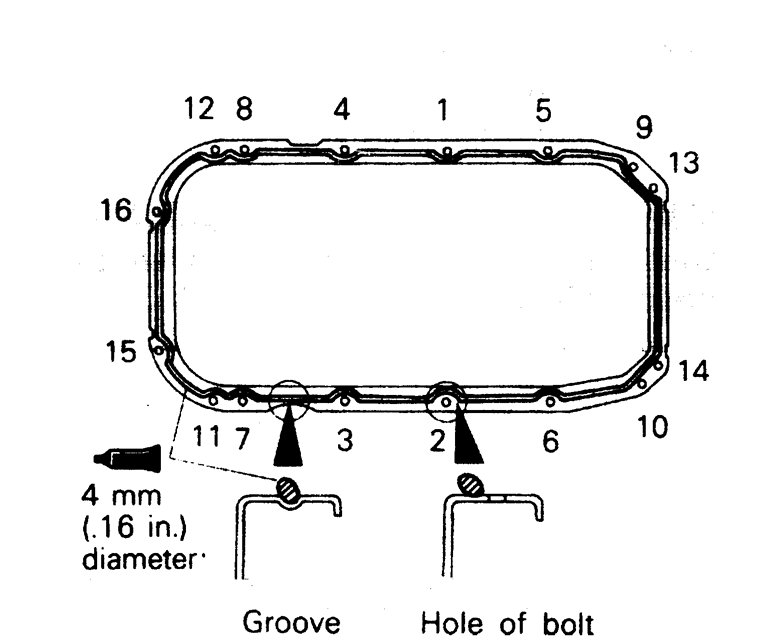
    Fig. 1: Oil pan bolt tightening sequence and application of sealant to the pan — Diamante 3.0L (J- and H-) engines

  5. Install or connect the following:
  6. Fill the engine with the proper amount of oil.
  7. Connect the negative battery cable and check for leaks.
3.5L ENGINE
  1. Before servicing the vehicle, refer to the precautions in the beginning of this section.
  2. Disconnect the negative battery cable.
  3. Drain the engine oil.
  4. Remove the mounting bolts from the lower oil pan.
  5. Place a block of wood against the side of the pan and tap the block with a hammer to break the seal and remove the lower pan.
  6. Remove or disconnect the following:

    WARNING
    Do not pry or use seal breaker tool to remove the oil pan. Damage to the aluminum surface can result.

  7. Screw a bolt into the threaded hole to force the oil pan from the engine block and remove the pan.
  8. Remove the bolt used to remove the pan.

    Fig. 2: Install a bolt in the threaded hole to force the oil pan from the engine block — 3.5L engine

    To install:

  9. Clean and degrease the sealing surfaces of the upper oil pan and engine block.
  10. Apply a bead of silicone sealant along the mounting surface of the upper oil pan.

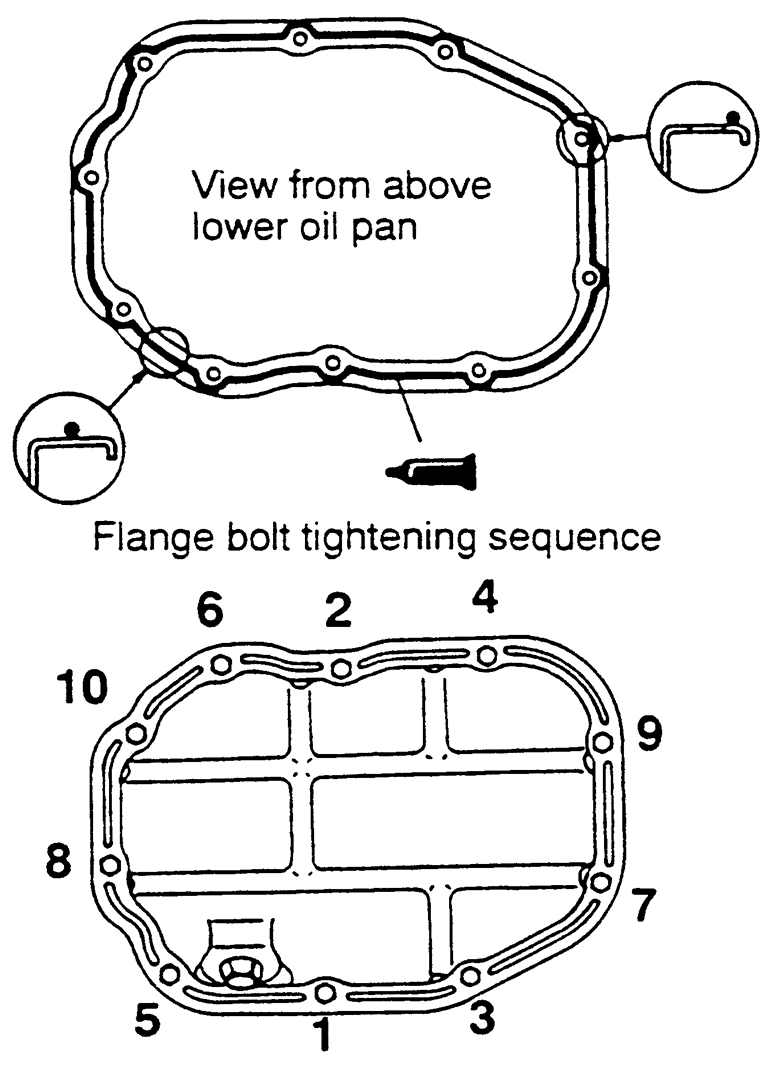
    Fig. 3: Apply sealant and tighten the bolts in the order shown — 3.5L engine, upper oil pan

  11. Install or connect the following:
  12. Clean and degrease the sealing surface of the lower oil pan.
  13. Place a bead of sealant on the mounting surface of the lower oil pan. Install the lower pan. Tighten the bolts in sequence to 84–108 inch lbs. (10–12 Nm).

    Fig. 4: Apply sealant and tighten the bolts in the order shown — 3.5L engine, lower oil pan

  14. Install the drain plug using a new washer. Tighten the drain plug to 29 ft. lbs. (39 Nm).
  15. Lower the vehicle and fill the crankcase to the correct level.
  16. Connect the negative battery cable.
  17. Start the engine and check for leaks.
Eclipse
2.0L (4G63) ENGINE
  1. Before servicing the vehicle, refer to the precautions in the beginning of this section.
  2. Disconnect the negative battery cable.
  3. Safely raise and support the vehicle.
  4. Remove or disconnect the following:
  5. Drain the engine oil.
  6. Remove or disconnect the following:
  7. Tap between the oil pan and the engine block to break the seal and remove the oil pan.

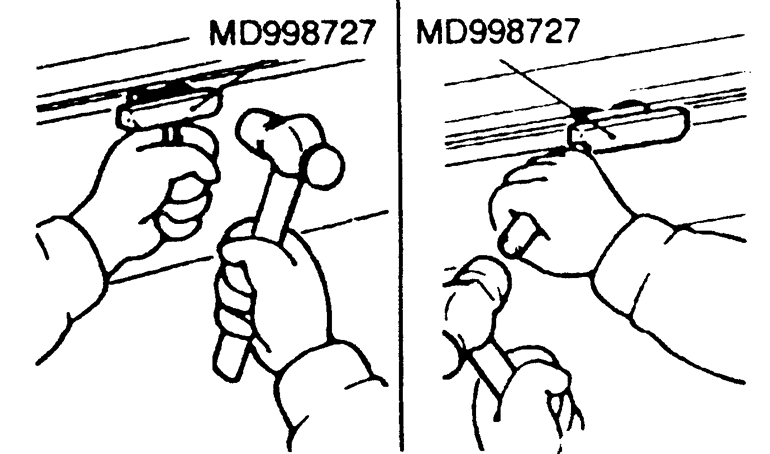
    Fig. 5: Using the special tool MB998727 to remove the oil pan — Eclipse 2.0L (4G63) engine

    To install:

  8. Clean the sealing surface on the oil pan and engine block. Apply a continuous bead of sealant to the oil pan.
  9. Clean the oil pan mounting bolt holes in the oil seal case.
  10. Install the oil pan. Torque the mounting bolts to 60 inch lbs. (6.9 Nm).
  11. Use a new gasket and connect the oil return pipe to the oil pan.
  12. Install or connect the following:
  13. Lower the vehicle and fill the crankcase to the correct level.
  14. Connect the negative battery cable.
  15. Start the engine and check for leaks.
2.0L (420A) ENGINE
  1. Before servicing the vehicle, refer to the precautions in the beginning of this section.
  2. Disconnect the negative battery cable.
  3. Drain the engine oil.
  4. Remove or disconnect the following:

    To install:

  5. Apply sealant at the point where the engine block meets the oil pump.
  6. Use a new gasket and install the oil pan. Torque the mounting bolts to 105 inch lbs. (12 Nm).
  7. Install or connect the following:
  8. Refill the crankcase with oil to the proper level.
  9. Connect the negative battery cable.
  10. Start the engine and check for leaks.
2.4L (4G64) ENGINE
  1. Before servicing the vehicle, refer to the precautions in the beginning of this section.
  2. Remove the negative battery cable.
  3. Drain the engine oil.
  4. Remove or disconnect the following:
  5. Remove the oil pan assembly.

    To install:

  6. Clean the sealing surface on the oil pan and engine block. Apply a continuous bead of sealant to the oil pan.
  7. Install or connect the following:
  8. Refill the engine with oil. Connect the negative battery cable. Start the engine and check for leaks.
Galant
  1. Before servicing the vehicle, refer to the precautions in the beginning of this section.
  2. Remove or disconnect the following:
  3. Tap in between the engine block and the oil pan.

    NOTE: Do not use a pry tool when removing the oil pan. Damage to engine components may occur.

    To install:

  4. Apply sealant around the gasket surfaces of the oil pan.
  5. Install or connect the following:
  6. Fill the crankcase to the proper level.
  7. Connect the negative battery cable. Start the engine and check for leaks.
Mirage
1.5L (4G15) ENGINE

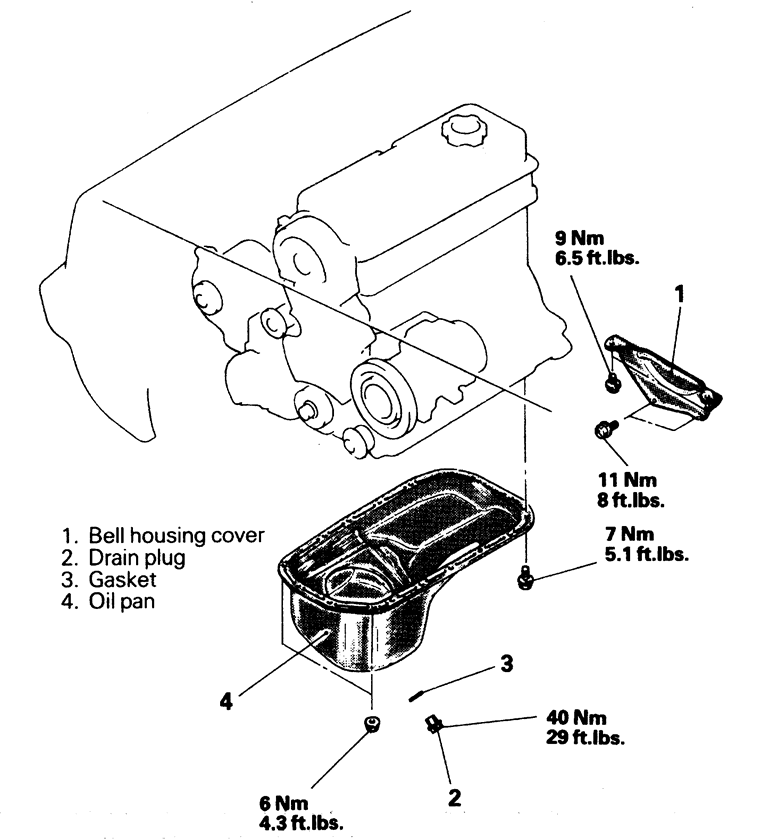
Fig. 6: Oil pan and related components — Mirage 1.5L (4G15) engine

  1. Before servicing the vehicle, refer to the precautions in the beginning of this section.
  2. Disconnect the negative battery cable.
  3. Drain the engine oil.
  4. Remove or disconnect the following:

    NOTE: Do not use a pry tool when removing the oil pan.

    To install:

  5. Clean all gasket surfaces of the cylinder block and the oil pan.
  6. Apply sealant to the gasket surfaces of the oil pan.
  7. Install or connect the following:
  8. Lower the vehicle and fill the crankcase to the proper level with clean engine oil.
  9. Connect the negative battery cable. Start the engine and check for leaks.
1.8L (4G93) ENGINE
  1. Before servicing the vehicle, refer to the precautions in the beginning of this section.
  2. Disconnect the negative battery cable.
  3. Raise the vehicle and support safely.
  4. Remove or disconnect the following:

    NOTE: Do not use a pry tool when removing the oil pan.

    To install:

  5. Clean all gasket surfaces of the cylinder block and the oil pan.
  6. Apply sealant around the gasket surfaces of the oil pan.
  7. Install or connect the following:
  8. Fill the crankcase to the proper level.
  9. Connect the negative battery cable. Start the engine and check for leaks.

Previous Next