- Before servicing the vehicle, refer to the precautions in the beginning
of this section.
- Disconnect the negative battery cable.
- Raise the vehicle and support safely allowing wheels and suspension to hang
freely.
- Remove or disconnect the following:
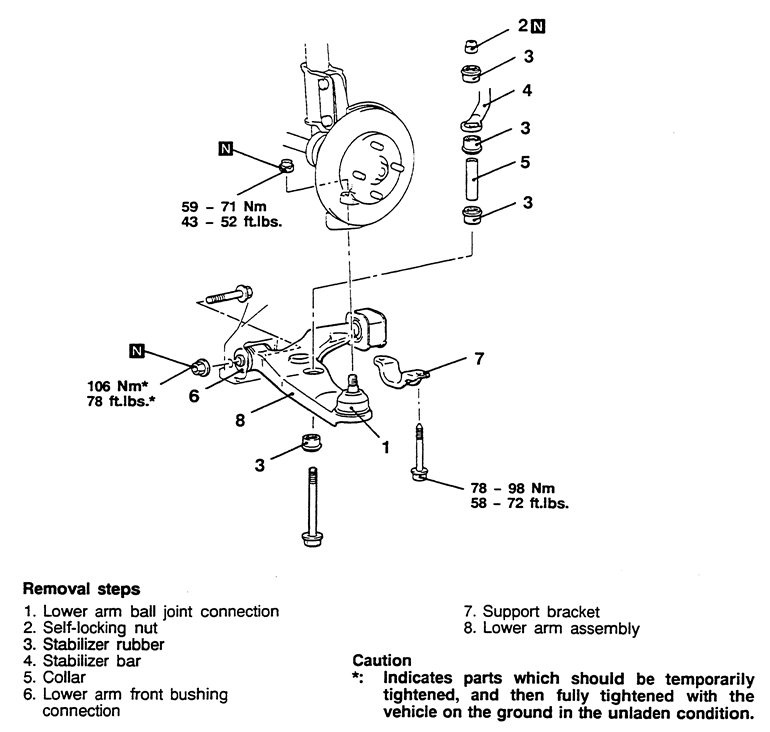
- Sway bar links from the lower control arm
- Ball joint stud from the steering knuckle
| Fig. 1: Exploded view of the lower control arm
removal procedure — 3000GT shown, Diamante is
similar
|
- Remove or disconnect the following:
- Inner mounting frame through-bolt and nut
- Rear mount bolts. Remove the clamp if equipped
- Rear rod bushing if servicing
To install:
- Assemble the control arm and bushing.
- Install or connect the following:
- Control arm to the vehicle and install the through-bolt. Replace the
nut and snug temporarily.
- Rear mount clamp, bolts and replacement nuts. Torque the bolts to 72–87
ft. lbs. (100–120 Nm). Torque the nuts to 29 ft. lbs. (40 Nm).
- Ball joint stud to the knuckle
- New nut and tighten to 43–52 ft. lbs. (60–72 Nm)
- Sway bar and links
- Lower the vehicle to the floor for the final tightening of the frame mount
through-bolt.
- Once the full weight of the vehicle is on the floor, tighten the frame mount
through-bolt nuts to 75–90 ft. lbs. (102–122 Nm).
- Connect the negative battery cable.
- Check the wheel alignment and adjust if necessary.
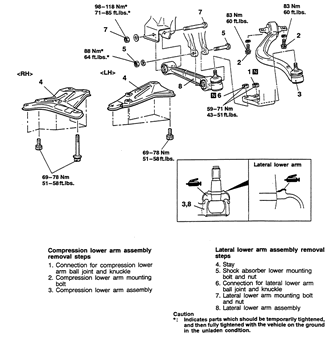
The lower lateral arm ball joint and the compression arm ball joint are integral
components of the lateral arm and the compression arm respectively. If the ball
joints are to be serviced, the arms must be replaced.
- Before servicing the vehicle, refer to the precautions in the beginning
of this section.
- Raise and support the vehicle safely.
- Disconnect both ball joint studs from the steering knuckle.
- To remove the lower lateral arm, remove the crossmember brackets.
- Remove or disconnect the following:
- Inner lateral arm mounting bolts and nut
- Arm from the vehicle
- 2 bolts holding the compression arm
- Compression arm
To install:
- Assemble the control arms and bushings.
- Install or connect the following:
- Lateral control arm to the vehicle and install the inner mounting bolts.
Install a new nut and snug temporarily.
- Compression arm to the vehicle
- Ball joint studs to the knuckle
- New nuts and tighten to 43–51 ft. lbs. (59–71 Nm)
- Lower the vehicle to the floor for the final tightening.
- Once the full weight of the vehicle is on the suspension, tighten the lateral
arm rear bolt to 71–85 ft. lbs. (98–118 Nm) and the front bolt
to the damper fork to 64 ft. lbs. (88 Nm).
- Torque the bolts for the compression arm to 60 ft. lbs. (83 Nm).
- Reinstall the crossmember brackets with their mounting bolts. Torque the
mounting bolts to 51–58 ft. lbs. (69–78 Nm).
- Perform an alignment on the vehicle.
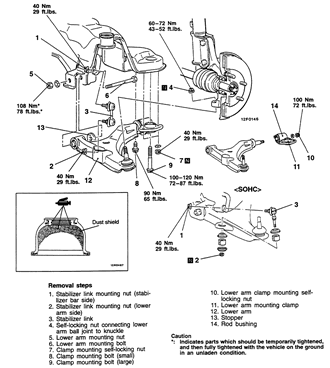
| Fig. 2: Exploded view of the lower control arms — Eclipse
and Galant
|
NOTE: The suspension components should not be tightened until
the vehicle's weight is resting on its wheels.
- Before servicing the vehicle, refer to the precautions in the beginning
of this section.
- Raise the vehicle and support safely.
- Remove or disconnect the following:
- Wheel and tire assembly
- Sway bar links or mounting nuts and bolts from lower control arm. Remove
the joint cups and bushings.
- Ball joint stud from the steering knuckle
- Inner lower arm mounting bolt and nut
- Rear mount bolts from the retaining clamp. Remove the rear retainer
clamp if equipped.
- Arm from the vehicle
To install:
- Install or connect the following:
- Control arm to the vehicle and install the inner mounting bolt. Install
new nut and tighten to 78 ft. lbs. (108 Nm).
- Rear mount clamp and bolts. Torque the clamp mounting bolts to 65 ft.
lbs. (90 Nm).
- Ball joint stud to the knuckle. Install a new nut and tighten to 43–52
ft. lbs. (60–72 Nm).
- Sway bar and links
- Lower the vehicle to the floor for the final tightening of the inner frame
mount bolt.
- Install the wheel and tire assembly.
| Fig. 3: Lower control arm assembly and related components — Mirage

|