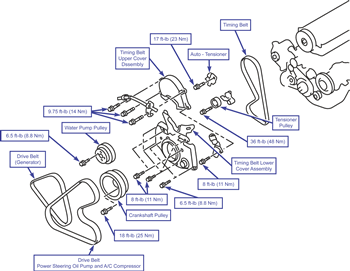
| Timing belt (2.4L)
|
To Remove:
- Remove the engine mount bracket.
- Remove the drive belt (power steering oil pump and A/C compressor).
- Remove the drive belt (generator).
- Remove the water pump pulley.
- Remove the crankshaft pulley.
- Remove the timing belt upper cover assembly.
- Remove the timing belt lower cover assembly.
CAUTION
The crankshaft should ONLY ever be turned in the forward direction.
- When removing the timing belt, do the following:
- Remove the tensioner pulley.
- Remove the auto tensioner.
To Install:
| Timing belt (2.4L)
|
CAUTION
Never compress the pushrod too quickly because damage may occur.
- To install the auto-tensioner, do the following:
| Auto-tensioner

|
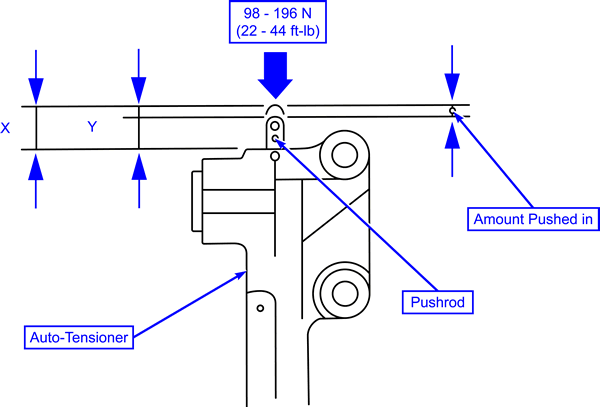
- Step 1: Apply 22-44 lb (98-196 N) of force to the pushrod of the auto-tensioner by pressing it against a metal object (like the engine block) then measure the movement of the pushrod. Standard value: Within 0.04 in (1 mm).
- X = Length when auto-tensioner is not pressed
- Y = Length when auto-tensioner is pressed
- X Y = Movement
- Install the tensioner pulley.
- To install the timing belt, do the following:
CAUTION
Do not use a wrench or other tool to turn the adjusting screw (special tool #MD998738) because the auto-tensioner set pin might break. Only turn the adjusting screw (special tool #MD998738) by hand.
- When adjusting the timing belt tension, do the following:
- Install the timing belt lower cover assembly.
- Install the timing belt upper cover assembly.
- Install the crankshaft pulley.
- Install the water pump pulley.
- Install the generator drive belt.
- Install the drive belt for the power steering oil pump and A/C compressor.
- Install the engine mount bracket.
- Check the drive belt tension.
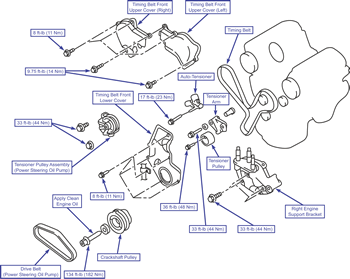
To Remove:
| Timing belt (3.0L)
|
- Remove the drive belt (power steering oil pump).
- To remove the crankshaft pulley, use an end yoke holder (special tool #MB990767) and a crankshaft pulley holder pin (special tool #MD998715) to remove the crankshaft pulley from the crankshaft.
- Remove the tensioner pulley assembly (power steering oil pump).
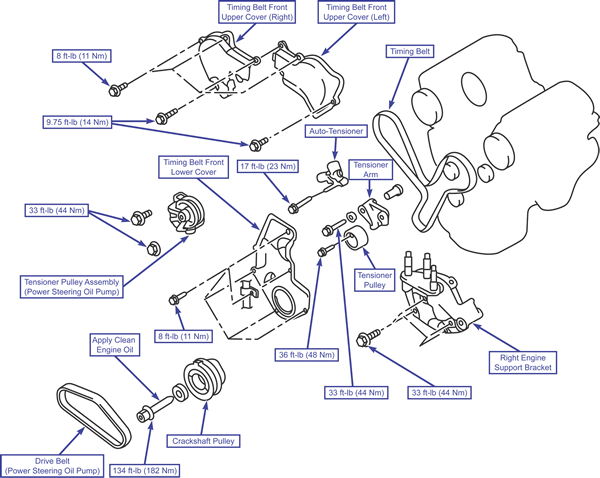
- Remove the timing belt front upper cover (right side).
- Remove the timing belt front upper cover (left side).
- Remove the timing belt front lower cover.
- Remove the engine support bracket (right side).
- When removing the timing belt, do the following:
- Step 1: Turn the crankshaft clockwise to line up each timing mark and to set the #1 cylinder to compression top dead center.
- Step 2: If the timing belt will be reused, use chalk to draw an arrow on the flat side of the belt showing the clockwise direction.
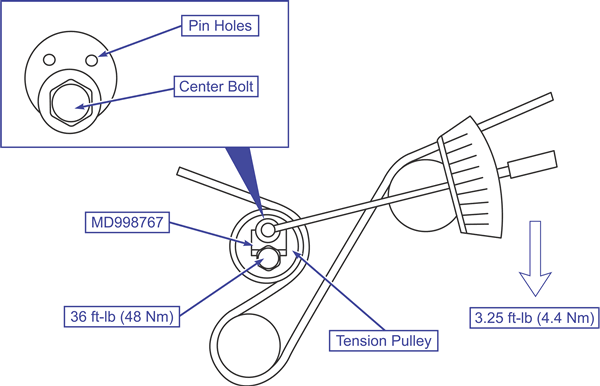
- Step 3: Loosen the center bolt from the tensioner pulley, then remove the timing belt.
- Remove the auto-tensioner.
- Remove the tensioner pulley.
- Remove the tensioner arm.
To Install:
| Timing belt (3.0L)
|
- Install the tensioner arm.
- Install the tensioner pulley.
- To install the auto-tensioner, do the following:
| Auto-tensioner
|
- Step 1: Apply 22-44 lb (98-196 N) of force to the pushrod of the auto-tensioner by pressing it against a metal object (like the engine block) then measure the movement of the pushrod. Standard value: Within 0.04 in (1 mm).
- X = Length when auto-tensioner is not pressed
- Y = Length when auto-tensioner is pressed
- X Y = Movement
- Step 2: If the measurement is outside the standard value, replace the auto-tensioner.
CAUTION
Put the auto-tensioner perpendicular to the jaws of the vice. If there is a plug at the base of the auto-tensioner, insert a plain washer onto the end of the auto-tensioner to protect the plug.
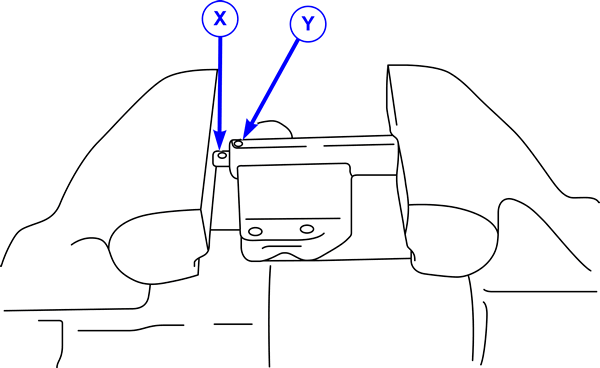
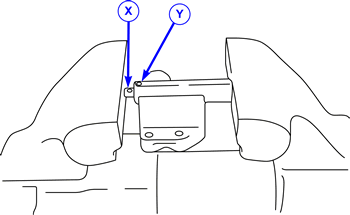
| Auto-tensioner pin hole alignment
|
- Step 3: Use a vise to carefully compress the auto-tensioner pushrod until pin hole X of the pushrod and pin hole Y of the tensioner cylinder are lined up.
- Step 4: Once the holes are aligned, insert the set pin.
NOTE: If you are replacing the auto-tensioner with a new part, the pin will be found in the auto-tensioner.
- Step 5: Install the auto-tensioner onto the engine.
- When installing the timing belt, do the following:
- Crankshaft sprocket
- Idler pulley
- Camshaft sprocket (left bank)
- Water pump pulley
- Camshaft sprocket (right bank)
- Tensioner pulley
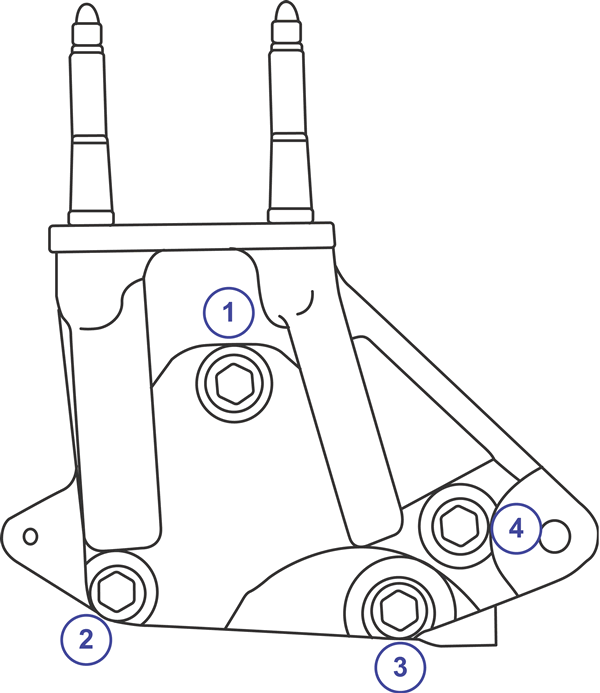
- When installing the right engine support bracket, tighten the right engine support bracket mounting bolts in the order shown.
| Right engine support bracket

|
- Remove the timing belt front lower cover.
- Remove the left timing belt front upper cover.
- Remove the right timing belt front upper cover.
- Remove the tensioner pulley assembly (power steering oil pump).
- To remove the crankshaft pulley, use an end yoke holder (special tool #MB990767) and a crankshaft pulley holder pin (special tool #MD998715) to install the crankshaft pulley.