NOTE: The following procedures are for the non-driven wheels
on 2wd vehicles only. Since all the wheels on 4wd vehicles are driven, periodic
greasing of the bearings is not necessary. For wheel bearing procedures on
4wd vehicles, please refer to Section 8.
The wheel bearings of the non-driven wheels on trucks, the front wheels on
2-wheel drive Pick-ups, should be repacked with Multipurpose Grease NLGI Grade
#2 E.P. or equivalent grease every 2 years or 30,000 miles (48,000 km). The
best way to accomplish this is to combine the repacking operation with brake
repairs. In other words, if brake linings require attention, always repack
the wheel bearings associated with the repair at the same time to avoid repeating
the operation at the specified interval. Of course, if brake linings last
longer than this interval, wheel bearings should be repacked as a discrete
operation.
Before handling the bearings, there are a few things that you should remember
to do and not to do.
Remember to DO the following:
- Remove all outside dirt from the housing before exposing the bearing.
- Treat a used bearing as gently as you would a new one.
- Work with clean tools in clean surroundings.
- Use clean, dry canvas gloves, or at least clean, dry hands.
- Clean solvents and flushing fluids are a must.
- Use clean paper when laying out the bearings to dry.
- Protect disassembled bearings from rust and dirt. Cover them with a clean
cloth or plastic bag.
- Use clean rags to wipe bearings.
- Keep the bearings in oil-proof paper or plastic when they are to be stored
or are not in use.
- Clean the inside of the housing before replacing the bearing.
Do NOT do the following:
- Do not work in dirty surroundings.
- Do not use dirty, chipped or damaged tools.
- Try not to work on wooden work benches or use wooden mallets.
- Don't handle bearings with dirty or moist hands.
- Do not use gasoline for cleaning; use a safe solvent.
- Do not spin-dry bearings with compressed air. They will be damaged.
- Do not spin dirty bearings.
- Avoid using cotton waste or dirty cloths to wipe bearings.
- Try not to scratch or nick bearing surfaces.
- Do not allow the bearing to come in contact with dirt or rust at any time.
NOTE: Wheel bearing service in this section covers only removal
and installation for the non-driven wheels (front wheels) on 2wd trucks and
Monteros. For more complete service procedures and 4-wheel drive, refer to
Section 8. Refer to that section before any work or adjustments are performed.
NOTE: To perform this procedure, you'll need three special
tools and access to a large press to insert the bearings. You will also need
bearing grease and a new cotter pin for each wheel assembly.
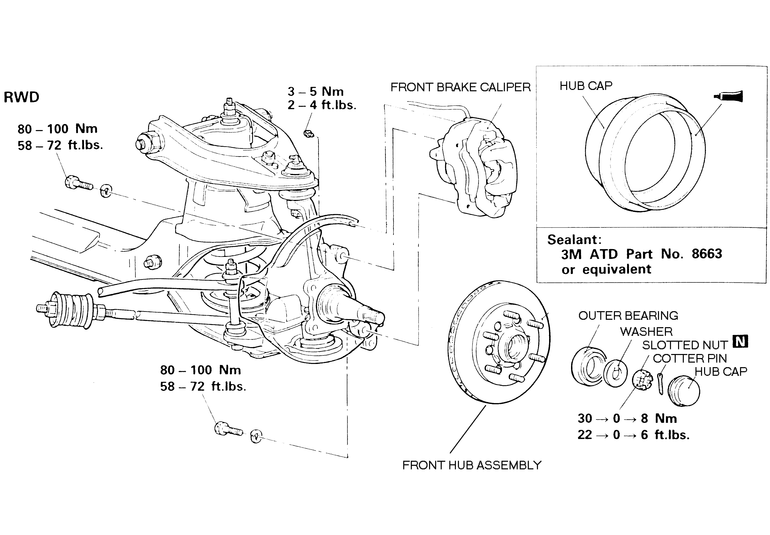
- Remove the hub and brake disc; separate the disc from the hub as described
in Section 9.
- Remove the oil seal and inner bearing. If the bearings are in good condition,
free of flats, gouges, scores etc., they may be cleaned, repacked and reused.
If the bearing must be replaced, the bearing races must also be replaced.
With a brass drift and hammer, knock out the outer races for both the inner
and outer bearings. In doing this, work from above and knock the bearing
out the bottom of the hub; then turn the hub over and repeat the process
for the other bearing.
- Use MB990938–01, or an equivalent driving handle, and, for the outer
bearing, MB990927–01 and, for the inner bearing, MB990931–01
or equivalent race driving tools. Press each bearing race in from the top
with the appropriate tool. The wider part of the race goes upward and the
contour of the race fits that of the special tool. Races must be pressed
in until the lower surface contacts the ridge in the hub designed to retain
them.
- Pack the bearing with grease meeting SAEJ310A NLGI grade #2 EP standards.
Use a liberal amount of grease and occasionally press the bearing into the
palm of your hand to make sure that the grease passes all the way through.
Also pack the inner contours of the hub and the hub cap with the grease.
- Press fit a new oil seal into the inner diameter of the hub with the MB990938–01
or equivalent and MB990931–01 or equivalent, but using the FLAT surface
against the outer surface of the seal, rather than the contoured surface
used to press in the inner bearing. The seal must end up flush with the
inner surface of the hub. Apply grease to the lip of the oil seal.
- Install the rotor to the hub and reinstall the hub to the steering knuckle.
Adjust the wheel bearings — refer to Knuckle and Spindle
removal and installation procedures in Section 8.
| Fig. 1: Exploded view of the front axle hub assembly
|