NOTE: Some vehicles may have an alternator cover that must
be removed before removing this assembly. On some of the 4-cylinder engines,
the A/C compressor assembly may have to be removed for working access.
- Turn ignition switch to OFF and disconnect both battery
cables.
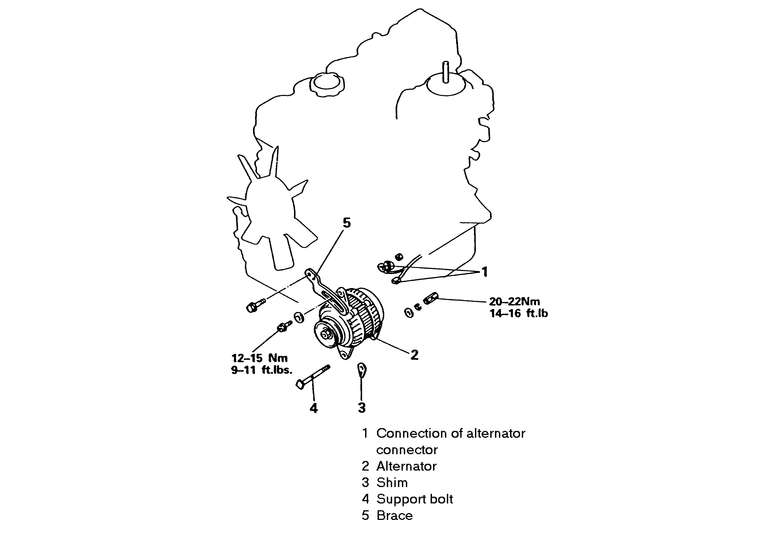
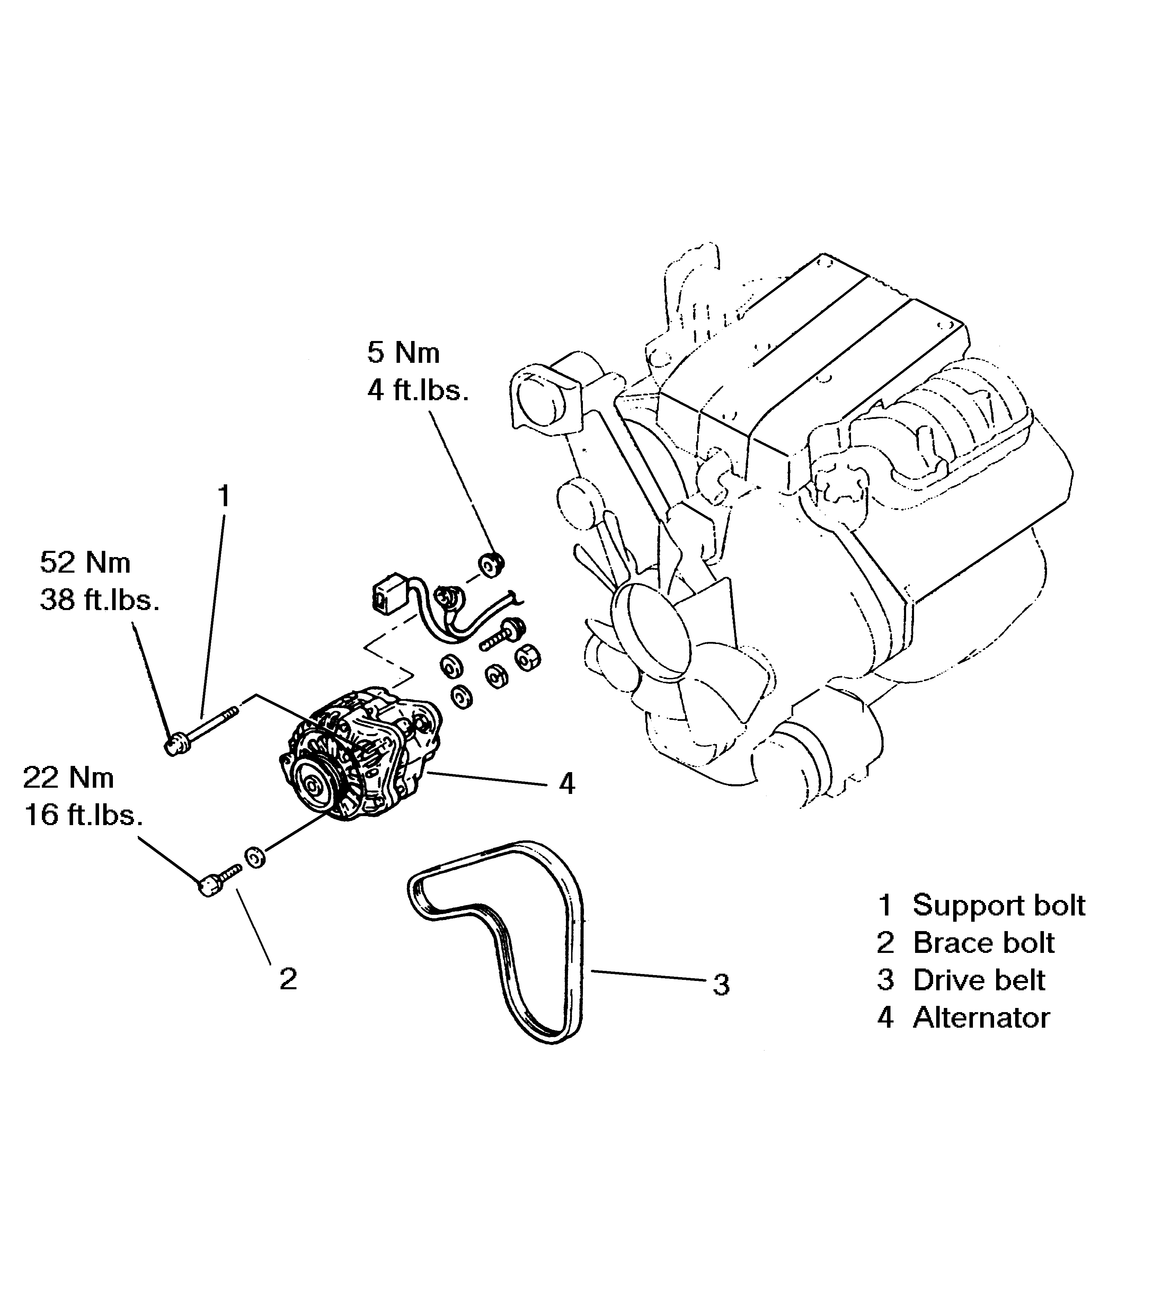
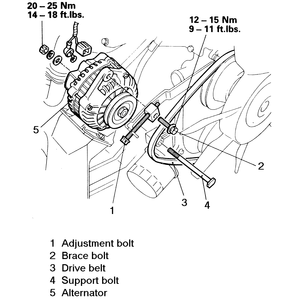
| Fig. 1: Alternator assembly — 2.0L
& 2.6L engines without A/C
|
- Loosen the support bolt and adjusting bolt, and then shift the alternator
toward the engine so belt tension is relaxed. Remove the belt. On some models
it will be necessary to loosen the power steering pump and belt and then remove
the pump from its brackets.
- Note locations of all connectors. Make a drawing, if necessary. Unplug electrical
connectors and unscrew fastening nuts for terminal type connectors. Clean
any dirty connections.
- Remove the adjusting bolt. Remove the nut from the rear of the mounting
bolt. Note that in the next step, shims located between the alternator and
the rear of the engine front cover may fall out. Retain these shims for re-use.
Supporting the alternator, slide the mounting bolt out and then remove the
unit from the vehicle.
NOTE: Some models may not be equipped with mounting shims.
To install:
- Position the assembly so that the mounting bolt can be inserted. If the
same alternator is being re-used, insert the shims between the rear of the
front cover and the rear hinge of the alternator body. Install the mounting
bolt. If the alternator is a different one, you'll have to measure the clearance
between the rear of the front cover and the section of alternator body that
fits against it. Pull the alternator forward and use a flat feeler gauge.
If the clearance exceeds 0.008 in. (0.2mm), insert shim(s) thick enough so
there is a slight friction fit and they will not fall out when you let go
of them. Put the shims between the front of the front cover and the rear of
the front hinge on the alternator body. Make sure you have installed shims
of adequate thickness (or that the clearance is within specification). Otherwise,
the alternator body may become damaged. Install the mounting bolt if it is
not already in place, and then install the mounting bolt nut loosely.
- Install the adjusting bolt, and then loosely install the nut at the rear
of it. Install the belt and tighten it as described in Section 1. Tighten
the adjusting bolt to 9–10 ft. lbs. (12–13 Nm) and the mounting
bolt and nut to 15–18 ft. lbs. (20–24 Nm).
- Reinstall the power steering pump and belt if it was removed. Adjust the
belt to the proper tension. Tighten the power steering pump bolts to 18 ft.
lbs. (24 Nm).
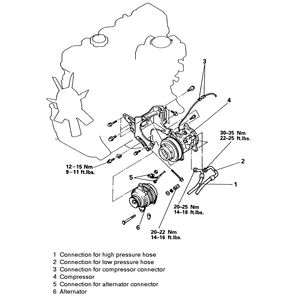
- Have the air conditioning system discharged by a trained and certified mechanic
using a recovery/recycling machine.
- Turn the ignition OFF and disconnect both battery cables.
CAUTION
Only perform the following procedure AFTER the system has been discharged
by a trained and certified mechanic. Doing otherwise may result in personal
harm, environmental damage and damage to the vehicle's components.
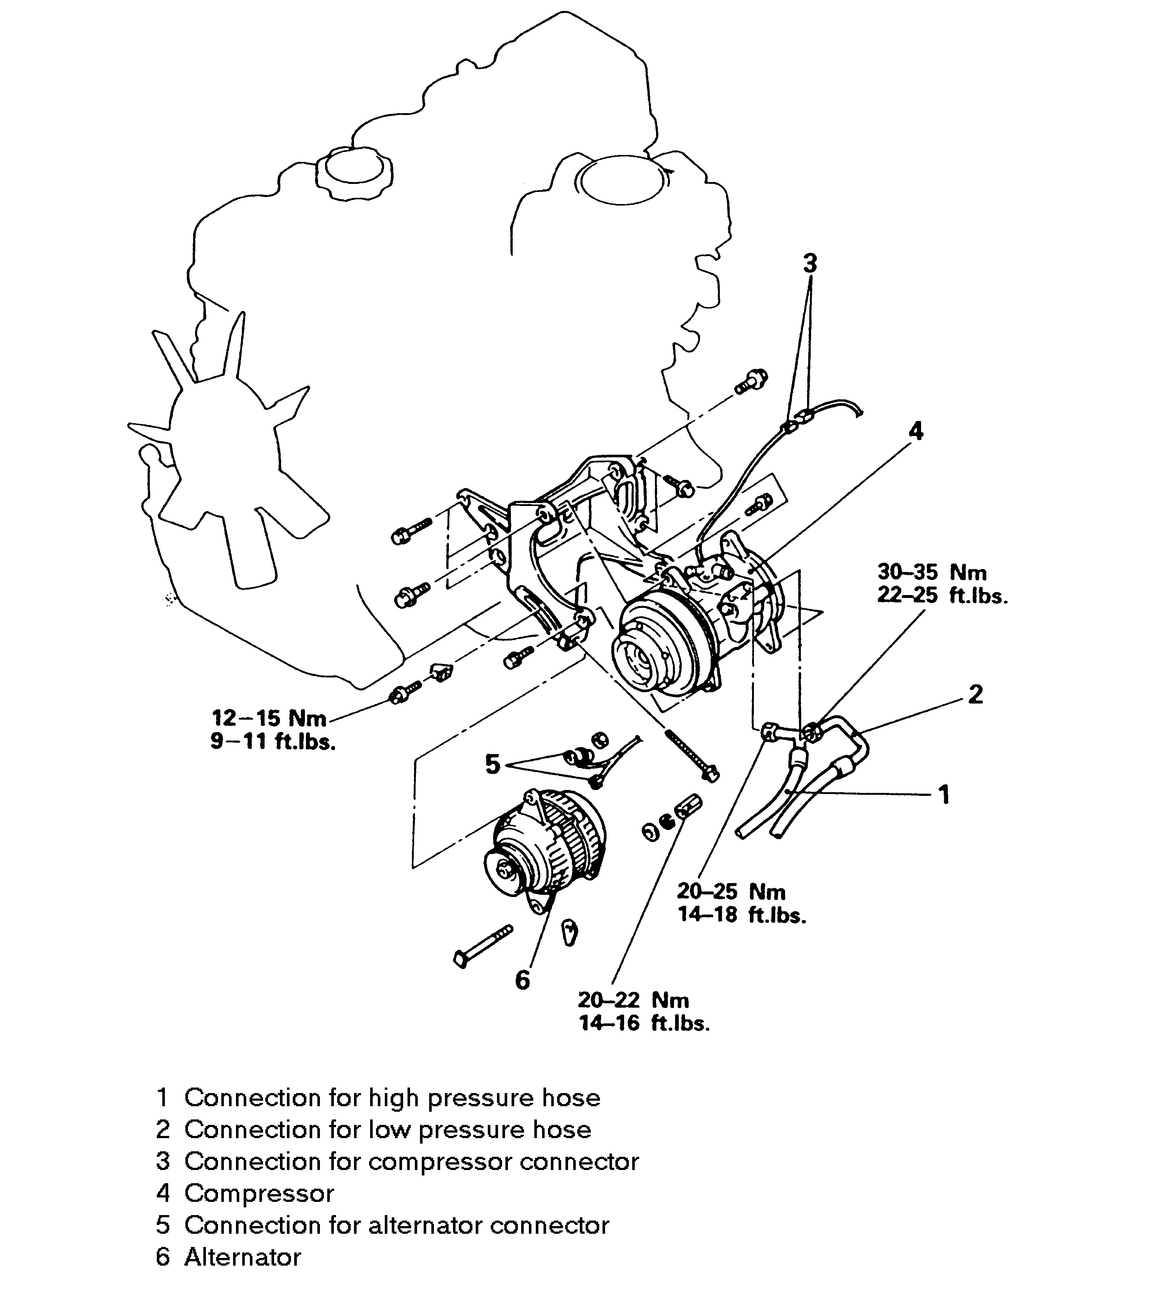
| Fig. 2: Alternator assembly — 2.0L
& 2.6L engines with A/C
|
- Disconnect and label the discharge hose from the compressor. Cap the compressor
port and plug the line immediately.
- Disconnect and label the suction hose from the compressor. Cap the compressor
port and plug the line immediately.
- Disconnect and label the wiring connector to the compressor.
- Loosen the belt tension adjuster, the lockbolt and the pivot bolt. Remove
the belt, the lockbolt and the pivot bolt from the compressor. Support the
compressor and remove it from the engine.
- Loosen the upper and lower alternator bolts, release the belt tension for
the alternator belt, pivot the alternator toward the engine and remove the
belt from the alternator.
- Label and disconnect the wiring connections at the back of the alternator.
- Remove the upper bolt. Remove the lower bolt while supporting the alternator.
Be prepared to catch the bolt shims, which will fall out when the bolt is
removed. Remove the alternator from its mount.
NOTE: Some models may not be equipped with mounting shims.
To install:
- Install the alternator in its original position and insert the lower support
bolt, but do not install the nut. Install the upper bolt just enough to hold
the bolt in place.
- Push the alternator forward (towards the front of the truck) and insert
shims between the front leg of the alternator and the front case (mount).
There should be enough shims to hold themselves in place when you let go.
The alternator should still be movable with light pressure.
- Tighten the upper and lower mounting bolts until they are finger-tight.
- Install the alternator belt and adjust it to the correct tension. For this
procedure, see Section 1. Tighten the upper mounting bolt to 10 ft. lbs. (13
Nm) and the lower mounting bolt to 16 ft. lbs. (28 Nm). Connect the wiring
to the alternator.
- Reinstall the compressor. Install the belt over the pulley (making sure
the belt is still correctly mounted on the other pulleys) and gently snug
the belt by moving the compressor on its mounts. As soon as there is a little
tension on the belt, tighten the compressor mounting bolts.
- Set the belt to its final tension by tightening the adjuster screw on the
compressor. Do not pry on the compressor to adjust the belt.
- Connect the compressor wiring harness.
- Remove the plugs and caps from the A/C fittings. Connect the suction hose
to its port on the compressor and then connect the discharge hose. Tighten
the fitting until finger-tight, making very certain they are clean and correctly
threaded. Tighten the suction hose to 24 ft. lbs. (32 Nm) and tighten the
discharge hose to 16 ft. lbs. (28 Nm).
- Reconnect the cables to the battery.
- Double check the drive belts for proper tension and adjust as necessary.
If a belt is replaced during this procedure, it will need to be rechecked
after 50–100 miles (80–160 km) of driving.
- Take the vehicle immediately back to the mechanic to have the A/C system
evacuated and recharged. The sooner this is done, the less chance of having
the system become contaminated.
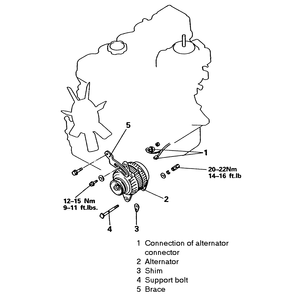
- Make certain the ignition switch is OFF and disconnect
the battery cables.
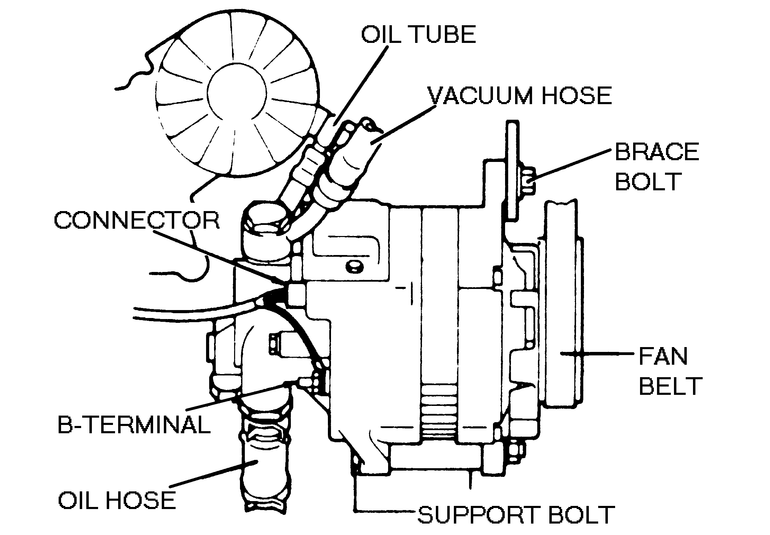
- Disconnect the cable from terminal B of the alternator.
| Fig. 3: Alternator assembly — diesel
engine
|
| Fig. 4: Remove the housing carefully
|
| Fig. 5: Always protect the shaft with tape
|
| Fig. 6: Correct installation of vanes
|
| Fig. 7: The housing must be pushed lightly in the
correct direction
|
| Fig. 8: Do not tighten the support bolt if clearance
A exceeds specifications. Damage to the alternator will result
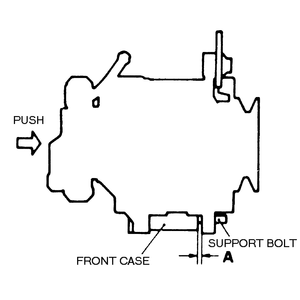
|
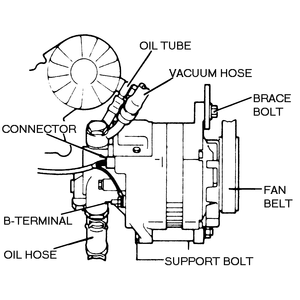
- Remove the electrical connector from the back of the alternator.
- Label and disconnect the oil hose, vacuum hose and return hose from the
vacuum pump. Due to difficult access, it is usually easier to disconnect the
oil return hose at the oil pan.
- Remove the brace bolt and the support bolt nut; loosen the alternator.
- Remove the drive belt from the alternator pulley.
- Support the alternator and pump. Pull out the through-bolt and extract the
unit from the vehicle.
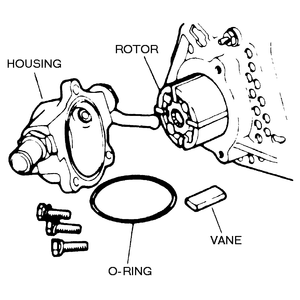
- Remove the vacuum housing bolts and then take out the housing.
- Remove the rotor and vane from the shaft. Use great care not to damage the
vanes or O-ring. Replace any piece showing signs of damage or wear.
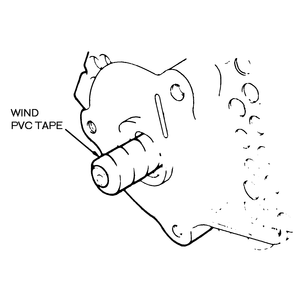
- Use a roll of black PVC (electrical) tape to wind around the shaft splines.
This prevents possible damage to the oil seal while the rotor assembly is
removed.
- At this point the alternator may be further disassembled, if desired.
To install:
- Coat the O-ring with a light coat of white grease to hold it in place. Make
certain it does not protrude from the groove.
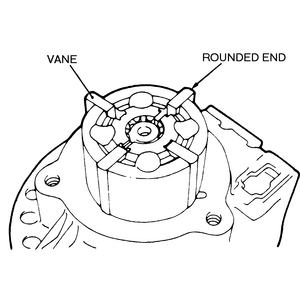
- Install the vane(s) with the rounded end outward. Never re-use a vane with
a damaged or chipped end. Remove the black tape from the splines just before
the shaft is inserted.
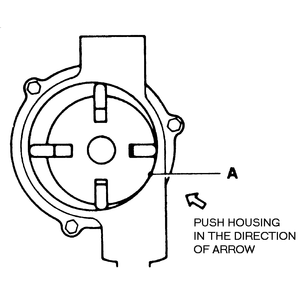
- Install the housing carefully. Gently push the housing in the direction
shown in the illustration, this minimizes clearance at critical points. The
performance of the pump is affected by the installation of the housing.
- Tighten the bolts evenly while keeping light pressure.
- If it is necessary to bench test the alternator after reassembly, make certain
the pump is properly lubricated before turning the alternator. Take great
care to insure the vacuum pump is never operated without lubrication.
- Install the oil return hose to the vacuum pump and install the alternator
in position. Once the unit is in place, it is impossible to attach the hose
properly. Insert the through–bolt from the rear.
- Install the drive belt onto the pulley; install the brace (upper) bolt.
- Push the alternator towards the front of the engine and check for proper
clearance between the alternator leg and the front case. If clearance is greater
than 0.008 in. (0.2mm) insert spacers to reduce clearance.
WARNING
If the support bolt is tightened without reducing the clearance, the alternator
leg may be broken off.
- Connect the oil delivery tube, the vacuum hose and the electrical connector.
- Connect the wiring to terminal B.
- Adjust the belt tension correctly.
- Connect the battery cables to their perspective terminals.
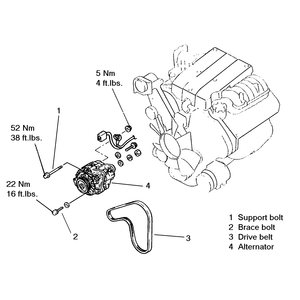
- Turn ignition switch OFF and disconnect both battery cables.
- Loosen the support bolt and the brace bolt, then loosen the adjusting bolt
to shift the alternator toward the engine so that belt tension is relaxed.
Remove the belt from the alternator pulley. If the alternator belt needs replacing
it will be necessary to loosen the power steering pump and belt and then remove
the pump from its brackets.
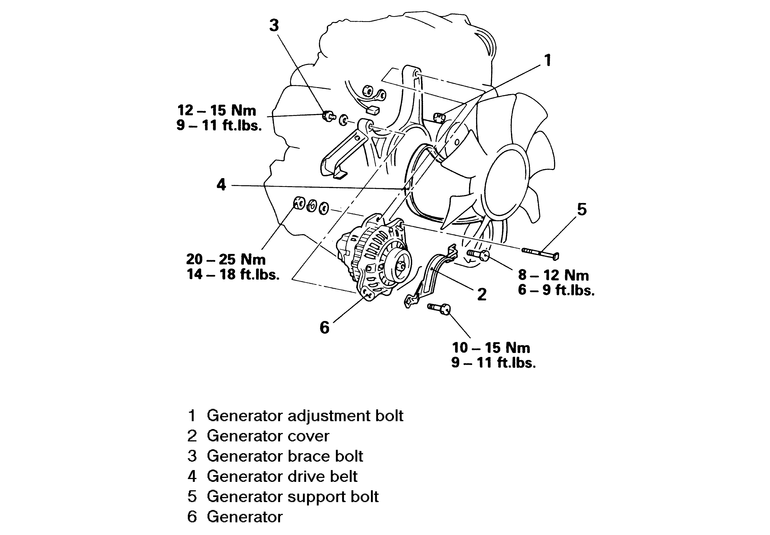
| Fig. 9: Alternator assembly components and location — 2.4L
engines
|
| Fig. 10: Alternator assembly components and location — 3.0L
(12 valve) engines
|
- Note locations of all connectors. Make a drawing, if necessary. Unplug electrical
connectors and unscrew fastening nuts for terminal type connectors. Clean
any dirty connections.
- Remove the adjusting bolt. Remove the nut from the rear of the support bolt.
Supporting the alternator, slide the support bolt out and then remove the
unit from the vehicle.
To install:
- Position the assembly so that the support bolt can be inserted. Install
the support bolt and attach the support bolt nut loosely.
- Install the adjusting bolt assembly and brace bolt, and then loosely install
the nut at the rear of the brace bolt. Install the belt and tighten it as
described in Section 1. Tighten the adjusting bolt to 9–10 ft. lbs.
(12–13 Nm) and the support bolt and nut to 15–18 ft. lbs. (20–24
Nm).
- Adjust the belt to the proper tension.
- Turn ignition switch to OFF and disconnect both battery
cables.
NOTE: Since the alternator on these engines is located
on the lower right hand (passenger) side of the engine, removal and installation
of the alternator will require access from both the top and bottom of the
engine compartment.
- Apply the parking brake and block the rear wheels.
- Raise the front of the vehicle with a floor jack, using the proper frame
positions.
- Support the vehicle on the frame or transmission crossmember, with jackstands.
Before working under the vehicle, make sure the vehicle is stable on the jackstands.
If it is not, reposition the jackstands so that it is.
- Loosen the support and brace bolts, then shift the alternator toward the
engine so that belt tension is relaxed. Remove the belt from the alternator
pulley. If the alternator belt needs replacing it will be necessary to loosen
the power steering pump, along with any other belt-driven accessories, and
remove the drive belts.
- Note locations of all connectors. Make a drawing, if necessary, or label
the wires. Unplug electrical connectors and unscrew fastening nuts for terminal
type connectors. Clean any dirty connections.
- Withdrawal the brace bolt, then remove the nut from the rear of the support
bolt. Supporting the alternator, slide the support bolt out and then remove
the unit from the vehicle.
To install:
- Position the alternator in its original position and so that the support
bolt can be inserted. Install the support bolt and attach the support bolt
nut loosely.
- Slide the brace bolt into place and loosely install its nut at the rear.
Install the drive belt and tighten it as described in Section 1. Tighten the
support bolt and nut to 15–18 ft. lbs. (20–24 Nm).
- Adjust the belt to the proper tension.
- If any other accessories or their belts were removed for belt replacement,
reinstall these components now.
- Lower the vehicle. Remove the blocks from the wheels.
| Fig. 11: Alternator assembly components and location — 3.0L
(24 valve) and 3.5L engines
|