WARNING
The use of the correct special tools or their equivalent is REQUIRED for this
procedure. The timing cannot be adjusted without tool MD998384, the prestroke
measuring adaptor. If this tool is not available, do not attempt to adjust the
injection timing.
- With the engine off, turn the crankshaft clockwise until all the timing
marks align. This places the engine at TDC/compression for No.1 piston.
- Loosen but do not remove the injection pipe union nuts at the injection
pump. Always use a second wrench to counterhold the pump fitting.
- Loosen the nuts and bolts holding the injection pump to the engine but do
not remove them.
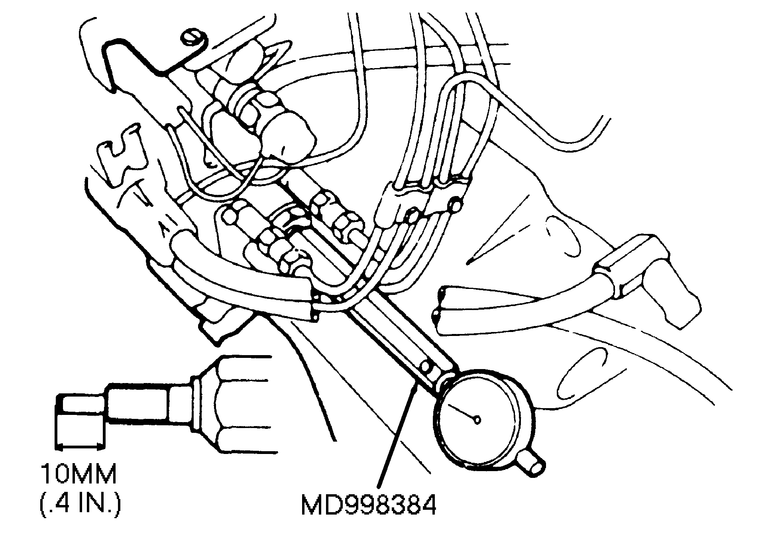
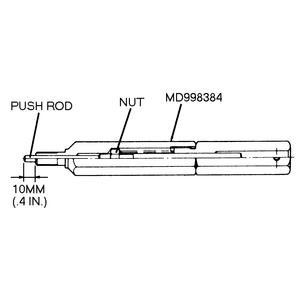
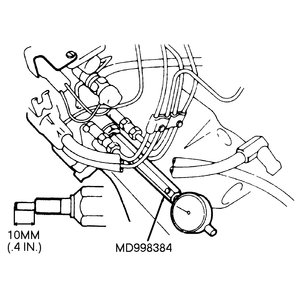
- Examine the special tool and make certain the tip protrudes 0.4 in. (10mm).
The pushrod can be adjusted by the inner nut.
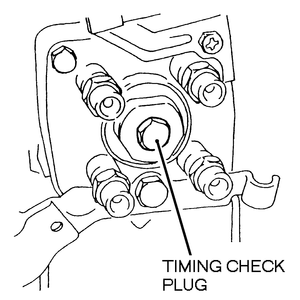
- Remove the timing check plug from the injector pump head and install the
prestroke measuring adapter and a dial indicator.
- Carefully turn the crankshaft counterclockwise until the notch on the pulley
is at a point about 30°before the TDC mark. The notch should be in roughly
the 11 o'clock position.
- Zero the dial indicator. With a wrench, slightly move the crankshaft in
both the clockwise and counterclockwise directions. The dial indicator should
stay at zero; if it changes with engine movement, the initial 30°setting
was incorrect. Repeat steps 6 and 7 until the gentle movement of the crankshaft
does not move the pointer on the dial indicator.
| Fig. 1: Mitsubishi tool MD998384 or equivalent is
needed to check the injection timing — 2.3L diesel
engines
|
| Fig. 2: Remove the timing check plug from the injection
pump head — 2.3L diesel engines
|
| Fig. 3: Attaching the prestroke measuring adapter — 2.3L
diesel engines
|
- Turn the crankshaft clockwise until the notch in the pulley aligns with
the 5°ATDC mark. At this point, the dial indicator should read 0.0383–0.0405
in. (0.997–1.003mm).
- If the gauge does not show the specified value, move the injection pump
body right or left on the mounts until the dial indicator reads correctly.
Tighten the mounting nuts and bolts to hold the pump in place.
- After the pump is locked in place, repeat the check procedure. Set the engine
30°before, zero the indicator, move the engine to 5°ATDC and check
for the correct gauge reading. Each time the pump is moved, the entire check
should be repeated.
- Remove the special tools. Install a new copper gasket and the timing check
plug. Tighten it to 6 ft. lbs. (8 Nm). Do not overtighten this bolt.
- Tighten the fuel delivery lines. Counterhold the joint while tightening
the line fittings to 22 ft. lbs. (29 Nm).
- Since the fuel lines were loosened, bleeding the system is recommended.