- Remove the dashboard, following instruction given later in this section.
- Disconnect the electric harness to the fan motor.
- Remove the 3 bolts holding the fan assembly.
- Remove the fan and motor assembly from the blower housing.
- Remove the fan from the motor shaft.
- Reassemble fan on the motor shaft and install it in the blower housing.
- Tighten the mounting screws.
- Connect the wiring to the motor.
- Reinstall the dashboard.
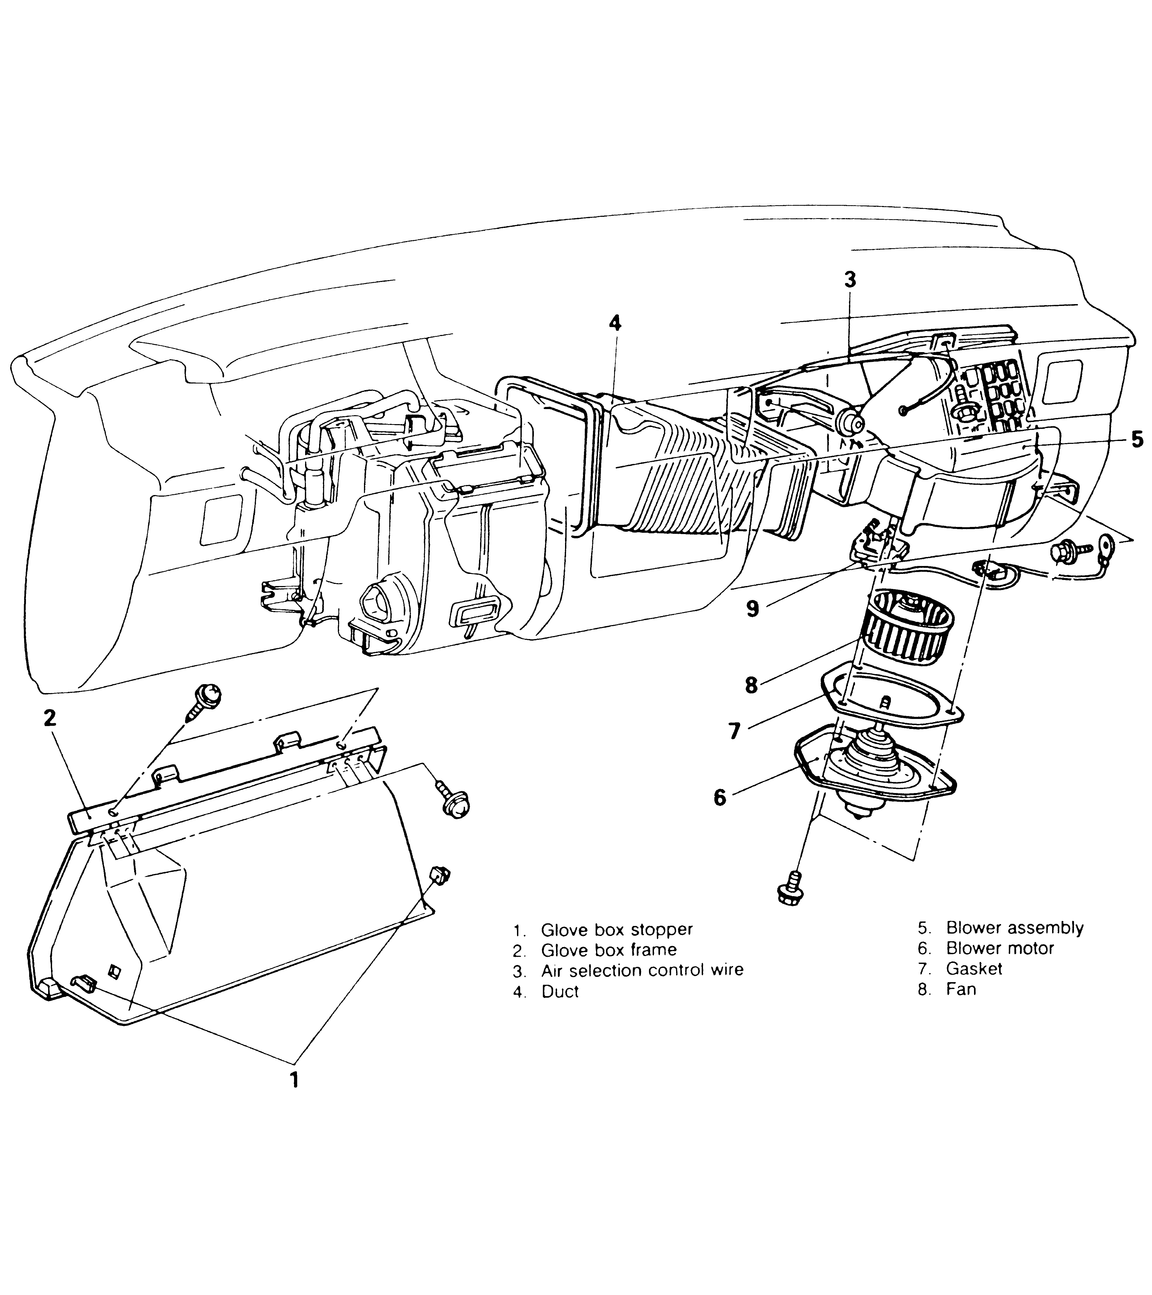
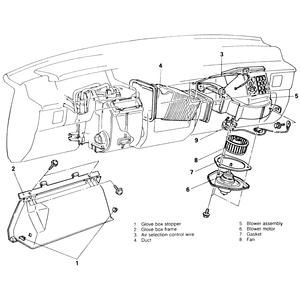
- Remove the glove box stopper and unbolt the glove box frame.
- Remove the glove box from the dashboard.
- Disconnect the air selection control wire.
- Remove the large center duct running from the blower to the heater unit.
- Disconnect the electrical harness from the motor. If necessary (for access),
disconnect the ground connector near the motor.
- Remove the three retaining bolts and remove the blower assembly. The fan
may be removed from the shaft when the motor is clear of the housing.
- When reinstalling, attach the fan to the shaft and install the assembly
into the housing.
- Tighten the mounting bolts and connect the electrical connector. Reconnect
the ground harness if it was removed.
- Install the large center duct.
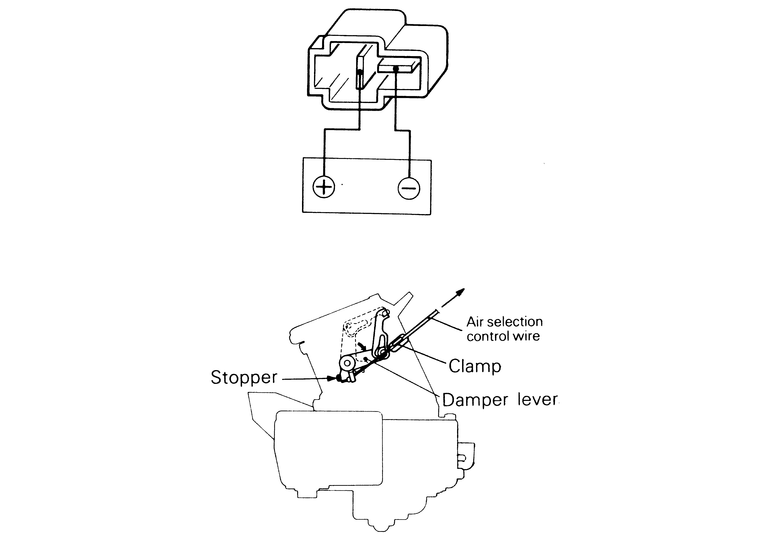
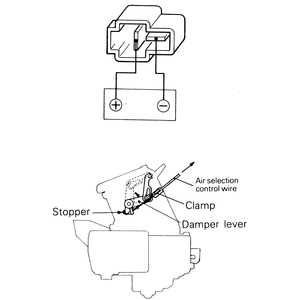
- Move the dashboard air selection lever to the "FRESH'' position. Push the
air selection damper lever against its stop (clockwise motion) and connect
the air selection cable to the lever. Secure the outer part of the cable in
place with the cable clip.
- Install the glove box and stoppers.
| Fig. 1: Blower motor assembly and component location — 1987–95
Pick-ups
|
| Fig. 2: The air selection control wire and damper
lever assembly — 1987–95 Pick-ups
|
NOTE: The order of steps may vary slightly for 1983–86
vehicles.
- Remove the lap heater duct under the right-side dashboard.
- Remove the glove box stoppers and the glove box assembly.
- Disconnect the air selection control wire.
- Remove the large center duct running from the blower to the heater unit.
(Except on 1983–86 Monteros)
- Disconnect the electrical harness from the motor. If necessary for access,
disconnect the ground connector near the motor. The resistor may be removed
from the motor as necessary.
- Disconnect the small breather hose from the motor. Remove the three retaining
bolts and remove the blower assembly. The fan may be removed from the shaft
when the motor is clear of the housing.
- When reinstalling, attach the fan to the shaft and install the assembly
into the housing. Make sure the gasket is seated correctly.
- Tighten the mounting bolts and connect the electrical connector. Reconnect
the ground harness if it was removed and secure the resistor if needed.
- Install the large center duct if it was removed.
- Move the dashboard air selection lever to the "RECIRCULATE'' position. Push
the air selection damper lever against its stop (counterclockwise motion)
and connect the air selection cable to the lever. Secure the outer part of
the cable in place with the cable clip.
- Install the glove box and stoppers.
- Install the lap heater duct.
| Fig. 3: Blower motor assembly and component location — 1983–89
Monteros
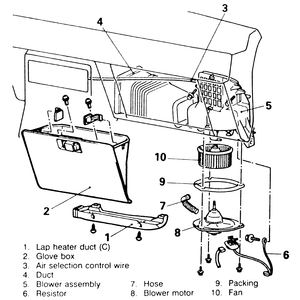
|
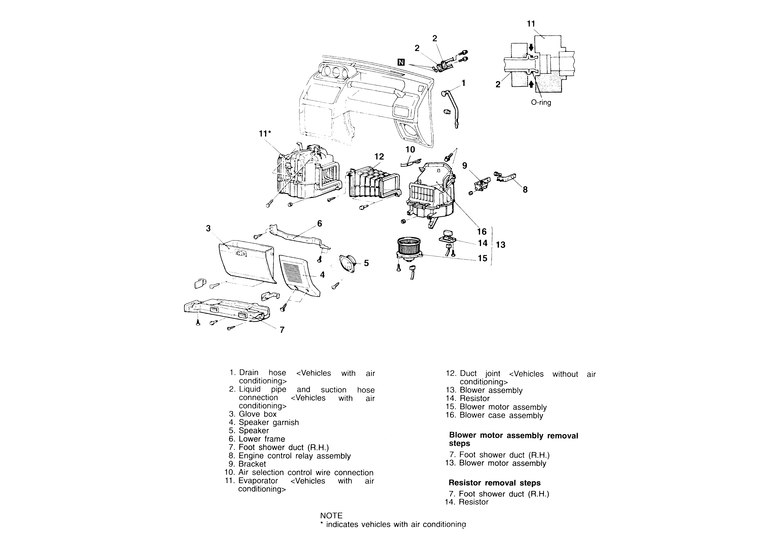
NOTE: If only the blower assembly (resistor, blower motor,
blower case) needs to be removed, it can be done simply by removing the foot
shower duct first, then the blower assembly; the other components need not be
removed.
Prior to this procedure, if the evaporator is going to be removed, the air
conditioning system must be discharged by an automotive mechanic trained and
certified to work on air conditioning systems. If the evaporator is not going
to be removed, the A/C system need not be discharged.
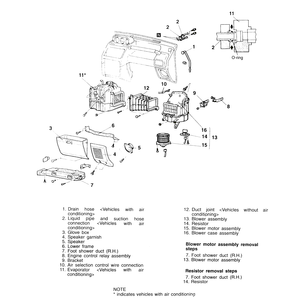
- On vehicles with air conditioning, disconnect the drain hose, the liquid
pipe and the suction hose.
- Extract the glove box assembly from the dashboard.
- The speaker grille cover should be removed, then the speaker itself.
- Unscrew the four mounting bolts and then remove the lower frame.
- Remove the right-hand side foot shower duct.
- Unplug the engine control relay assembly and remove its bracket.
- Disconnect the air selection control wire from the air selection damper
lever.
- On vehicles with air conditioning, the evaporator will need to be removed.
On vehicles without air conditioning, remove the duct joint instead.
- Loosen and remove the blower assembly mounting bolts, then drop the assembly
down and out of the dashboard.
To install:
- Secure the blower assembly in its position with the mounting bolts.
- Install the duct joint (vehicles with no A/C) or the evaporator (vehicles
with A/C).
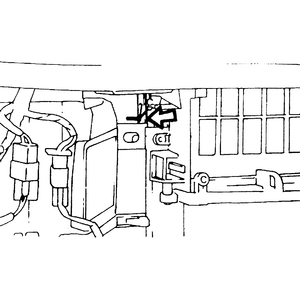
- Connect the air selection control wire to the air selection damper lever
by following the following steps:
- Move the air selection control lever to the recirculation position.
- With the air selection damper lever pressed inward in the direction
indicated by the arrow, connect the inner cable of the air selection lever,
then use a clip to secure the outer cable.
- Install the engine control relay assembly and its bracket.
- Secure the right-hand side foot shower duct in place and tighten the retaining
bolts.
- Install the lower frame, the speaker and grille cover, and the glove box.
- Reattach the liquid pipe, the suction hose, and the drain hose, if removed
earlier.
- Have the A/C system evacuated and charged by an automotive mechanic.
| Fig. 4: Blower motor assembly and component location — 1990–95
Monteros
|
| Fig. 5: Press the air selection damper lever in the
direction of the arrow, and connect the inner cable of the air selection
control wire — 1990–95 Monteros
|