NOTE: While steering wheel removal is not required for this
procedure, extra room can be gained if the wheel is removed.
CAUTION
If removal of the steering wheel on a vehicle equipped with an air bag is planned,
refer to the Supplemental Restraint System procedures in this section for instructions
and warnings.
NOTE: In many cases, it will be easier to disconnect the speedometer
cable at the transmission first. Push some slack in the cable into the vehicle;
this will allow the instrument cluster to come out of the dash far enough to
reach the upper connector.
NOTE: The instrument cluster and radio/heater faceplate are
all one piece.
- Remove the radio knobs.
- Remove the fan control knob and the heater control slider knobs.
- Remove the instrument cluster panel attaching screws.
- Remove the locking nuts from the radio shafts and the fan control switch.
- Remove the ashtray and remove the ashtray bracket.
- Remove the attaching screws at the top of the instrument assembly.
- Beginning at the left lower corner, remove the faceplate from the instrument
cluster.
- As the panel comes free, reach behind and disconnect the wiring for the
gauges, the lighter, the heater controls and the clock. Disconnect the speedometer
cable.
- Remove the instrument cluster.
| Fig. 1: Disconnect the wiring as the panel comes
loose — 1983–86 Pick-ups
|
- To reinstall, fit the panel loosely in position and connect each wire and
cable to its proper location. Fit the panel into place and engage the spring
tabs.
- Install the retaining screws.
- Install the ashtray and bracket.
- Install the panel attaching screws.
- Install the knobs for the heater and radio.
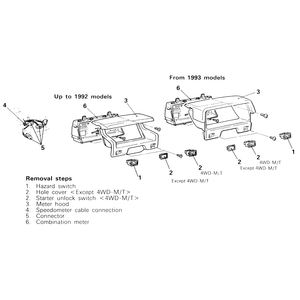
- Disconnect the negative (-) battery cable from the battery.
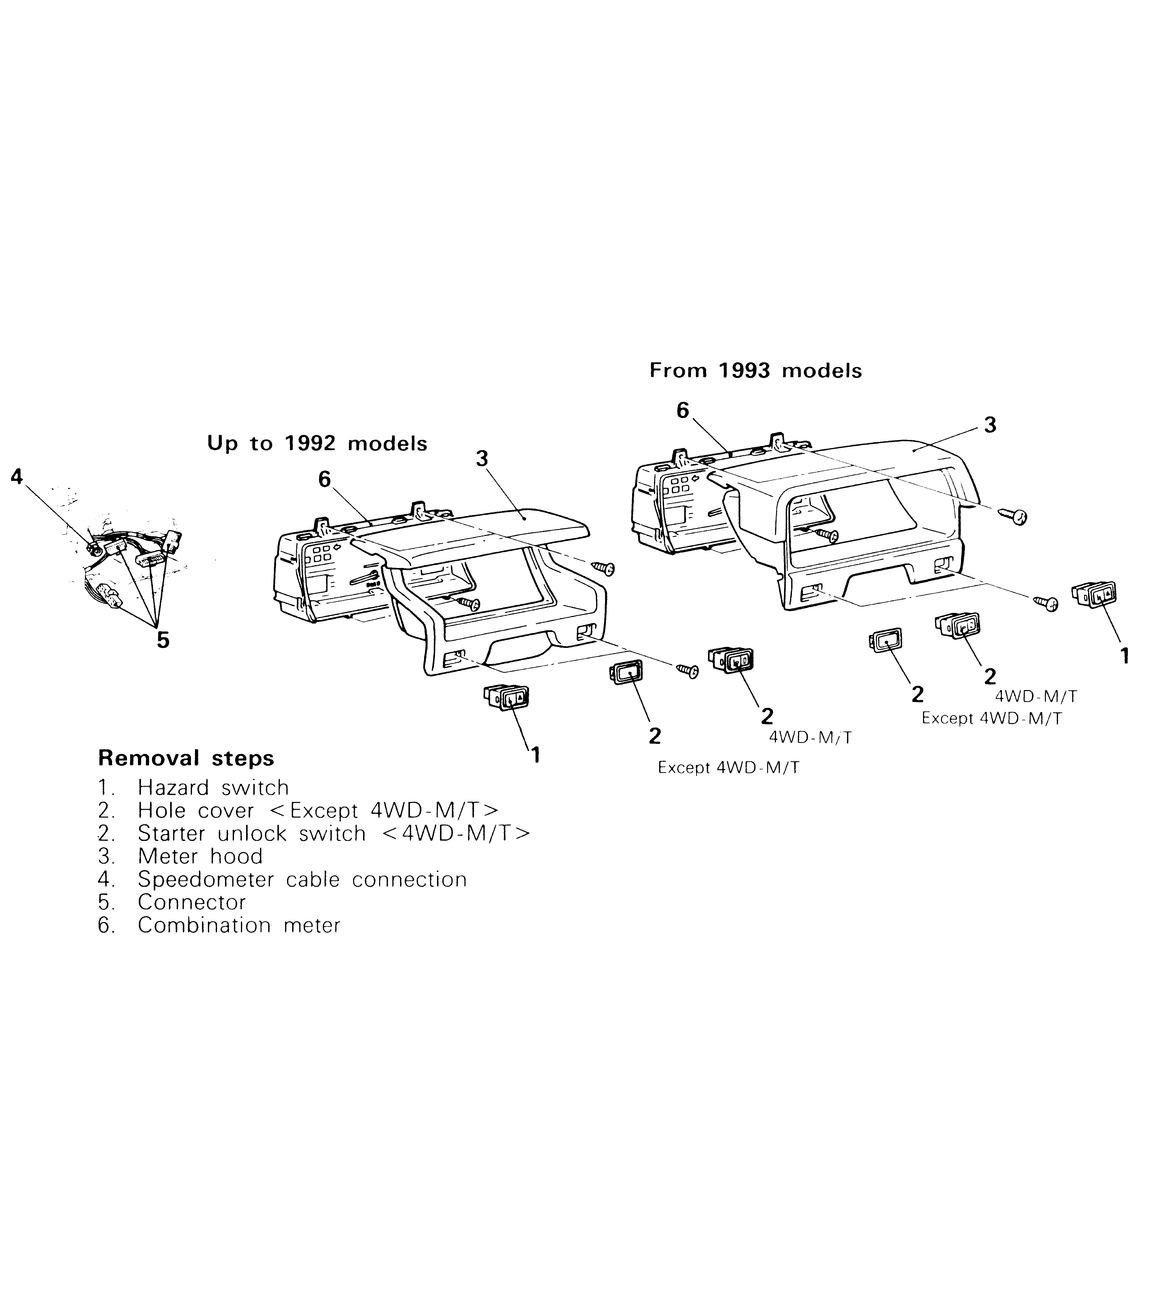
- Use a small protected flat tool to pry the hazard flasher switch, the starter
unlock switch or the hole cover out of the dash.
- Disconnect the wiring to these switches.
- Remove the 4 screws (two need to be accessed through the switch holes) holding
the hood in place. Remove the hood.
- Remove the 4 screws holding the instrument cluster. Pull the cluster towards
you.
- Disconnect the electrical harnesses and the speedometer cable from the instrument
cluster.
| Fig. 2: Combination meter removal and installation
components — 1987–95 Pick-ups
|
- To install, connect the electrical wiring to the back of the instrument
cluster.
- Insert the speedometer cable into the back of the instrument cluster until
its stopper properly fits to the meter-side groove. After installing the speedometer,
pull the speedometer cable through the grommet in the toe-board (fire wall)
until the cable marking is visible from the engine compartment side.
- Secure the instrument cluster in place with the four retaining screws.
- Install the meter hood and mount in place with the four mounting screws.
- Connect the hazard switch and the starter unlock switch, if so equipped,
to their respective wiring.
- Push the two switches back into their holes until they click in place.
- Connect the negative (-) battery cable back to the battery.
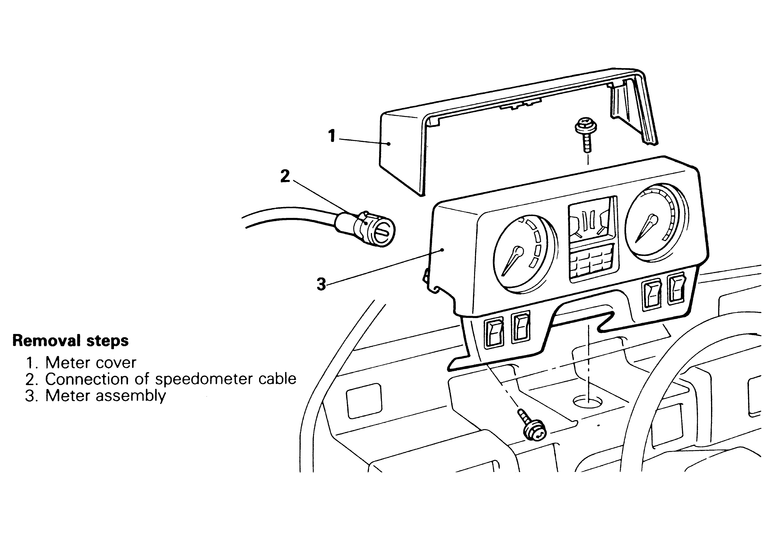
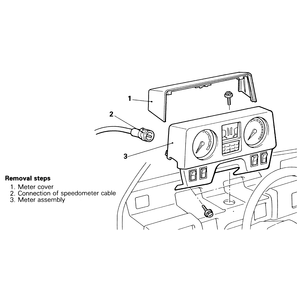
- Disconnect the speedometer cable at the transmission.
- Using a screwdriver or similar tool wrapped in a rag, gently pry the instrument
cover loose. Note that this is the rear panel on top of the cluster, between
the instrument pod and the defroster grille.
- Remove the screws from the bottom of the instrument cluster and remove the
bolt from the top of the cluster.
- Work the cluster out from the dash and disconnect the speedometer cable.
- Carefully disconnect the wiring harnesses from the cluster and remove the
cluster.
- Reinstall in reverse order, taking care that each cable and harness is securely
installed.
- When installing the cluster cover, make certain it snaps into place and
is correctly positioned.
- Connect the speedometer cable at the transmission.
- Disconnect the negative (-) battery cable from the battery.
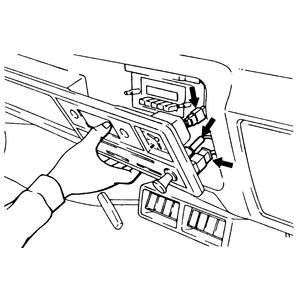
- Using a plastic trim tool, pry the meter cover off of the meter assembly.
If no plastic trim tool is available, use a metal prytool wrapped in cloth.
- Remove the speedometer and any wiring (make sure to label the wires) from
the back of the meter assembly.
- Remove the lower and upper retaining screws holding the meter assembly in
place and remove the assembly from the instrument panel (dashboard).
- To install, mount and secure the assembly in place with the retaining screws.
- Insert the speedometer cable until its stopper properly fits into the speedometer
groove.
WARNING
Poor installation of the cable may cause a fluctuating meter pointer, or
noise and a damaged harness inside the instrument panel.
- Connect the electrical wiring to the back of the instrument meter assembly.
- Push the meter cover into place until it "clicks''.
- Connect the negative (-) battery cable to the battery.
| Fig. 3: Combination meter removal and installation
components — 1987–91 Monteros
|
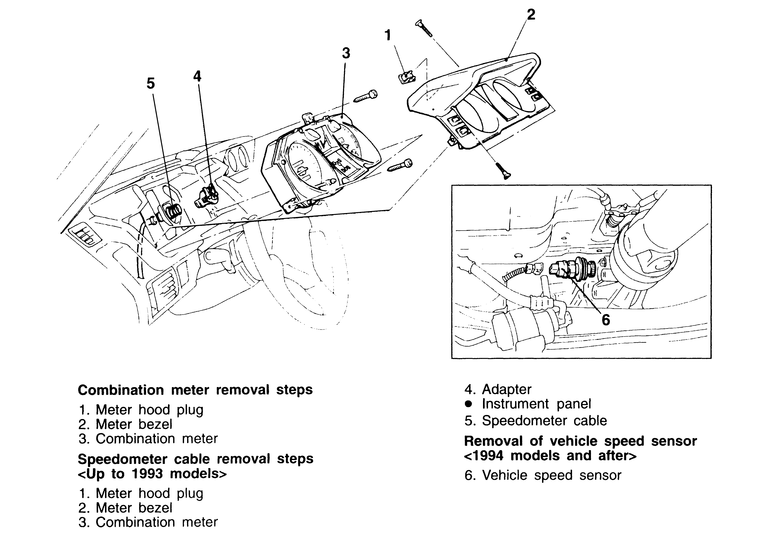
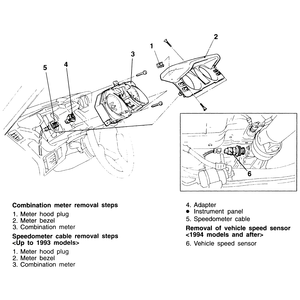
- Disconnect the negative (-) battery cable from the battery.
- Pop the upper-rear meter hood plug out of the meter hood, using a plastic
trim tool or a prytool wrapped in cloth.
- Unscrew the retaining screws, then remove the meter bezel.
- Remove the three mounting screws and pull the combination meter out and
away from the instrument panel.
- Disconnect the wiring from the rear of the combination meter. The speedometer
cable (1992–93 models only) and adapter pulls right out of the combination
meter.
- To remove the speedometer cable (1992–93 models only) adapter, disconnect
the speedometer cable at the transmission end of the cable. From inside the
Montero, pull the speedometer able slightly toward the vehicle's interior,
release the lock by turning the adapter to the left or right, and then remove
the adapter from the instrument panel.
- To remove the vehicle speed sensor (1994–95 models only), unplug the
wiring harness from the vehicle speed sensor, which is located on the driver's
side, tail-shaft of the transmission. Unscrew the sensor from the tail-shaft
of the transmission.
| Fig. 4: Combination meter removal and installation
components — 1992–95 Monteros
|
- To install, screw the vehicle speed sensor back into the transmission and
hook up the wiring harness to it, or insert the speedometer cable adapter
back into the instrument panel.
- Connect the electrical wiring and the speedometer cable adapter to the combination
meter, then set the meter in place.
- Secure the meter with the three retaining screws.
- Place the meter bezel over the combination meter and fasten it there with
the mounting screws.
- Pop the meter hood plug back into its hole and connect the negative (-)
battery cable to the battery.