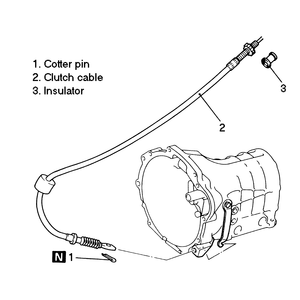
- From the engine compartment, pull the clutch cable out and turn the adjusting
nut counter-clockwise to increase the cable play (which will allow the cable
to be easier to remove from the clutch lever.
- From inside of the vehicle, unhook the cable from the clutch lever.
- From back in the engine bay, pull the cable out through the firewall.
- Raise the vehicle and safely support it on jackstands.
- The other end of the clutch cable attaches to the left-hand side of the
front of the transmission. Remove the cotter pin holding it in place.
- Unhook the cable end from the transmission lever, then pull the cable out
of the transmission mounting hole.
- Pull the cable out of the engine mount insulator bracket. Retain the insulator
pad for assembly.
| Fig. 1: Clutch cable removal and installation
|
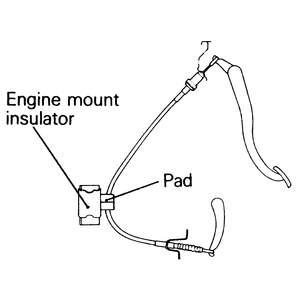
| Fig. 2: Make sure to route the cable so that it is
retained by the engine mount insulator
|
- To install the cable, route it through the engine mount insulator bracket,
making sure that the insulator pad is pushed into the bracket (this protects
the cable from rubbing against the bracket).
- Insert the transmission end of the cable through the transmission mounting
hole, then hook the cable to the lever.
- Install a new cotter pin to retain the cable in the transmission.
- Lower the vehicle back to the ground.
- Slide the cable through the firewall hole as far as it will go.
- From inside the vehicle, hook the cable to the clutch lever.
- Adjust the clutch pedal and cable — refer to the clutch
switch procedures in this section.
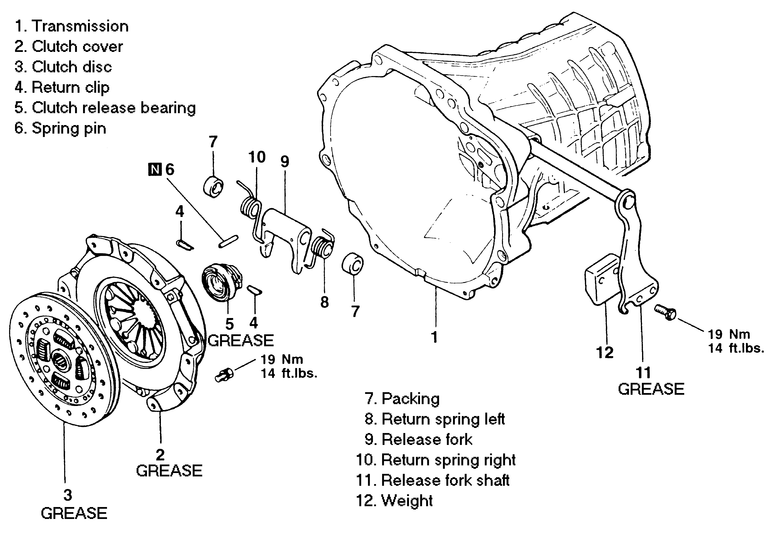
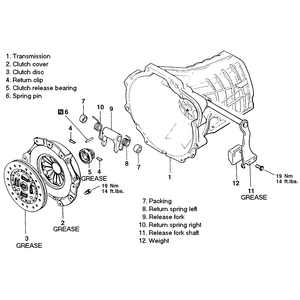
- To remove the inner linkage of the clutch system, the transmission will
have to be removed from the vehicle. To do this, follow the previously outlined
instructions in this section.
- With the transmission out of the vehicle, remove the retaining clips from
the clutch release bearing (located on the transmission end shaft.
- Slide the release bearing off of the shaft.
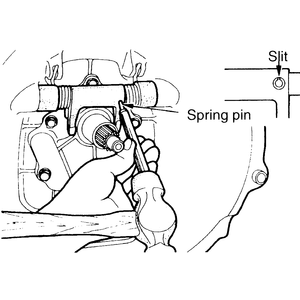
- Using a punch with the same outside diameter as the spring clips (two are
located in the release fork), tap the spring clips out of the release fork.
Discard the old spring clips, new ones will be needed for reassembly.
- Slide the release fork shaft out of the transmission, making sure to account
for the two pieces of packing, the right-hand return spring, the left-hand
return spring and the release fork. Note the positions of these components
for reassembly.
- If need be, remove the weight from the release fork shaft.
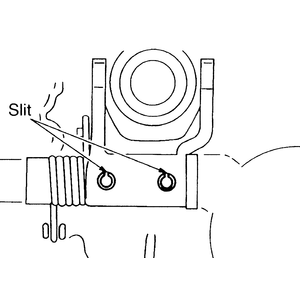
| Fig. 3: Install the two new spring clips with the
slits facing the tongs on the release fork
|
| Fig. 4: Use a punch to remove the old and install
the new spring clips from the release fork — cable-actuated
clutch systems
|
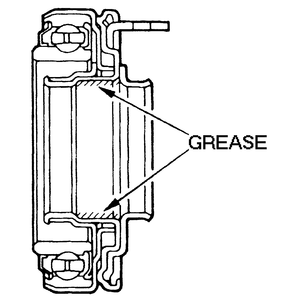
| Fig. 5: Grease the areas shown on the inner-surface
of the release bearing — all clutch systems are similar
|
| Fig. 6: Inner-transmission and clutch plate removal
and installation — cable-actuated clutch systems
|
- To reassemble, mount the weight back onto the release fork shaft.
- Before reassembling the release fork and components, grease the release
fork shaft from each end of the shaft for about 2–3 in. (25–37mm).
Also grease the two front surfaces of the tongs on the release fork.
- As the release fork shaft is slid into the transmission, install the inner
components on the shaft. The order is: packing, left return spring, release
fork, right return spring, packing.
- Line the spring clip holes up with the holes on the release fork shaft,
then tap new spring clips into the release fork and shaft. Make sure that
the slits in the spring clips are toward the tongs on the release fork (facing
toward the transmission end shaft).
CAUTION
Do not reuse the old spring clips.
- Grease the inside surface of the clutch release bearing, then slide the
bearing onto the transmission end shaft.
- Secure the release bearing on the shaft with new retaining clips.
- Install the transmission into the vehicle.
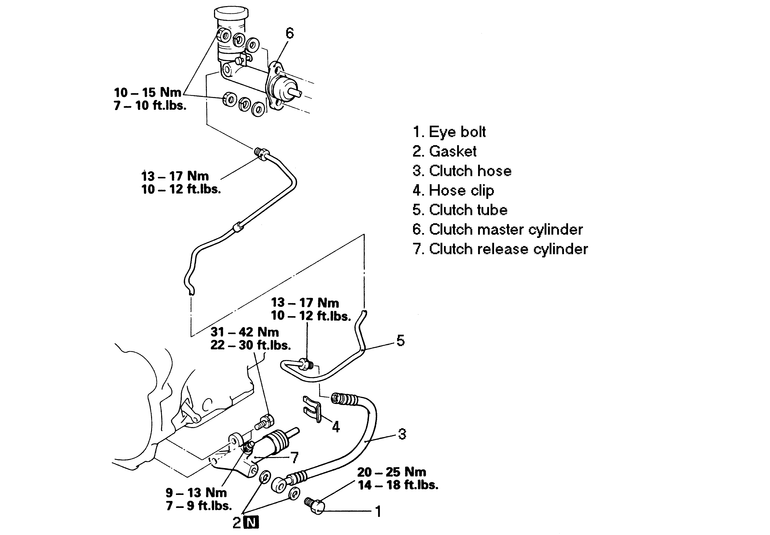
This procedure is for all hydraulic clutches with or without ABS. If the vehicle
does have ABS, the ABS connection can be removed from the pipe once the entire
pipe has been removed from the vehicle.
- Raise and safely support the vehicle on jackstands.
- Place a pan or similar container under the clutch hose connection to the
clutch release cylinder to catch the clutch fluid.
- Loosen and remove the eye bolt holding the clutch hose to the clutch release
cylinder. Drain the fluid into the container.
- Discard the two old eye bolt gaskets, new ones will be needed for reassembly.
- Holding the nut at the clutch hose side, loosen the flare nut of the clutch
tube.
- Remove the clutch hose from the vehicle.
- Loosen the clutch tube from the clutch master cylinder and extract the tube
from the vehicle.
- At this point the ABS connector can be removed from the tube if need be.
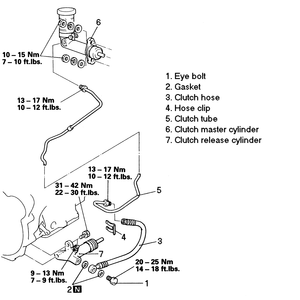
| Fig. 7: Clutch hose and tube removal and installation
|
- To install, carefully thread the upper flare nut of the clutch tube into
the clutch master cylinder, then tighten it to 10–12 ft. lbs. (13–17
Nm).
- Carefully thread the lower flare nut into the upper end of the clutch hose.
Once the threads are started, tighten the connection to 10–12 ft. lbs.
(13–17 Nm). Take care to not let the clutch hose twist.
- Connect the clutch hose to the release cylinder at the stepped portion.
Make sure to use two new gaskets on the clutch hose connection. Tighten the
eye bolt to 14–18 ft. lbs. (20–25 Nm).
- Fill the master cylinder with brake fluid meeting SAE J1703 (DOT3) specifications.
WARNING
Use the specified brake fluid. Avoid using a mixture of the specified fluid
and another fluid.
- Bleed the system until no air remains in it.
- Check for clutch fluid leaks at all connections in the system.
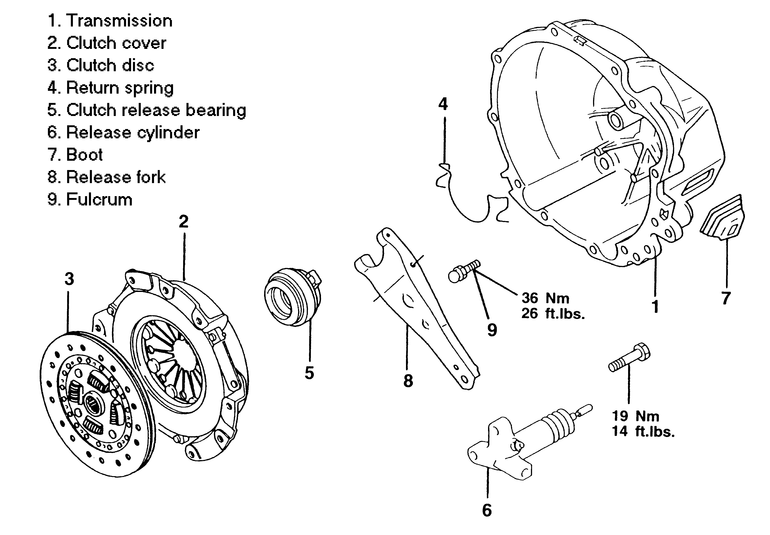
To service the inner linkage, the transmission must first be removed from the
vehicle.
- With the transmission removed from the vehicle, remove the return spring.
- Slide the clutch release bearing off of the transmission end shaft.
- Remove the release cylinder from the side of the transmission.
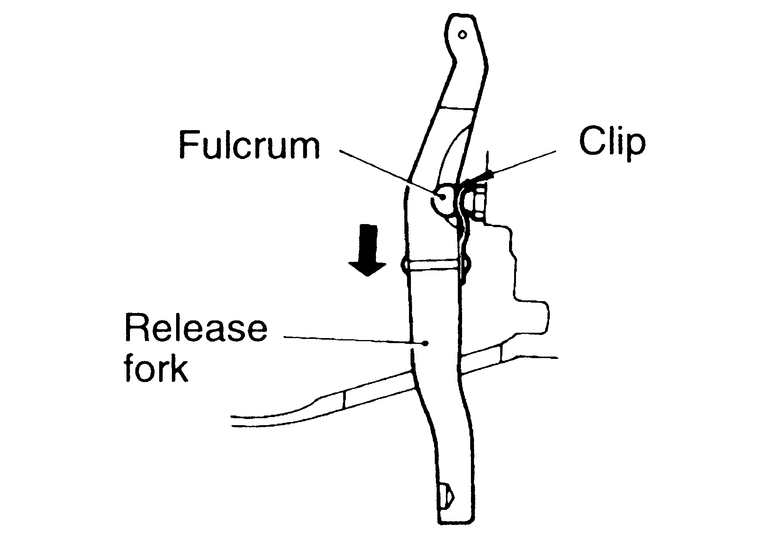
- Pop the release fork boot out of the transmission hole.
- Slide the release fork toward the boot hole in the transmission. This will
disengage the fulcrum from the retaining clip. Be careful not to cause any
damage to the clip by pushing the release fork in the direction other than
that of toward the transmission boot hole or by removing it with force.
- If needed, unscrew the fulcrum from the transmission.
| Fig. 8: Inner-transmission clutch linkage and clutch
plate removal and installation — hydraulic clutch
systems
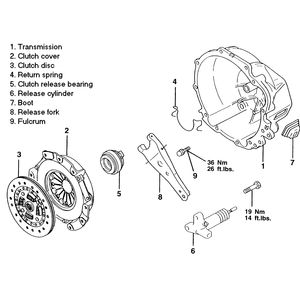
|
| Fig. 9: Slide the release fork toward the release
fork boot hole in the transmission to unhook the retainer clip — hydraulic
clutch systems
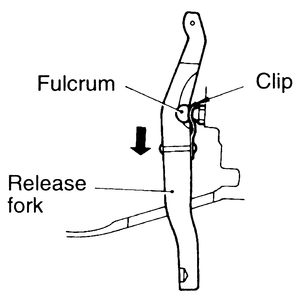
|
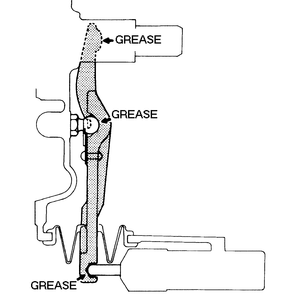
| Fig. 10: Grease the release fork at the positions
shown prior to installation — hydraulic clutch systems
|
- Before reassembly the following areas must be greased with Mitsubishi genuine
grease Part No. 0101011 or its equivalent:
- The fulcrum pivot-point on the release fork.
- The release cylinder pivot-point on the release fork.
- The release bearing pivot-point of the release fork.
- The inner-surface of the release bearing.
- Screw the fulcrum back into the transmission and tighten to 26 ft. lbs.
(36 Nm).
- Insert the thin end of the release fork through the transmission boot hole
from the inside. Slide the fork onto the fulcrum and make sure the clip engages
the fulcrum pivot-point.
- Slide the release fork boot over the outside end of the fork and install
it to the transmission hole.
- Mount the release cylinder onto the outside of the transmission, making
sure that the actuating rod fits into the indent on the release fork.
- Slide the release bearing onto the transmission end shaft (make sure the
bearing has already been greased). Make certain that the release bearing is
installed facing the correct direction.
- Install the return spring.
- Install the transmission into the vehicle.