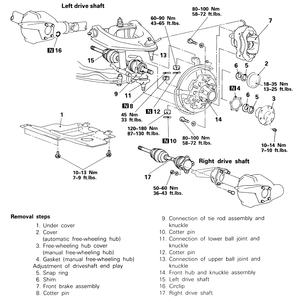
Before beginning, place the locking hubs in the FREE position by placing the
transfer lever in the 2H position and moving in reverse for about 3–7
ft. (1–2 m) for the automatic free-wheeling systems. For the manual systems,
rotate the handles on the hubs themselves to the FREE position.
- Slightly loosen the lug nuts while the vehicle is still on the ground (only
a little — do not loosen the lug nuts more than 1⁄2 of
a turn.)
- Raise the vehicle and support it safely on stands.
- Remove the wheel.
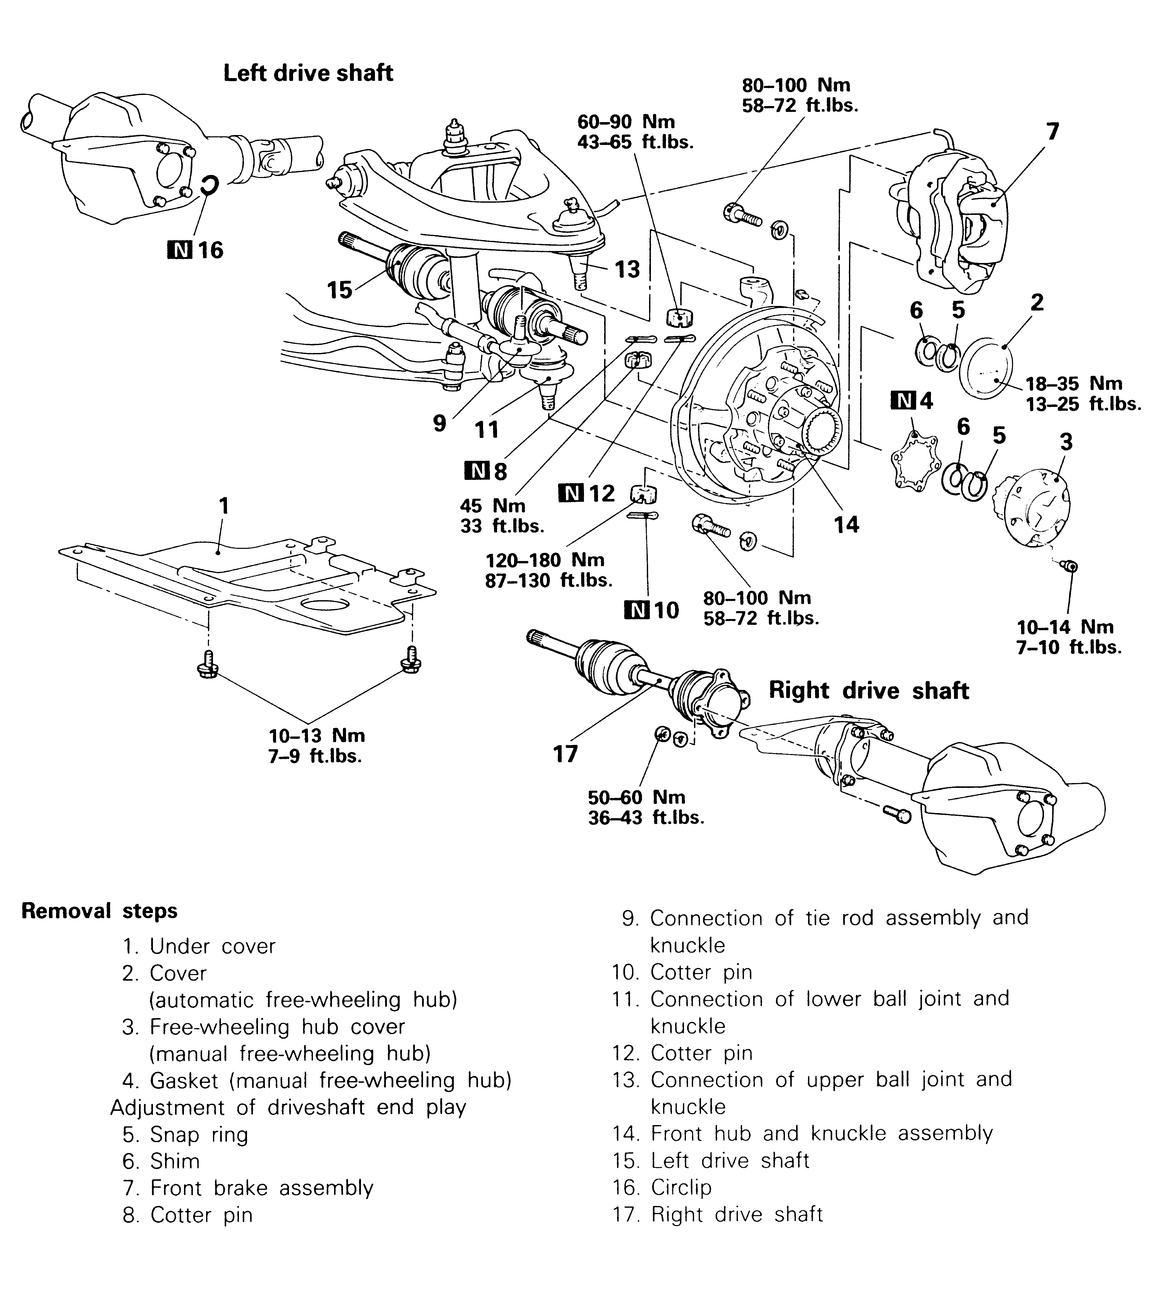
- Remove the front brake caliper assembly and position it to the side. Do
not disconnect the brake hose; simply move the entire caliper out of the way
and suspend it from rope or stiff wire. Do not let it hang by the hose.
CAUTION
Brake pads and shoes may contain asbestos, which has been determined to
be a cancer causing agent. Never clean the brake surfaces with compressed
air! Avoid inhaling any dust from brake surfaces! When cleaning brakes,
use commercially available brake cleaning fluids.
- Remove the free wheeling hub cover assembly and remove the snapring from
the axle shaft.
- Remove the cover gasket (if a manual system) and shim.
- Remove the tie rod assembly-to-spindle connection cotter pin. Loosen the
castle nut (slotted nut) a couple of turns, then use a tie rod separator tool
(MB990635–01) to remove the tie rod end from the spindle. Once the tie
rod end is loose, remove the castle nut and the tie rod end from the spindle.
- Remove the lower spindle ball joint cotter pin. Use the special tool MB990809–01
(ball joint separator) to separate the lower ball joint from the spindle.
CAUTION
Support the lower arm with a jack when removing the knuckle from the lower
ball joint or the upper ball joint.
- Remove the upper ball joint cotter pin, then using the tool MB990778–01
(ball joint separator) separate the upper ball joint from the knuckle.
CAUTION
After the knuckle has been removed, lower the jack slowly.
- Remove the knuckle and front hub together as a unit.
- If removing the left side shaft, simply pull the shaft out of the differential
carrier assembly. When pulling the left shaft from the differential carrier
assembly, be careful that the shaft splines do not damage the oil seal.
- On 1986 Pick-up only, raise the right lower suspension arm and remove the
right shock absorber if removing the right side shaft.
| Fig. 1: Front drive axle removal and installation — 4WD
vehicles
|
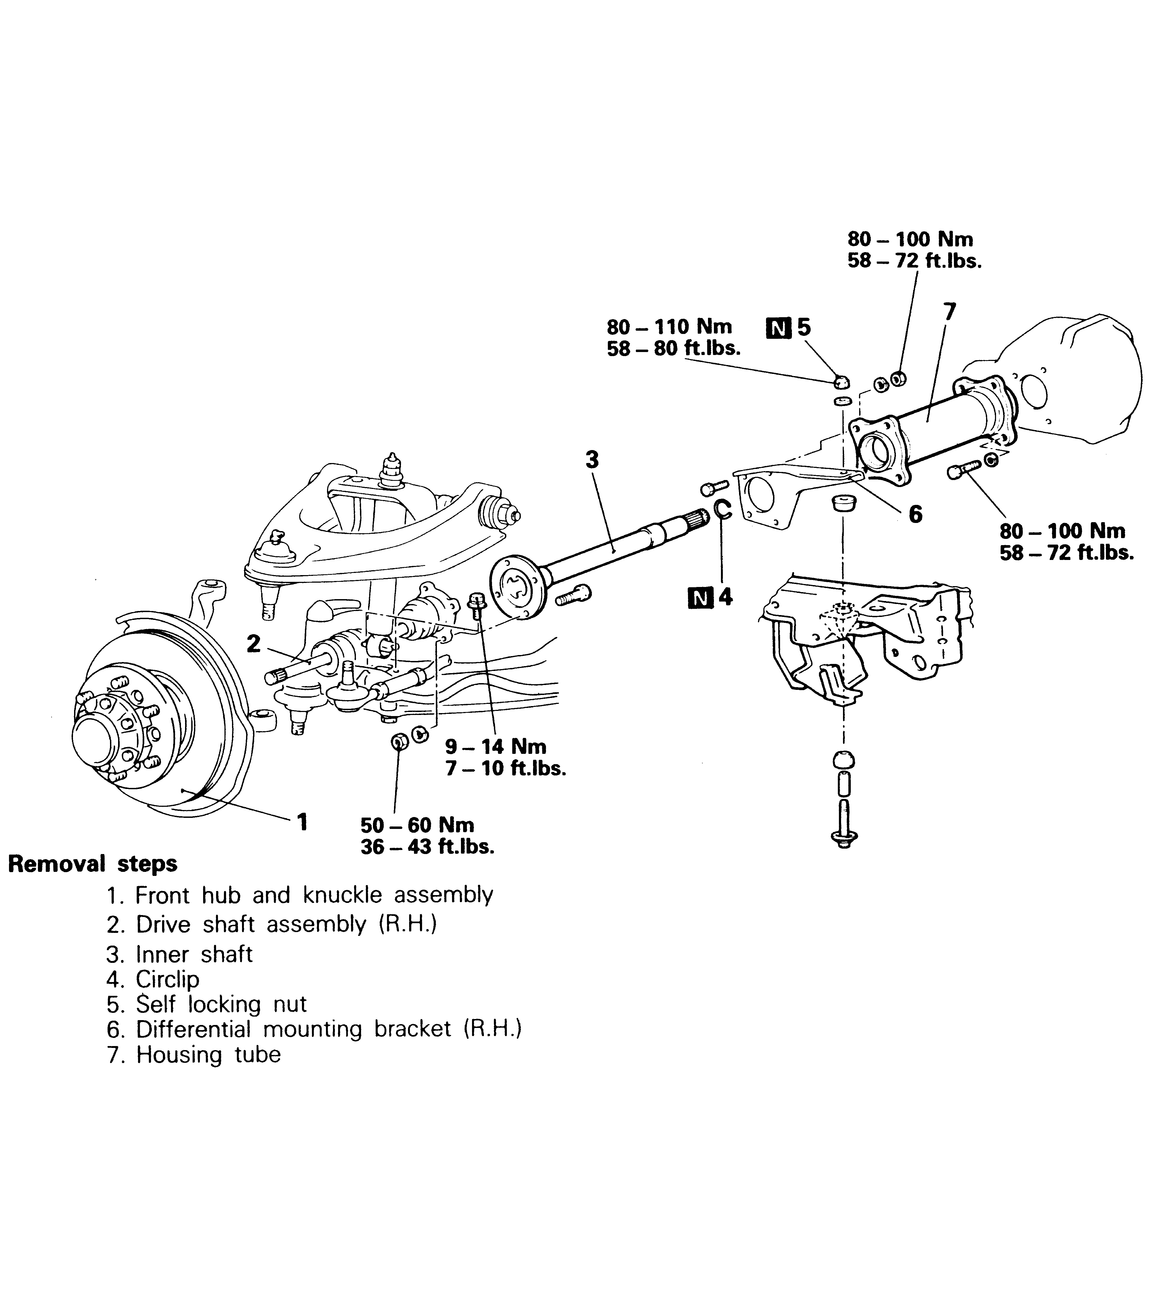
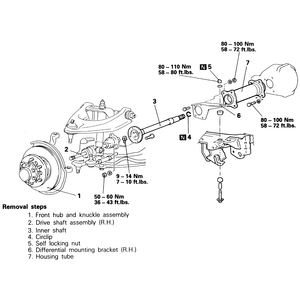
| Fig. 2: Right-hand inner drive axle removal and installation — 4WD
vehicles
|
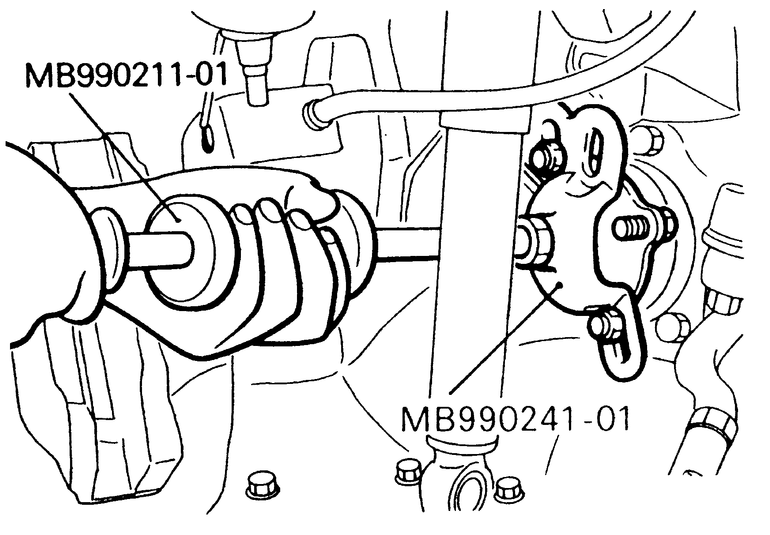
| Fig. 3: Remove the inner drive axle from the differential
unit with an impact puller — Mitsubishi tools MB990211–01
and MB990241–01

|
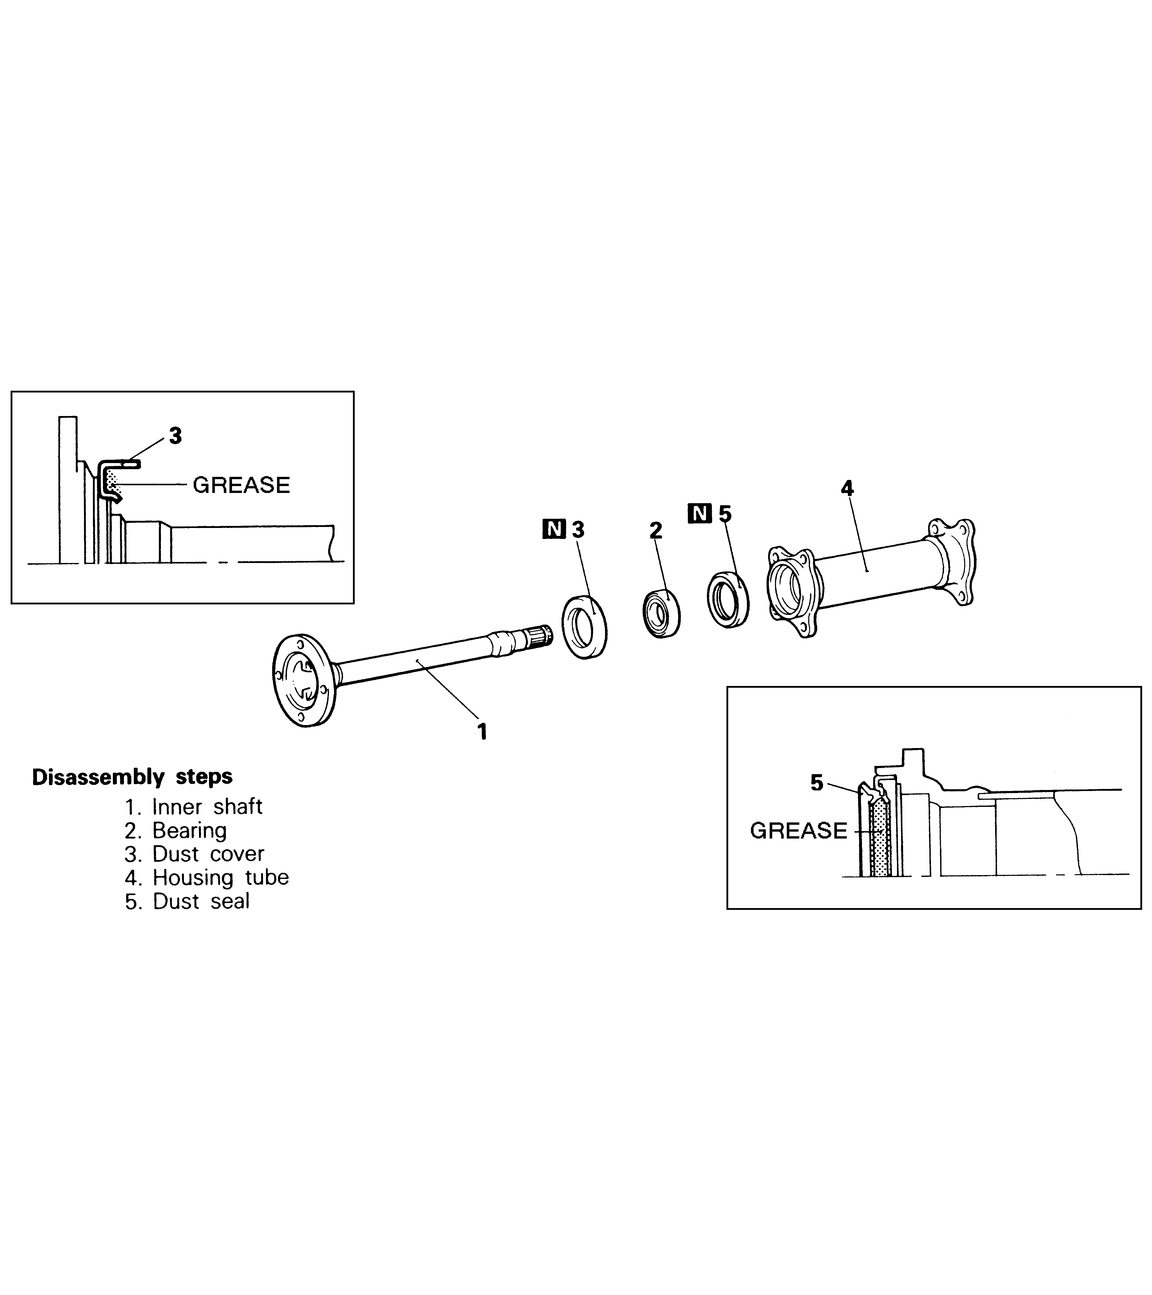
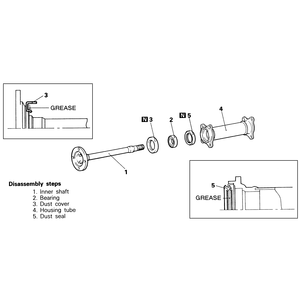
| Fig. 4: Right-hand inner drive axle disassembly and
assembly components — 4WD vehicles
|
| Fig. 5: To remove the drive axle shaft bearing, use
a plastic mallet to bend the outside periphery of the dust cover inward
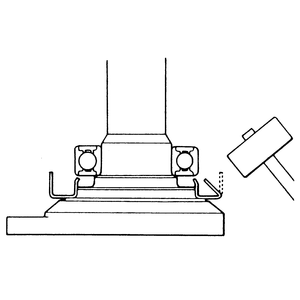
|
| Fig. 6: Install the tool (MB998348–01) until
the portion A touches the bearing outer race
|
| Fig. 7: Set the inner shaft with the tool installed
onto two wooden blocks, as shown in the illustration, and use a hammer
to drive the shaft downward — make sure to not allow
the inner shaft to fall
|
| Fig. 8: Use the special tool to install the dust
seal into the housing tube
|
| Fig. 9: Use a suitably-sized pipe to drive the new
dust cover onto the inner drive axle shaft
|
- Matchmark the right shaft and the inner shaft assembly, then the inner shaft
and the housing tube.
- Disconnect the right shaft from the inner shaft assembly and remove the
shaft. Remove the inner shaft from the housing tube and the housing tube from
the differential housing.
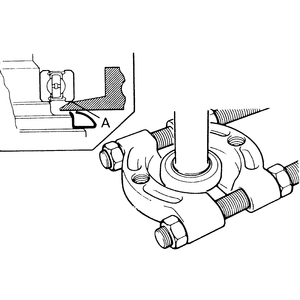
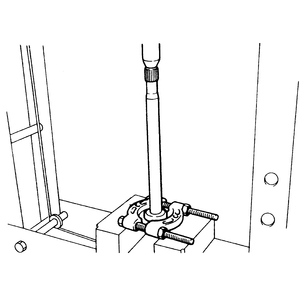
- Remove the inner shaft with an impact puller tool (Mitsubishi tool MB990241–01
and MB990211–01 to remove the inner shaft.
CAUTION
When pulling the inner shaft assembly from the differential carrier,
be careful that the spline of the inner shaft does not damage the oil
seal.
- Remove the circlip from the end of the inner shaft.
- Remove the self locking nut from the differential mounting bracket,
then remove the mounting bracket from the housing tube.
- Remove the housing tube from the differential housing.
- Press the bearing and seal off of the inner shaft and remove the dust seal
from the tube.
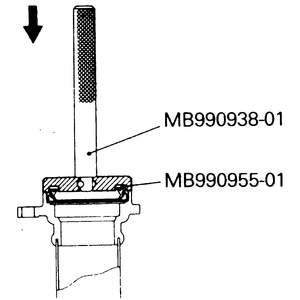
- To remove the bearing, bend the outside periphery of the dust cover
inward with a hammer. Install the general service tool MB998348–01
and tighten the nut of tool until the portion A of the tool touches the
bearing outer race. Set the inner shaft with the tool attached onto two
wooden blocks and drive the inner shaft down to remove the bearing. Make
sure the inner shaft is not allowed to fall on a hard surface.
To install:
- Using tool MB990955–01, install a new dust seal to the tube until
it is flush with the housing tube and face, and coat the lip with grease.
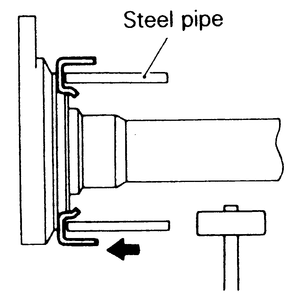
- Using a suitable long steel pipe (outside diameter: 2.95 in. (75 mm), wall
thickness: 0.16 in. (4 mm)), install a new dust cover to the inner shaft and
coat the inside with grease. Press the bearing onto the shaft using tool MD990560
and a press or tool MB998348–01.
- Install a new circlip on the splines of the left side shaft or inner right
shaft.
- Drive the shafts into the differential carrier assembly with a plastic hammer.
Be careful not to damage the lip of the oil seal.
- Install the right outer shaft to the inner shaft and tighten the nuts to
40 ft. lbs. (54 Nm). Install the right shock absorber if it was removed.
- Install the knuckle and front hub assembly. This procedure is very particular
and important, refer to Section 8.
- Install the shim and snapring and check for proper end-play. Set a dial
indicator so the pin is resting on the end of the axle shaft. The end-play
specification is 0.0079–0.02 in. (0.2–0.5mm). If not within specifications,
adjust by adding or removing shims.
- Install the hub cover. Tighten the retaining bolts to 7–10 ft. lbs.
(10–14 Nm).
- Install the front brake caliper assembly. Tighten the brake caliper assembly
mounting bolts to 58–72 ft. lbs. (80–100 Nm).
- Install the tire and wheel assembly. Tighten the lug nuts as tight as possible
considering that the wheel will turn since it is off of the ground. Lower
the vehicle until the wheels touch the ground, then tighten the lug nuts completely.
Let the vehicle down all of the way.
- Road test the vehicle.