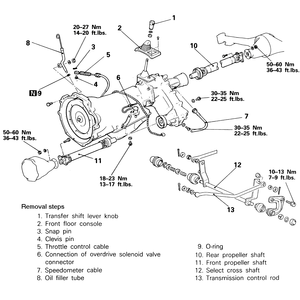
WARNING
The transmission and the torque converter must always be connected when removed
from the engine, otherwise damage to the drive plate, oil pump bushing and oil
seal could be the result. The drive plate cannot support any load. Make sure
that the weight of the transmission does not act on the drive plate during removal.
- Disconnect the negative battery cable.
- It may be necessary to remove the front exhaust pipe (AW372 and KM148 transmissions),
do so now. Disconnect the front exhaust pipe from the exhaust manifold and
the catalytic converter.
- Disconnect the kickdown linkage.
- Remove the selector lever cover and the console. Remove the selector lever.
- Raise and safely support the vehicle on stands.
- If 4WD, remove the skid plate from below the transfer case.
- Remove the shifter control linkage from the transmission. Remove the transfer
shifter (if 4WD) and the transmission shifter.
- Drain the transmission fluid into a suitable container.
- Disconnect the oil cooler lines and hose from the transmission. Immediately
plug or cap the open lines and ports. Suspend the lines vertically to reduce
leakage into the work. Disconnect the front and rear driveshafts from the
transmission and transfer case.
- Disconnect the speedometer cable, the back up light wiring and the four
wheel drive indicator wiring if so equipped.
- Remove the converter cover. Remove the torque converter to flex plate (drive
plate) retaining bolts. The torque converter will have to be turned as the
bolts are loosened and removed, having a friend turn the crankshaft with a
large wrench is extremely helpful.
- Remove the starter mounting bolts and remove the starter. If you're careful,
the wiring can remain attached; use stiff wire to tie the starter to a frame
rail or other solid mount. Allow it to hang from the wire (NOT the electrical
wires — the stiff wire).
- Support the transmission with a jack or transmission cradle. Distribute
the weight of the transmission over a wide area with a piece of lumber.
- Remove the rear insulator from the crossmember.
- Remove the crossmember. It is heavy and bulky; a second jack can be helpful
in removing it.
- Remove the transfer case support (if 4WD). Remove the transmission retaining
(bell housing) bolts and remove the transmission unit out of the car. Slide
the transmission backward and then down, the transmission needs to clear the
alignment tangs.
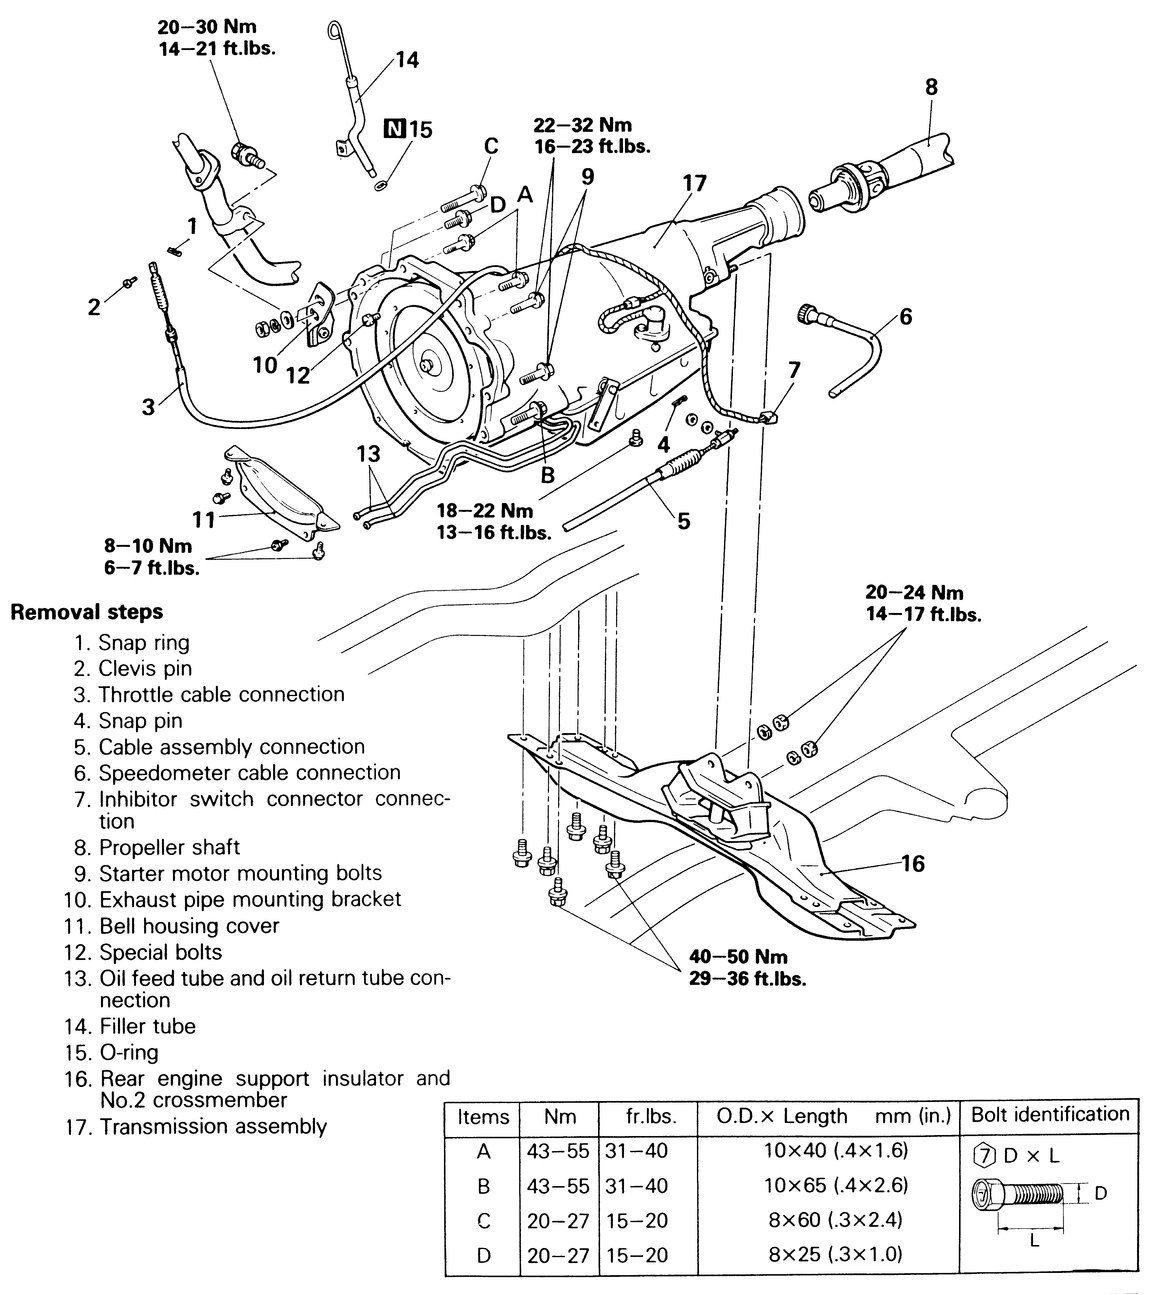
| Fig. 1: Automatic transmission removal and installation — AW372
transmissions/ 1987–89 2WD Pick-ups
|
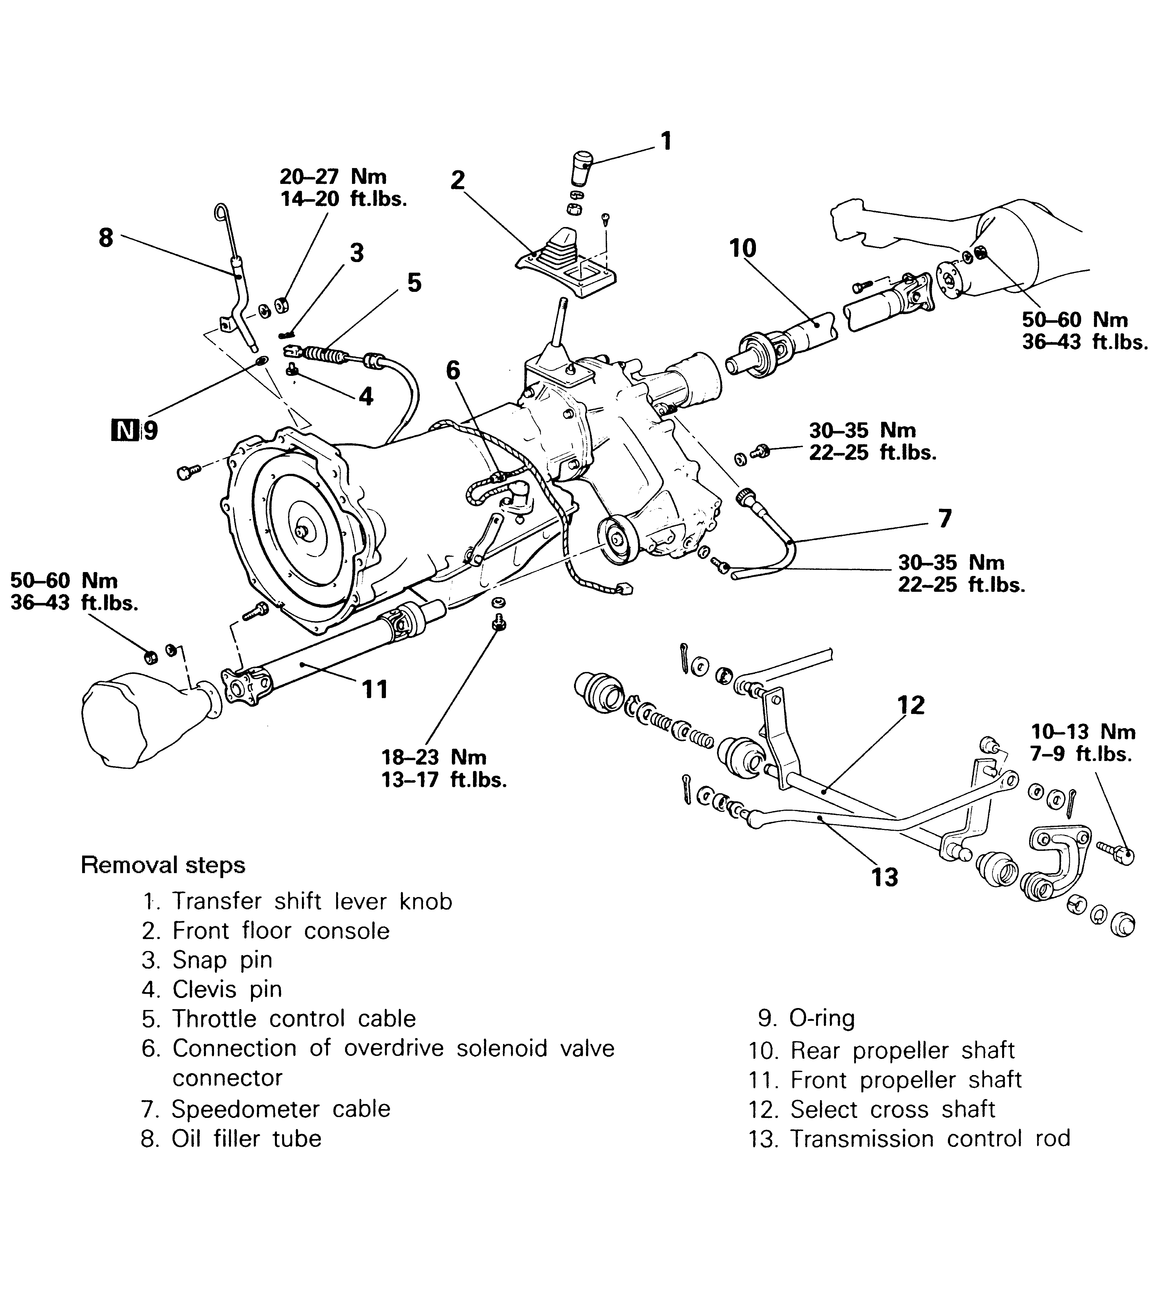
| Fig. 2: Automatic transmission removal and installation — KM148
transmissions/ 1987–89 Monteros and 4WD Pick-ups
|
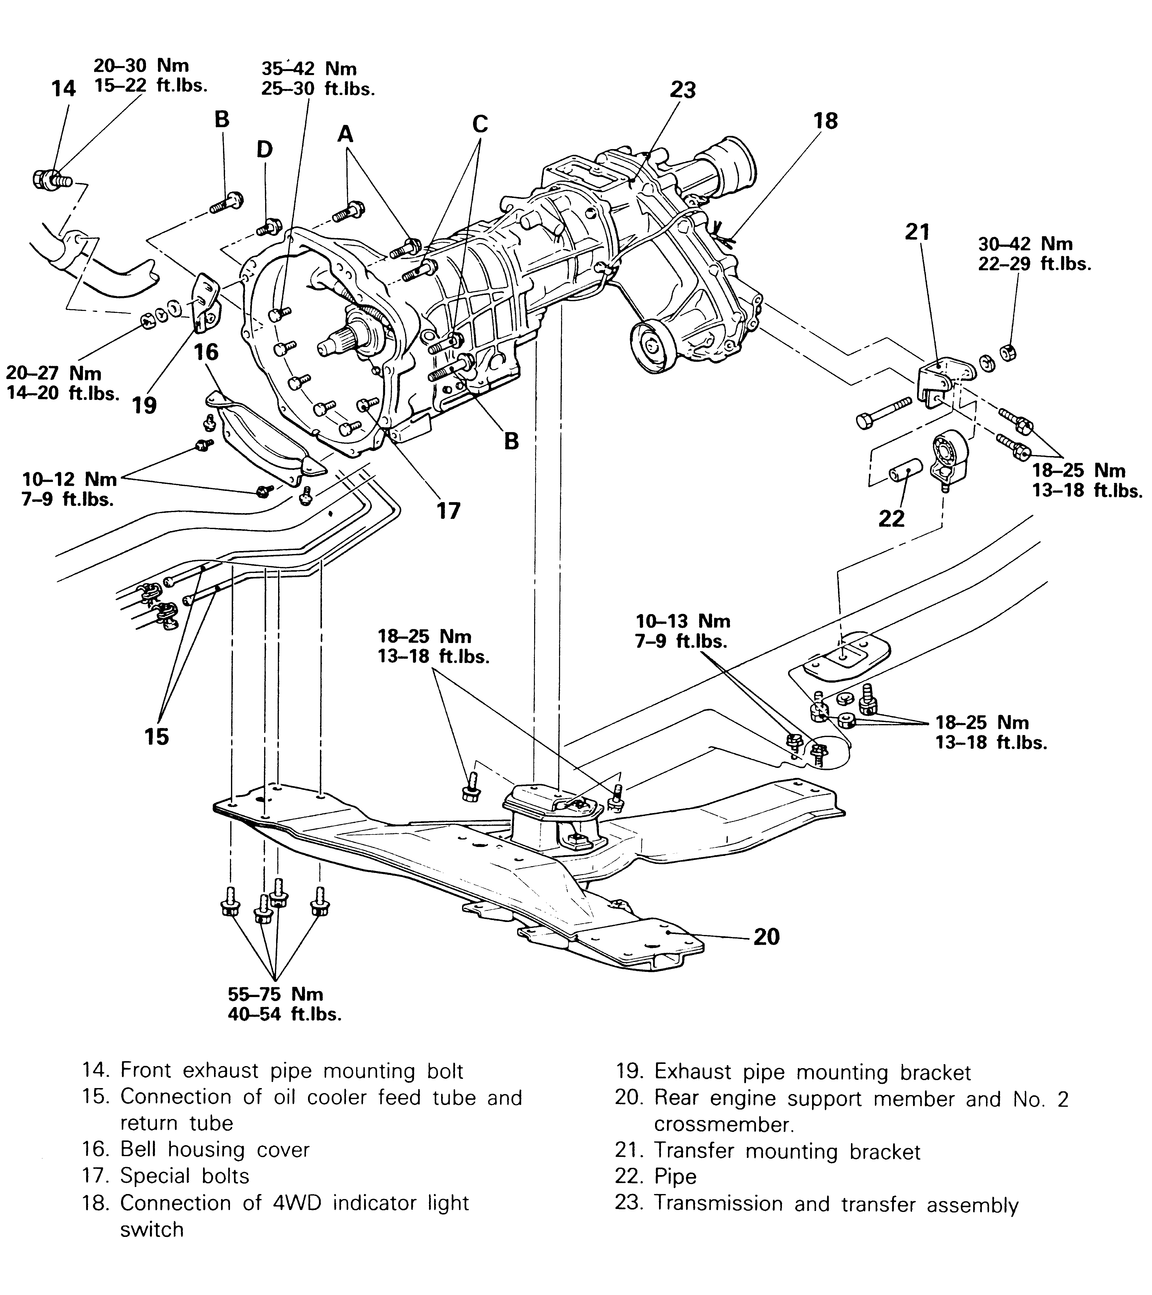
| Fig. 3: Automatic transmission removal and installation
continued — KM148 transmissions/ 1987–89 Monteros
and 4WD Pick-ups
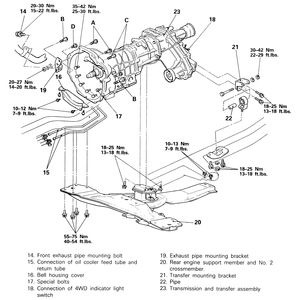
|
To install:
- To reinstall, raise the transmission into place and install the retaining
(bell housing) bolts. Install the transfer case support if so equipped.
- Install the rear insulator on the crossmember.
- Install the starter.
- Have that friend of yours turn the engine until the flywheel (drive plate)
holes line up with the torque converter holes. Install the first bolt finger
tight, then have the engine turned and install the next bolt only finger tight.
Continue to do this until all of the converter bolts are installed finger
tight in the flywheel. Tighten the flywheel to torque converter bolts in two
stages up to 25–30 ft. lbs. (35–42 Nm). If the bolts aren't tightened
in stages, the flywheel may become tightened down on an angle.
- Install the converter cover.
- Connect the speedometer cable, backup light switch wiring and 4WD indicator
wiring harness.
- Connect the front and rear driveshafts to the transmission and transfer
case.
- Connect the oil cooler tubes and hoses from the transmission.
- Install the shift control arm, cross select shaft and control rod to the
transmission.
- Install the skid plate if so equipped.
- Lower the vehicle the the ground.
- Install the shifter linkage — refer to the previous procedures
in this section.
- Install the transfer and transmission shifter assemblies.
- Connect the kickdown link.
- Install the front exhaust pipe.
- Install the proper amount of transmission fluid.
- Connect the negative battery cable.
- After installation, refill the transmission with the approved fluid. Check
that the transmission will start only in N and P positions and that the back-up
lights function only in the R position, otherwise adjusted the shifter linkage.
- Disconnect the negative battery cable from the battery.
- Raise and safely support the vehicle on jackstands. Chock the wheels on
the ground to keep the vehicle from rolling when the driveshafts are removed.
- Remove the under covers.
- Remove the front exhaust pipe.
- Matchmark the driveshaft to the rear differential unit and the transmission.
Detach the driveshaft from the rear differential and slide the yoke out of
the tail of the transmission. Have a pan handy to catch the draining transmission
fluid. Try not to spill any transmission fluid because it will stain any clothing
and even pavement.
- Remove the transmission fluid filler tube. Dispose of the O-ring on the
end of the tube (it will need to be replaced with a new on upon reassembly).
- Unplug the transmission harness connector.
- Loosen the speedometer cable retaining ring, then pull the cable out of
the transmission.
- Disconnect the transmission control rod at the transmission.
- Disconnect the fluid cooler hoses from the transmission.
- Disconnect the kickdown rod from the cable.
- Remove the exhaust pipe mounting bracket from the right side of the transmission.
- Remove the lower torque converter cover.
- Remove the torque converter to flywheel bolts. Having a friend turn the
engine with a large wrench is a lot of help for this procedure.
- Support the transmission with a floor jack or a transmission cradle.
- Remove the two mounting bolts holding the tail of the transmission to the
crossmember, then remove the crossmember.
- With the transmission tilted so that the rear is lowered slightly, remove
the flange bolt which fastens the starter motor and bell crank bracket.
NOTE: Suspend the starter motor from the body by using
a piece of wire or a similar method.
- Disconnect the transmission assembly from the engine by pulling it slowly
toward the rear of the vehicle.
NOTE: Detach so that the torque converter does not remain
at the engine side.
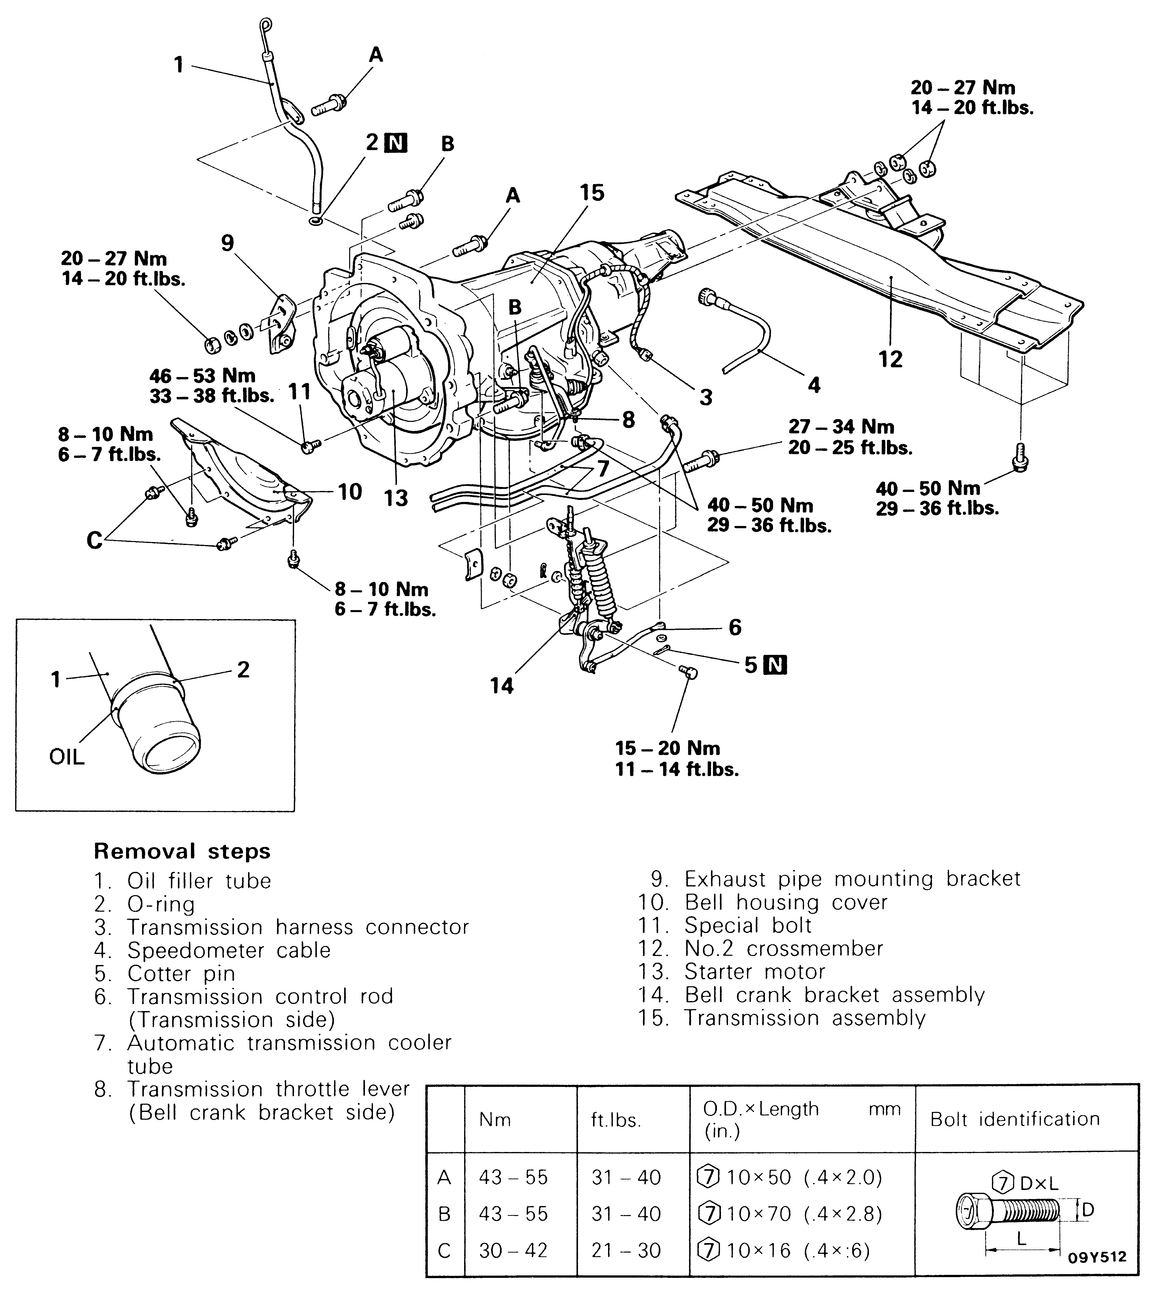
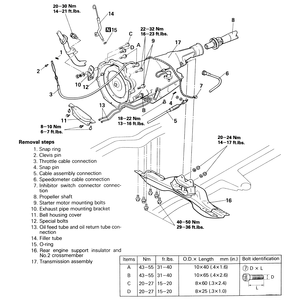
| Fig. 4: Automatic transmission removal and installation — R4AC1
transmissions/ 1990–95 Pick-ups
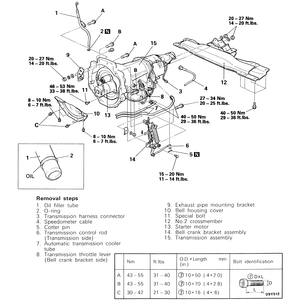
|
To install:
- On the engine side, there are two centering locations. Make sure that the
transmission mounting bolt holes are aligned with them before mounting the
transmission assembly to the engine.
NOTE: The engine with the transmission assembly removed
has its rear slightly raised up due to imbalance caused by such removal.
Therefore, disconnect the front exhaust pipe from the catalytic converter
to lower the engine.
- Install the bell housing-to-engine block bolts (refer to the illustration
for the torque figures). While installing these bolts also install the bell
crank bracket assembly and the starter motor.
- Install the crossmember, then secure the rear of the transmission to the
crossmember with the two mounting nuts. Tighten the rear nuts to 14–20
ft. lbs. (20–27 Nm).
- Install the torque converter-to-flywheel bolts. Before installing the bolts,
make sure that the torque converter paint color can be seen through the check
hole in the drive plate. Have that friend of yours turn the engine until the
flywheel (drive plate) holes line up (and color can be seen) with the torque
converter holes. Install the first bolt finger tight, then have the engine
turned and install the next bolt only finger tight. Continue to do this until
all of the converter bolts are installed finger tight in the flywheel. Tighten
the flywheel-to-torque converter bolts in two stages up to 33–38 ft.
lbs. (46–53 Nm). If the bolts aren't tightened in stages, the flywheel
may become tightened down on an angle.
- Install the bell housing lower cover.
- Install the exhaust pipe mounting bracket to the right side of the transmission.
Tighten the mounting nuts to 14–20 ft. lbs. (20–27 Nm).
- Install the transmission throttle (kickdown) lever.
- Connect the transmission cooler tubes to the transmission. Make sure to
install the cooler tube retainer to the transmission.
- Connect the transmission control rod to the transmission. Both the kickdown
and the control rod will have to be adjusted once the transmission is completely
installed — refer to the procedures in this section.
- Insert the speedometer cable into the transmission, then tighten the retaining
ring to hold it in place.
- Plug the transmission harness connectors together.
- Insert the fluid filler tube into the transmission with a new O-ring.
- Fill the transmission up with automatic transmission fluid.
- Install the driveshaft, making sure that the matchmarks line up.
- Install the front exhaust pipe.
- Adjust the kickdown and shifter linkages — refer to the
procedures in this section.
- Install the under covers, then lower the vehicle to the ground.
- Connect the negative battery cable to the battery.
- Remove the wheel chocks, start the vehicle up and allow it to warm up. While
it is warming up, check for any fluid leaks. Once it is warmed up, check the
fluid level and add if needed.
- Disconnect the negative battery cable from the battery.
- Remove the transfer shift lever assembly — refer to the
manual transmission procedures for the transfer assembly.
- Raise and support the vehicle on jackstands. Before crawling under the vehicle,
make absolute certain that the vehicle is safely supported by the jackstands.
- Remove the transfer case protector.
- Unfasten the front exhaust pipe from the two exhaust manifolds, then disconnect
it from the intermediate pipe/ catalytic convertor (make certain to retain
the bolts and nuts for reassembly). Remove the entire pipe from under the
vehicle.
- Drain the transmission fluid into a clean, large pan. With the transmission
out for any reason, it is a good time to change the transmission fluid filter.
Drain the transfer case as well.
- Matchmark and disconnect the rear driveshaft at both the rear axle and the
transfer case flanges.
- On 4-wheel drive vehicles, disconnect the forward driveshaft from the front
axle and remove it by sliding it forward. Install a plug in the transfer case
to prevent residual fluid leakage.
- Remove the fluid filler tube from the transmission. Replace the O-ring with
a new O-ring upon reassembly.
- Disconnect the kickdown linkage from the transmission.
- Remove the dust seal from the rear extension housing.
- Disconnect the shifter linkage from the transmission.
- Label and unplug all wires leading to the transmission, some are: Ground
cables, 4WD indicator light switch connector, park/ neutral position switch
connector, back-up light switch connector, HI/LO detection switch connector,
center differential lock detection switch connection. There may be others
depending on the particular year, model and engine the vehicle came equipped
with.
- Unscrew the retaining ring holding the speedometer in the transmission.
Pull the speedometer cable out of the transmission and label it.
- Disconnect the transmission cooling lines from the transmission.
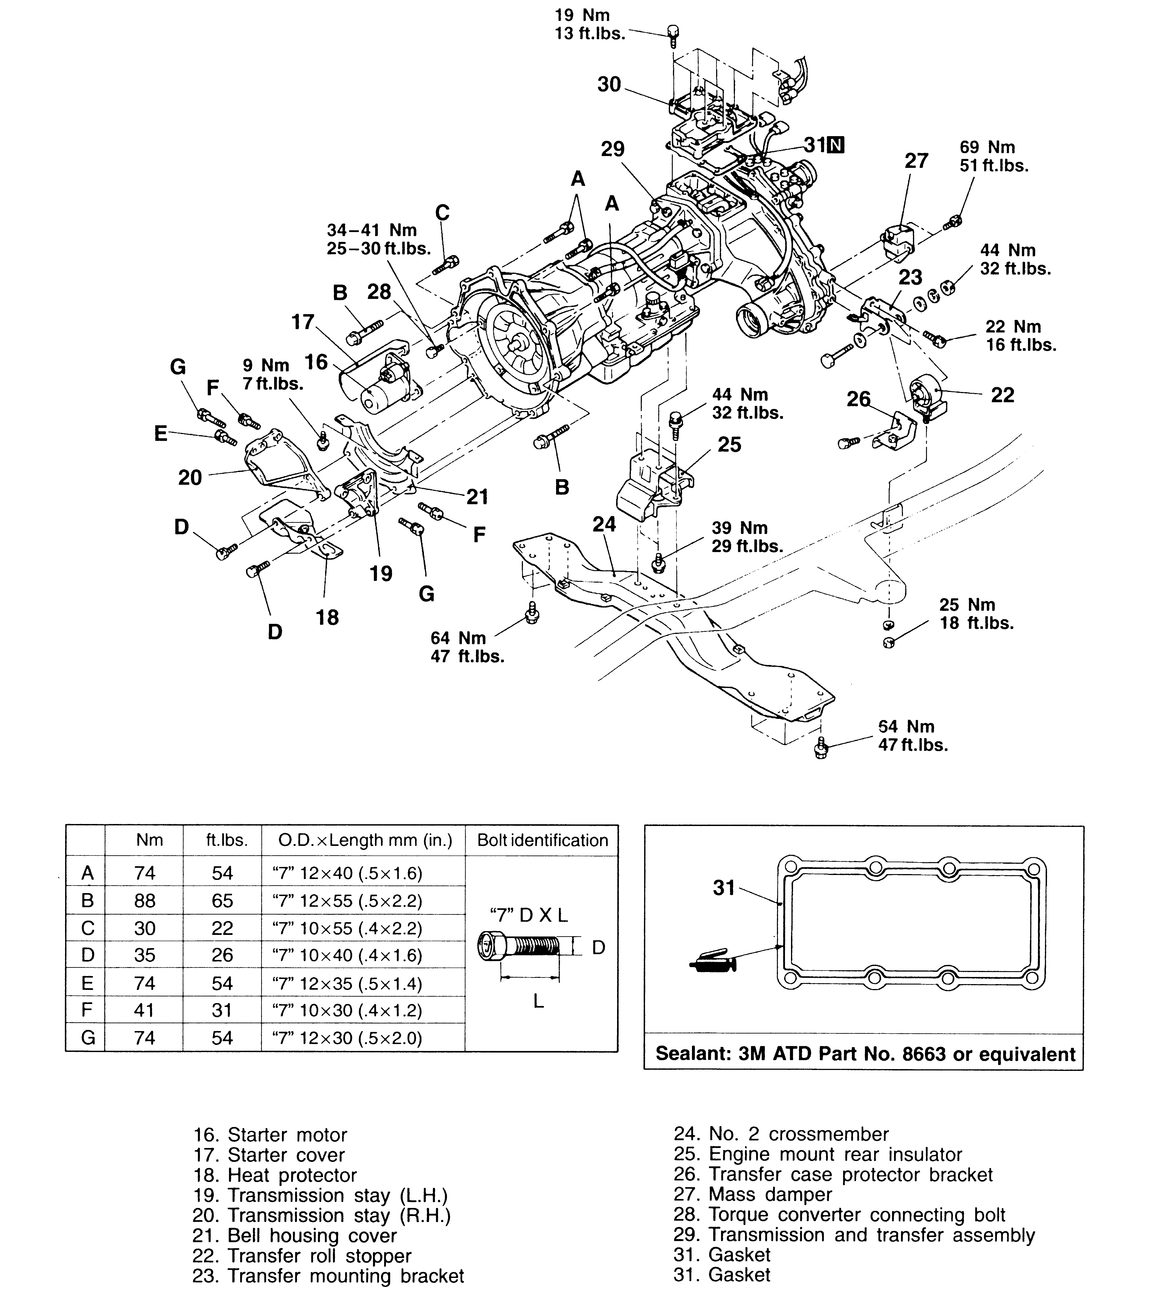
- Unbolt the starter motor from the front of the transmission and remove it.
Remove the heat shield, if so equipped.
- Place a floor jack, with a block of wood on the jacking area, below the
engine oil pan.
- Lift the floor jack under the engine just until the weight of the engine
is taken onto the jack — the engine should only barely be
lifted by the jack.
- Use a transmission jack or second floor jack to place under the transmission.
Don't support the transmission yet, only lift the jack until it is slightly
below the transmission.
- Remove the left-hand and right-hand side transmission stays from the front
of the transmission.
- Unbolt the bell housing lower cover.
- Remove the transfer case mounting bracket, roll stopper, mass damper and
transfer case protector bracket.
- Lift the second floor jack up until the transmission is being slightly supported
by it.
- Remove the two transmission-to-crossmember bolts. Lift the jack about 1/4
of an inch off of the crossmember support. Remove the entire crossmember from
the vehicle.
- Remove the transmission and transfer case together from the vehicle.
- Remove the cover from the oil pan upper.
- Remove the connecting bolts (6 places) while turning the crankshaft.
Having a friend to help with this makes this stage much easier.
- Gently lower the rear section of the transmission and transfer assembly
to remove the assembly from the engine.
CAUTION
When removing the transmission and transfer assembly, push the torque
converter over to the transmission and transfer assembly side so it
does not remain on the engine side.
- Next, tilt the front section of the transmission and transfer assembly
downward and gently lower it, being careful that the rear section of the
transfer does not touch the rear crossmember.
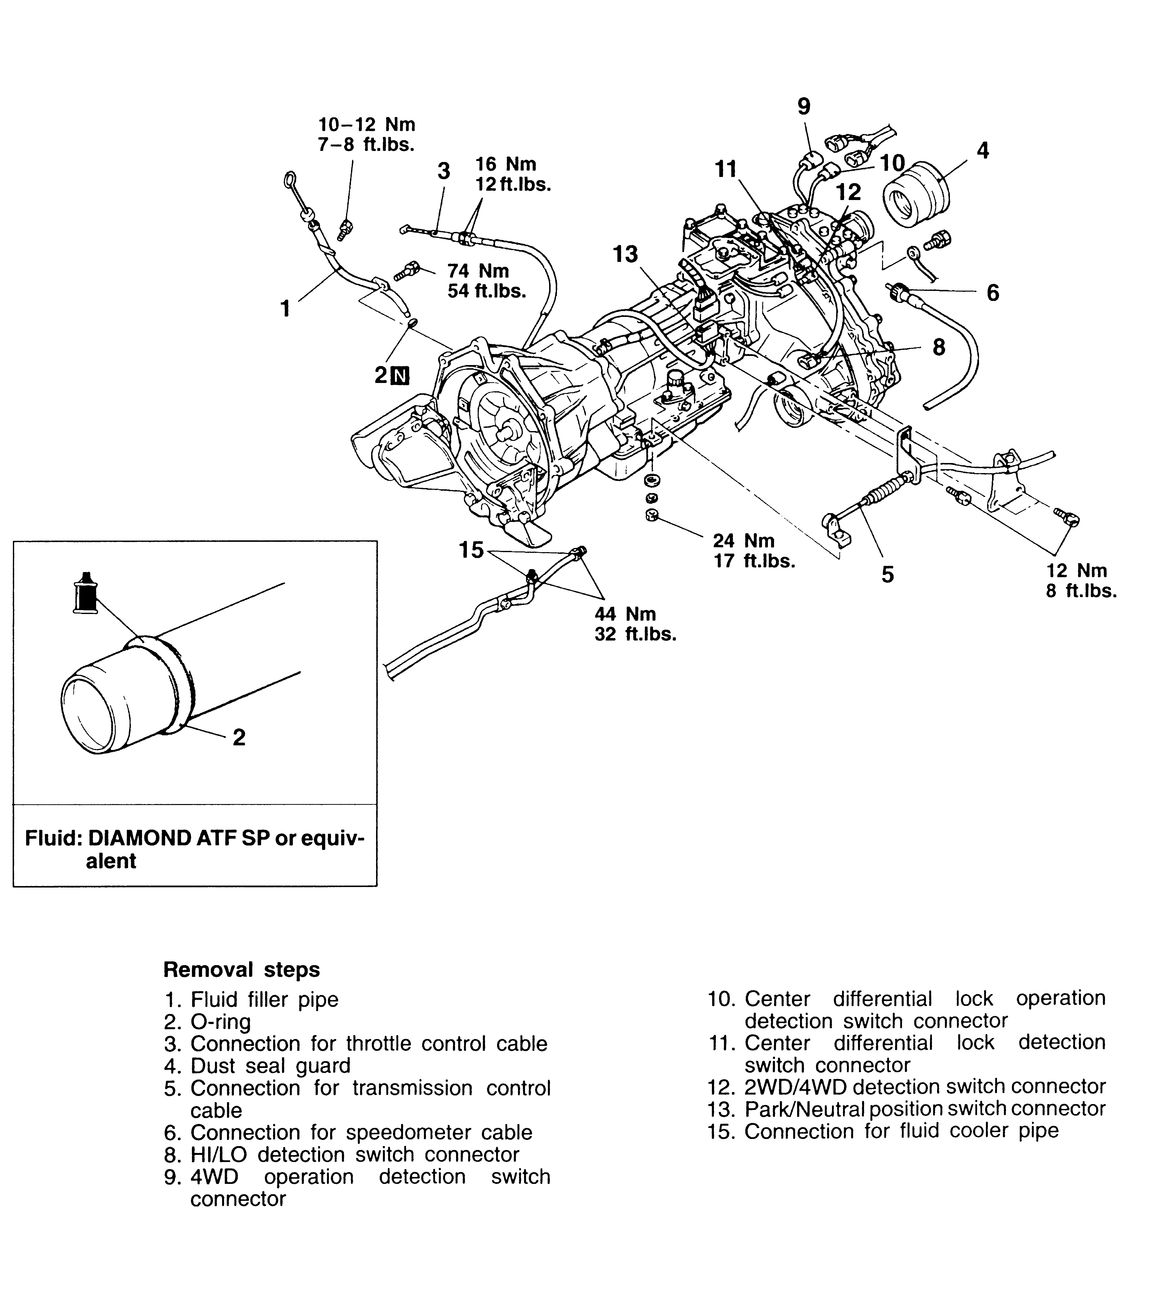
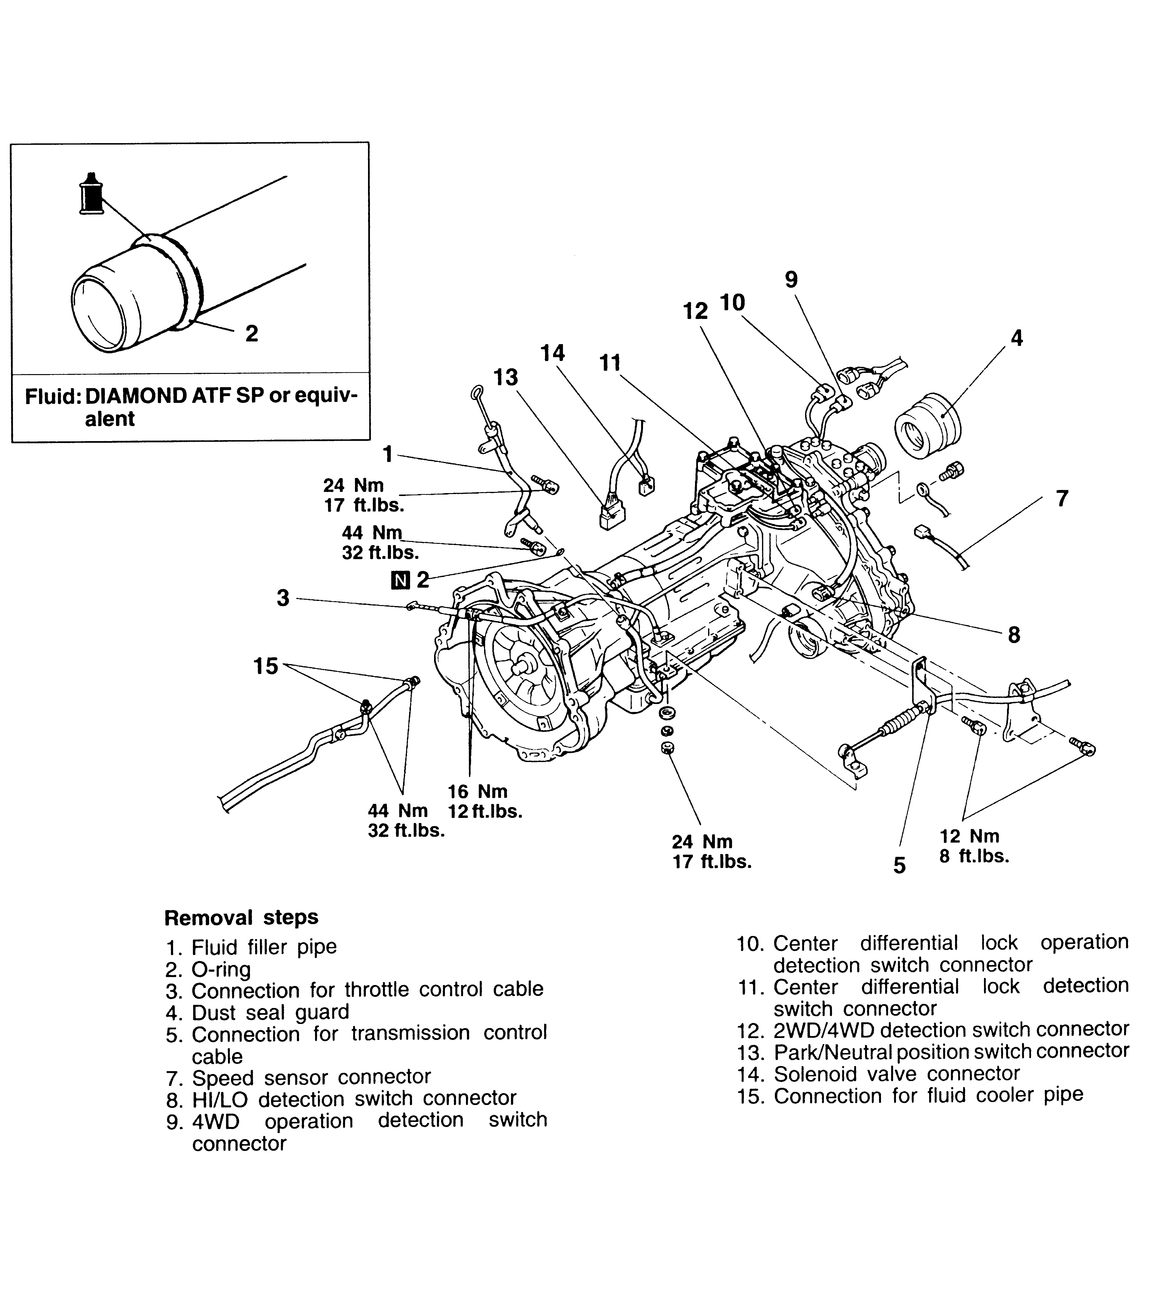
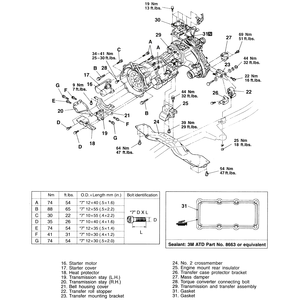
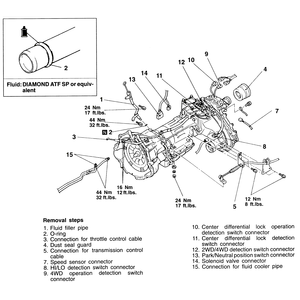
| Fig. 5: Automatic transmission removal and installation — V4AW2
transmissions/ 1990–95 Monteros
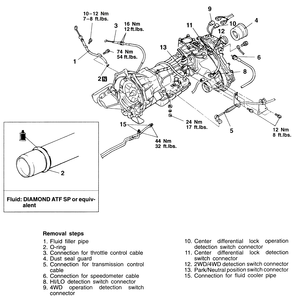
|
| Fig. 6: Automatic transmission removal and installation
continued — V4AW2 transmissions/ 1990–95
Monteros
|
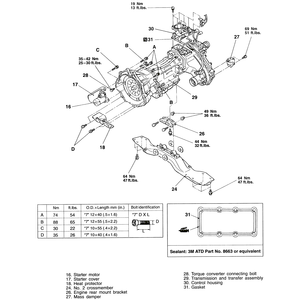
| Fig. 7: Automatic transmission removal and installation — V4AW3
transmissions/ 1994–95 Monteros
|
| Fig. 8: Automatic transmission removal and installation — V4AW3
transmissions/ 1994–95 Monteros
|
To install:
- Lift the transmission and transfer assembly close to position with the floor
jack.
- On the engine side, there are two centering locations. Make sure that the
transmission mounting bolt holes are aligned with them before mounting the
transmission and transfer assembly to the engine. Lowering the rear of the
engine SLIGHTLY may help align the two assemblies.
- Slide the transmission assembly onto the engine making sure the aligning
areas stay aligned.
- Install and tighten the bell housing bolts to 54 ft. lbs. (75 Nm).
- Lift the transmission/transfer assembly with the floor jack (since the engine
is now attached to the transmission, it also will rise slightly — adjust
its jack to keep only slight support).
- Hold the crossmember in place and secure with the mounting bolts. Tighten
the mounting bolts to 47 ft. lbs. (65 Nm).
- Lower the transmission and transfer case assembly onto the crossmember.
Install the two crossmember-to-transmission bolts and tighten them to 29 ft.
lbs. (39 Nm).
- Install the torque converter-to-flywheel bolts. Have that friend of yours
turn the engine until the flywheel (drive plate) holes line up with the torque
converter holes. Install the first bolt finger tight, then have the engine
turned and install the next bolt only finger tight. Continue to do this until
all of the converter bolts are installed finger tight in the flywheel. Tighten
the flywheel-to-torque converter bolts in two stages up to 25–30 ft.
lbs. (34–41 Nm). If the bolts aren't tightened in stages, the flywheel
may become tightened down on an angle.
- Install the transfer mounting bracket, the mass damper and the transfer
case protector bracket back onto the transfer case.
- Install the bell housing lower cover, then mount the left-hand and right-hand
side transmission stays.
- Mount the starter motor and heat shield to the transmission.
- Connect the transmission cooling lines back to the transmission.
- Insert the speedometer cable into the transmission and secure it there with
the retaining ring.
- Plug all of the electrical harness connectors back together.
- Install and adjust (refer to previous adjustment procedures) the kickdown
and shifter linkages.
- Insert the fluid filler tube (with a new O-ring installed) into the transmission.
- Tap the dust seal guard back onto the rear extension housing with a rubber
or plastic mallet.
- Slide the front driveshaft into the transfer case, then attach it to the
front differential. Install the rear driveshaft also. Make certain that the
matchmarks line up.
- Fill the transmission and transfer case with oil — refer
to Section 1.
- Install the front exhaust pipe to the catalytic convertor and the exhaust
manifolds. Use new gaskets if it was equipped with them. Make sure that the
wiring does not lay on or very close to the exhaust pipes or exhaust manifolds,
if they do, reroute them away from the exhaust components.
- Install the transfer case protector.
- Lower the vehicle to the ground. Install the transmission and transfer shift
lever assemblies.
- Connect the negative battery cable to the battery.
- Start the vehicle and check for any transmission or transfer case fluid
leaks.