Previous Next

Transmission

REMOVAL & INSTALLATION

1983–95 2-Wheel Drive Pick-Ups
  1. Elevate and safely support the vehicle on stands.
  2. Drain the transmission fluid.
  3. Remove the shifter assembly.
  4. Disconnect the driveshaft. Matchmark the flanges at the rear axle and remove the bolts. Lower the shaft and slide it to the rear to remove it from the transmission.
  5. Disconnect the reverse light wiring and disconnect the speedometer cable.
  6. Disconnect the mounting bracket for the exhaust system. While not required, it may be helpful the disconnect the exhaust system at the front joint. Use wire to suspend the pipe out of the way.
  7. Remove the bell housing cover.
  8. Disconnect the clutch cable.
  9. Support the transmission with a floor jack. Use a broad piece of wood to distribute the load evenly.
  10. Remove the rear engine support insulator and transmission mount nuts; separate them from the transmission.
  11. Remove the mounting bolts for the rear (No. 2) crossmember. Remove the crossmember and the mount.
  12. Remove the bolts holding the bell housing to the engine. Take note of the placement and size of each bolt; correct reinstallation is required.
  13. Work the transmission rearward and off the engine. Once free, lower the jack and remove the transmission.

    To install:

  14. When reinstalling, position the transmission on the jack. Before installing, make certain the transmission case is in line with the two locating dowels or guides on the rear of the engine. Slide the transmission straight onto the engine and engage the shaft. Do not allow the transmission to hang on the shaft. Install the engine to bell housing retaining bolts. Make sure the bolts are correctly placed.

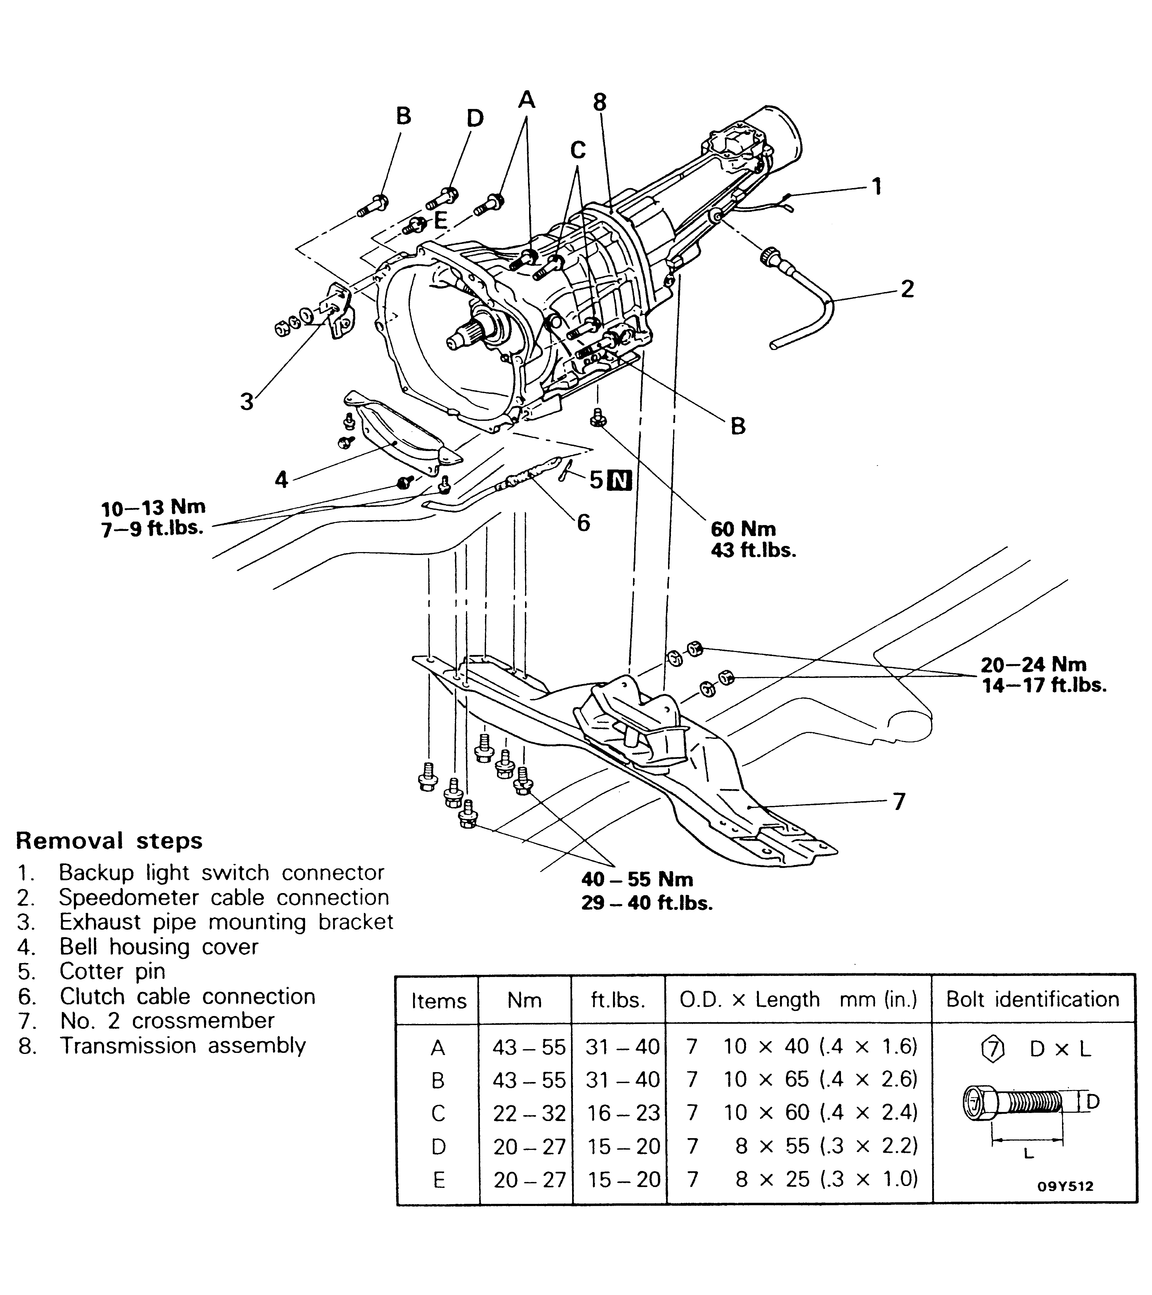
    Fig. 1: Removal and installation for rear-wheel drive manual transmissions — all years similar, some slight differences may exist

  15. Install the rear crossmember, tightening the bolts to 33 ft. lbs. (45 Nm).
  16. Connect the transmission mount and install the nuts and bolts. Correct torque is 15 ft. lbs. (20 Nm).
  17. Connect the clutch cable.
  18. Install the bell housing cover.
  19. Connect the exhaust system if detached and secure the bracket at the transmission case.
  20. Connect the speedometer cable and the backup light wiring harness.
  21. Install the driveshaft observing the matchmarks made earlier.
  22. Install the shift lever assembly.
  23. Install the proper amount of transmission lubricant.
  24. Lower the car to the ground.
1983–89 Monteros and 4-Wheel Drive Pick-Ups
  1. Place the gear selector in Neutral.
  2. Remove the boot retaining screws around the shifter boot; remove the boot and the shift knob.
  3. Pull the gearshift lever assembly out of the control housing.
  4. Cover the opening in the control housing with a cloth to prevent dirt from entering the transmission.
  5. Disconnect the negative battery cable.
  6. Raise and safely support the vehicle on stands.
  7. Matchmark and disconnect the rear driveshaft at both the rear axle and the transfer case flanges.
  8. Disconnect the forward driveshaft from the front axle and remove it by sliding it forward. Install a plug in the transfer case to prevent fluid loss.
  9. Disconnect the hydraulic fluid line from the transfer case.
  10. Disconnect the starter motor cable, the back up lamp harness and the neutral safety switch wire.
  11. Disconnect the speedometer cable.
  12. Place a floor jack and a block of wood below the engine oil pan.
  13. Support the transfer case and remove it from the vehicle.
  14. Remove the starter.
  15. Use a transmission jack or second floor jack to place under the transmission.
  16. Remove the bell housing bolts holding the unit to the engine.
  17. Remove the nuts and bolts attaching the transmission mount and damper to the crossmember.
  18. Remove the nuts and bolts holding the crossmember to the frame rails and remove the crossmember.
  19. Lower the engine jack. Work the clutch housing off the locating dowels and slide the clutch housing and the transmission rearward until the input shaft clears the clutch disc.
  20. Remove the transmission unit from the vehicle.

    To install:

  21. Make certain all the mating surfaces are free of nicks, burrs, paint, etc. The transmission may be reinstalled with or without the transfer case attached.
  22. Elevate the transmission on a jack under the car and position it correctly. Start the input shaft into the clutch disc.
  23. Align the splines on the input shaft with the splines in the clutch disc.
  24. Move the transmission forward and carefully seat the clutch housing on the locating dowels of the engine rear plate.
  25. Install the bolts and washers attaching the clutch housing to the rear plate and tighten them to 36 ft. lbs (49 Nm).
  26. Install the starter motor. Tighten the nuts to 20 ft. lbs (27 Nm).
  27. Raise the engine and install the rear crossmember, insulator and damper.
  28. Install the transfer case.
  29. Install the driveshafts front and rear. Make sure the marks made during disassembly are aligned.
  30. Connect the starter cable, the backup light wiring and other wires to the transmission.
  31. Connect the hydraulic line to the slave cylinder. Bleed the clutch system.
  32. Install the speedometer cable.
  33. Remove the fill plug and fill the transmission unit to the correct level.
  34. Lower the vehicle to the ground.
  35. Remove the cloth over the transfer case adapter. Install the gear shift lever assembly in the transfer case. Make sure the ball on the lever is in the socket in the adapter. Install the attaching bolts and tighten to 10 ft. lbs. (12 Nm).
  36. Install the boot cover, shift knob and boot retaining screws.
1990–95 Monteros and 4-Wheel Drive Pick-Ups
  1. Disconnect the negative battery cable from the battery.
  2. Remove the transmission and transfer shift lever assembly — refer to the previously described procedures.
  3. Raise and support the vehicle on jackstands. Before crawling under the vehicle, make absolute certain that the vehicle is safely supported by the jackstands.
  4. Remove the transfer case protector.
  5. Unfasten the front exhaust pipe from the two exhaust manifolds, then disconnect it from the intermediate pipe/ catalytic convertor (make certain to retain the bolts and nuts for reassembly). Remove the entire pipe from under the vehicle.
  6. Drain the transmission fluid into a clean, large pan. With the transmission out for any reason, it is a good time to change the transmission fluid filter on automatic transmissions.
  7. Matchmark and disconnect the rear driveshaft at both the rear axle and the transfer case flanges.
  8. On 4-wheel drive vehicles, disconnect the forward driveshaft from the front axle and remove it by sliding it forward. Install a plug in the transfer case to prevent residual fluid leakage.
  9. Remove the dust seal from the rear extension housing.
  10. Label and unplug all wires leading to the transmission, some are: Ground cables, 4WD indicator light switch connector, pulse generator connector, oxygen sensor connector, back-up light switch connector, HI/LO detection switch connector, center differential lock detection switch connection. There may be others depending on the particular year, model and engine the vehicle came equipped with.
  11. Unscrew the retaining ring holding the speedometer in the transmission. Pull the speedometer cable out of the transmission and label it.
  12. Remove the clutch cylinder heat protector, if so equipped.
  13. Remove the retaining bolts, then the clutch release cylinder (with the clutch hose connected to it) from the transmission. Suspend it from the body by using a piece of wire or a similarly safe method.
  14. Unbolt the starter motor from the front of the transmission and remove it. Remove the heat shield, if so equipped.
  15. Place a floor jack and a block of wood below the engine oil pan.
  16. Lift the floor jack under the engine just until the weight of the engine is taken onto the jack — the engine should only barely be lifted by the jack.
  17. Use a transmission jack or second floor jack to place under the transmission. Don't support the transmission yet, only lift the jack until it is slightly below the transmission.
  18. Remove the left-hand and right-hand side transmission stays from the front of the transmission.
  19. Unbolt the bell housing lower cover.
  20. Remove the transfer case mounting bracket.
  21. Lift the floor jack up until the transmission is being slightly supported by it.
  22. Remove the two transmission-to-crossmember bolts. Lift the jack about 14 in. (6mm) off of the crossmember support. Remove the entire crossmember from the vehicle.
  23. Remove the transmission and transfer case assembly together.

    CAUTION
    Do not jolt the transmission when it is being removed from the engine. If it is jolted strongly, the front end of the main drive gear, pilot bearing or clutch disk could be damaged.

    1. Disconnect the transmission and transfer assembly from the engine by pulling it slowly toward the rear of the vehicle.
    2. When the transmission and transfer assembly are lowered, tilt the front of the transmission downward and slowly lower forward, while making sure that the rear of the transmission does not interfere with the rear-most crossmember.

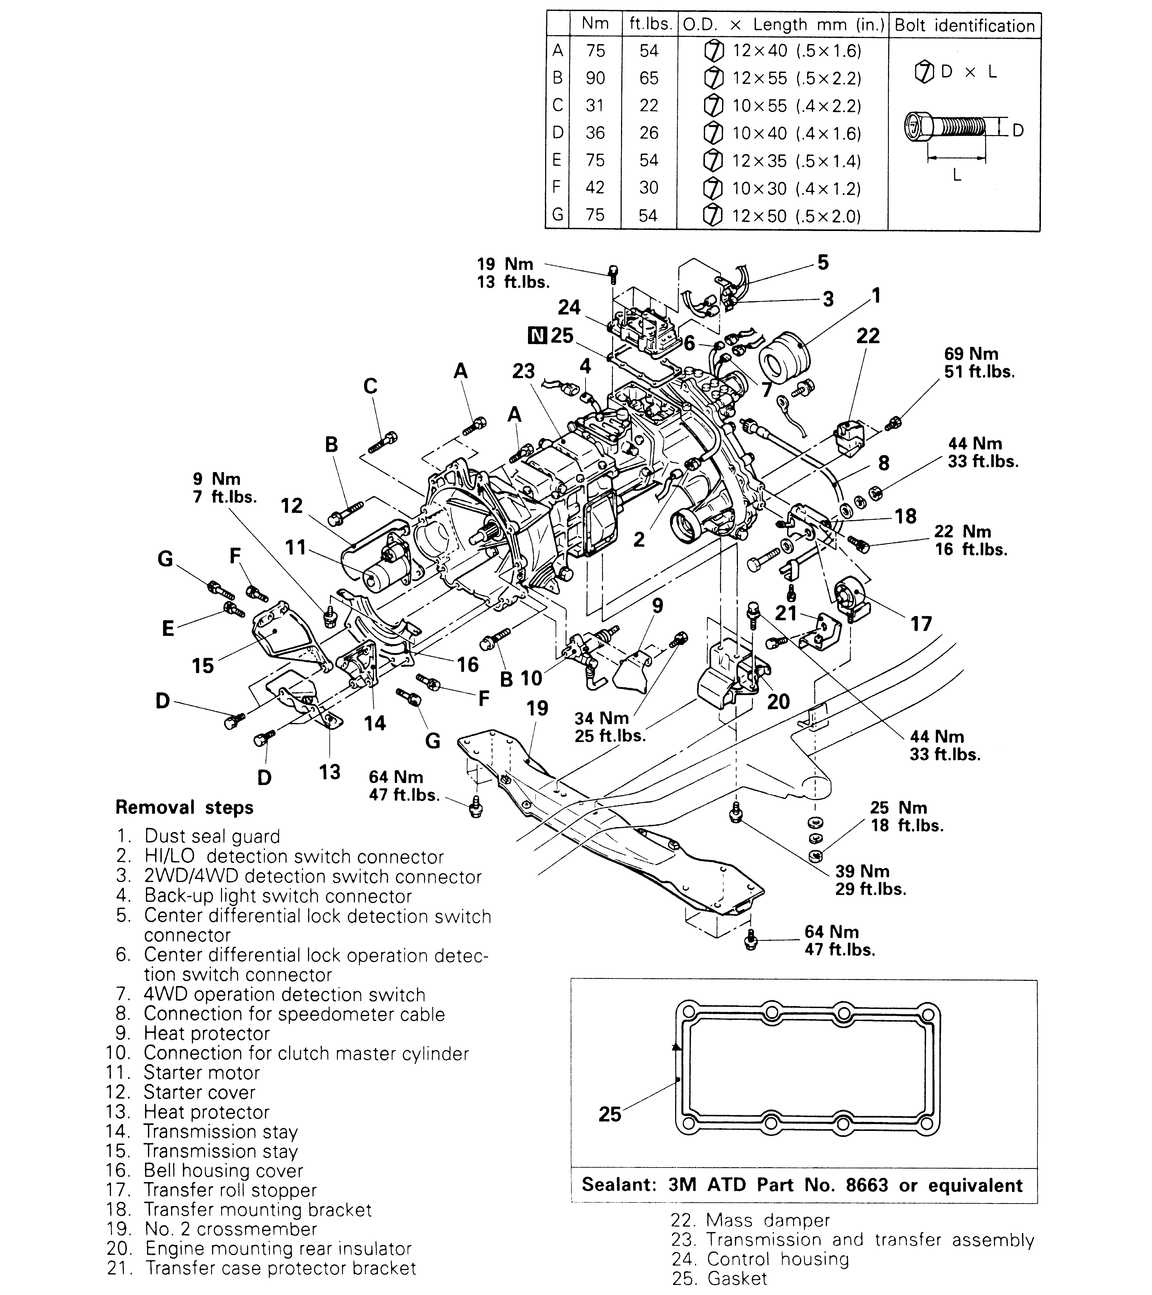
      Fig. 2: Removal and installation for the 1992–95 Montero manual transmission — other years are similar, some differences may be present

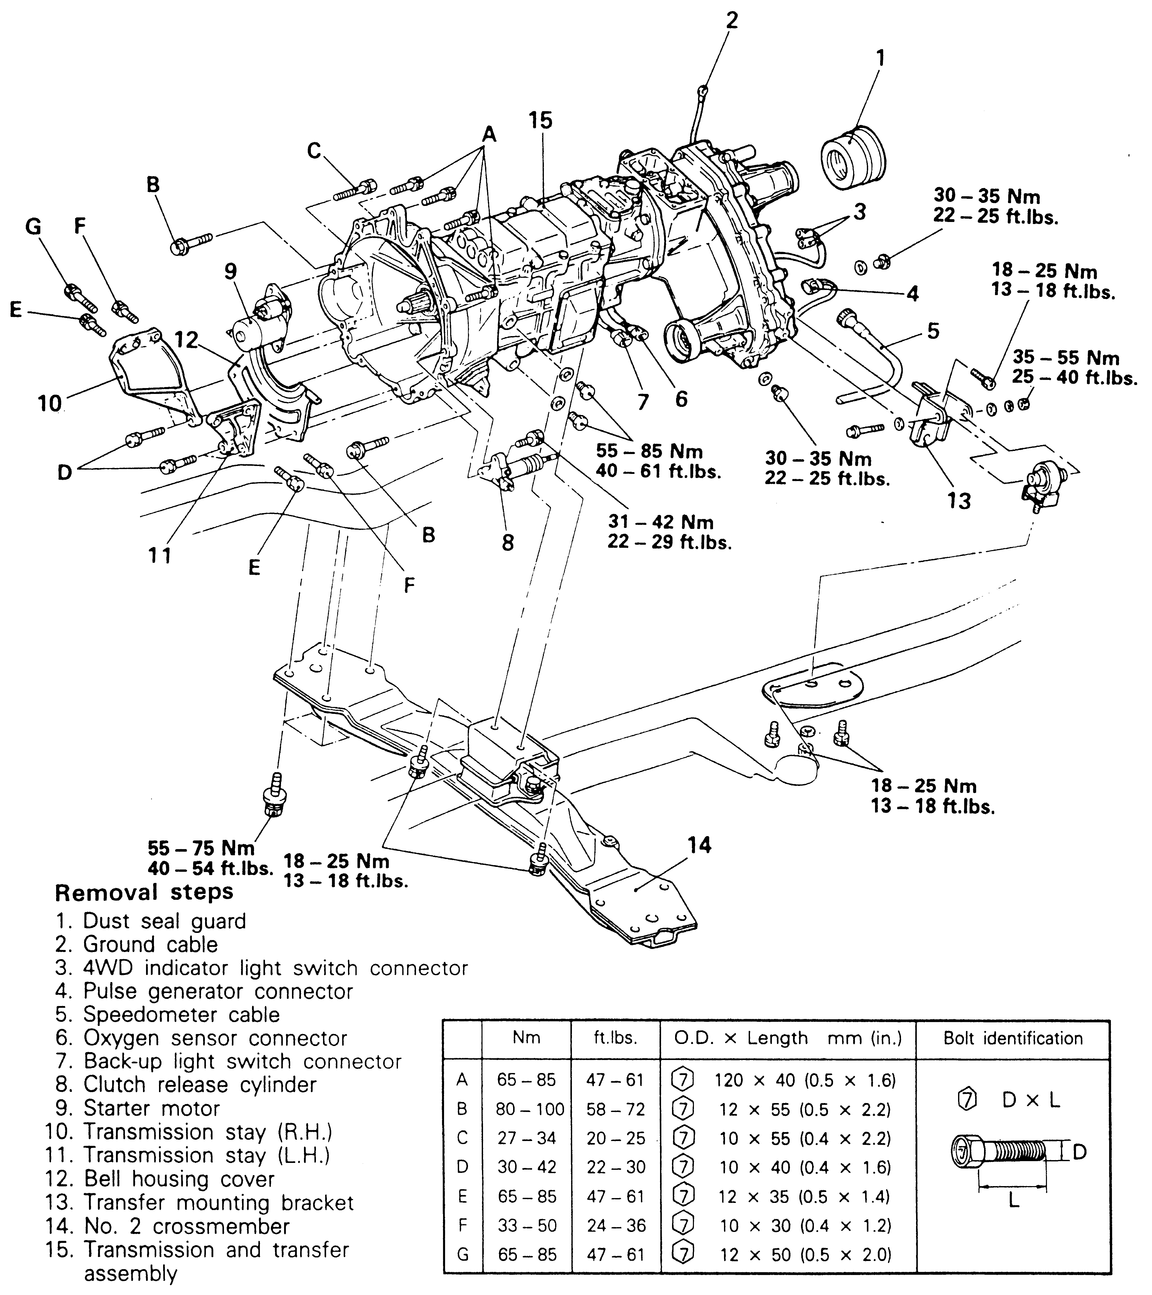
      Fig. 3: Although mostly similar with the Montero, the 4-wheel drive manual transmission for the 1990–95 Pick-ups has different torque values and components

      To install:

  24. Lift the transmission and transfer assembly close to position with the floor jack.
  25. On the engine side, there are two centering locations. Make sure that the transmission mounting bolt holes are aligned with them before mounting the transmission and transfer assembly to the engine. Lowering the rear of the engine SLIGHTLY may help align the two assemblies.
  26. Slide the transmission assembly onto the engine making sure the aligning areas stay aligned.
  27. Install and tighten the bell housing bolts to 54 ft. lbs. (75 Nm).
  28. Lift the transmission/transfer assembly with the floor jack. Since the engine is now attached to the transmission, it also will rise slightly — adjust its jack to keep only slight support.
  29. Hold the crossmember in place and secure with the mounting bolts. Tighten the mounting bolts to 47 ft. lbs. (65 Nm).
  30. Lower the transmission and transfer case assembly onto the crossmember. Install the two crossmember-to-transmission bolts and tighten them to 13–18 ft. lbs. (18–25 Nm) on Pick-ups and to 29 ft. lbs. (39 Nm) on Monteros.
  31. Install the transfer mounting bracket back onto the transfer case.
  32. Install the bell housing lower cover, then mount the left-hand and right-hand side transmission stays.
  33. Mount the starter motor and clutch release cylinder (and heat shield, if so equipped) to the transmission.
  34. Insert the speedometer cable into the transmission and secure it there with the retaining ring.
  35. Plug all of the electrical harness connectors back together.
  36. Tap the dust seal guard back onto the rear extension housing with a rubber or plastic mallet.
  37. Slide the front driveshaft into the transfer case, then attach it to the front differential. Install the rear driveshaft also. Make certain that the matchmarks line up.
  38. Fill the transmission and transfer case with oil. Refer to Section 1.
  39. Install the front exhaust pipe to the catalytic convertor and the exhaust manifolds. Use new gaskets if it was equipped with them. Make sure that the wiring does not lay on or very close to the exhaust pipes or exhaust manifolds, if they do, reroute them away from the exhaust components.
  40. Install the transfer case protector.
  41. Lower the vehicle to the ground. Install the transmission and transfer shift lever assembly.
  42. Connect the negative battery cable to the battery.
  43. Start the vehicle and check for any transmission or transfer case fluid leaks.

Previous Next