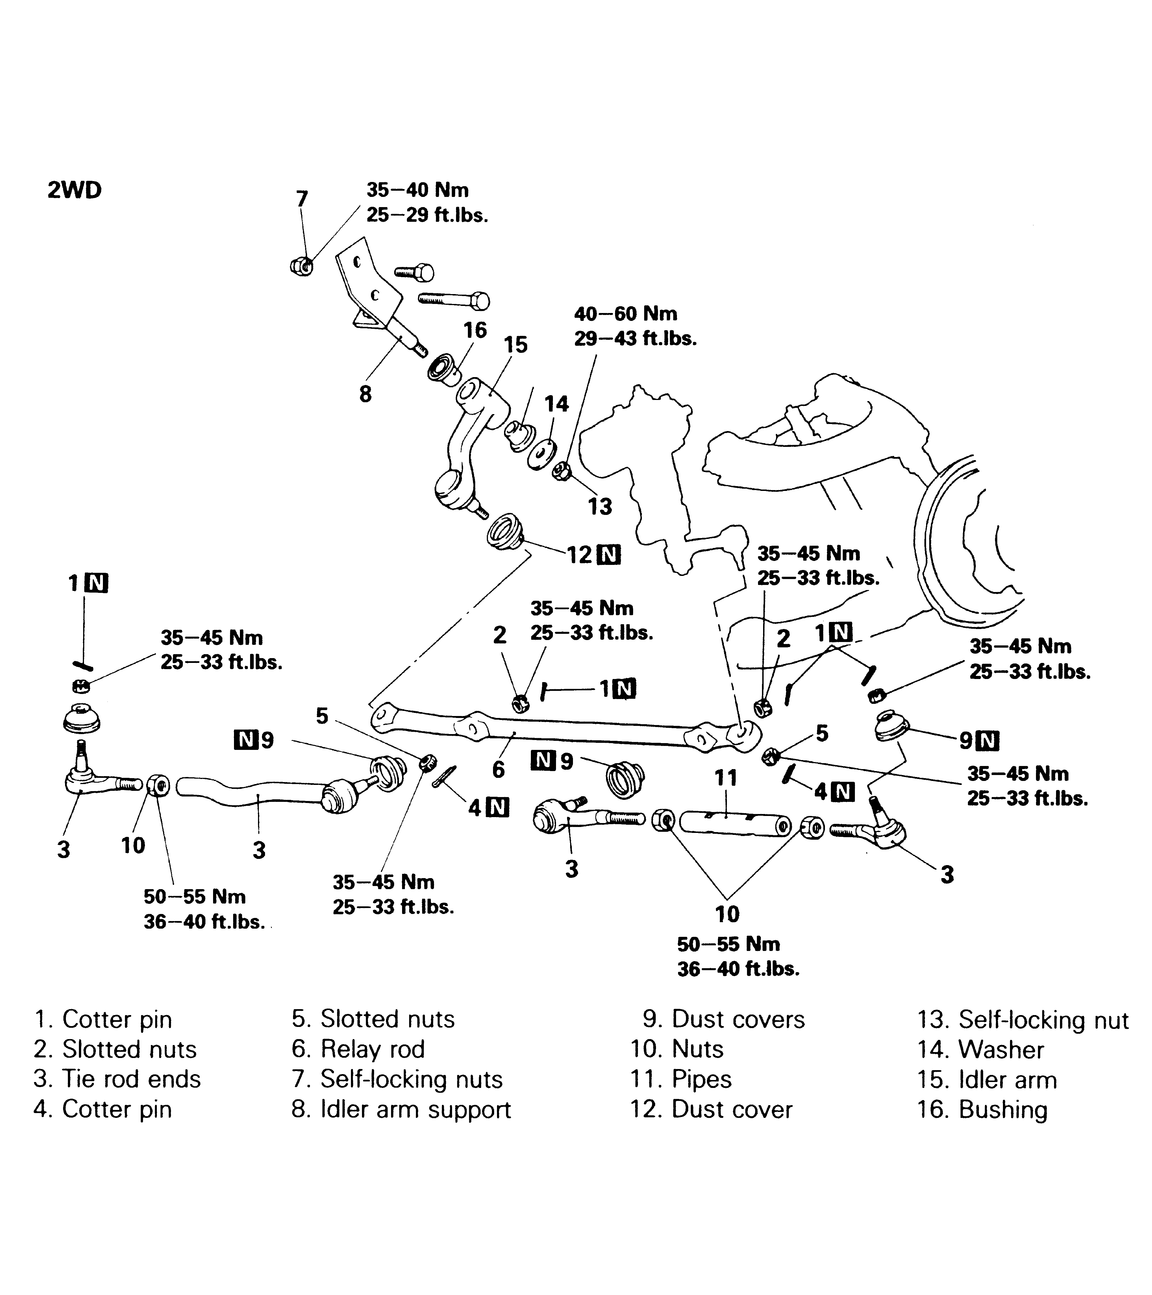
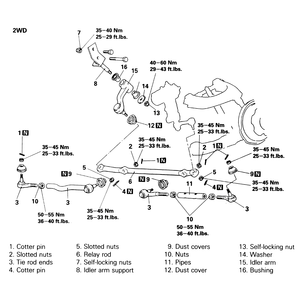
| Fig. 1: Steering linkage components and torque values
for 1983–91 rear wheel drive vehicles
|
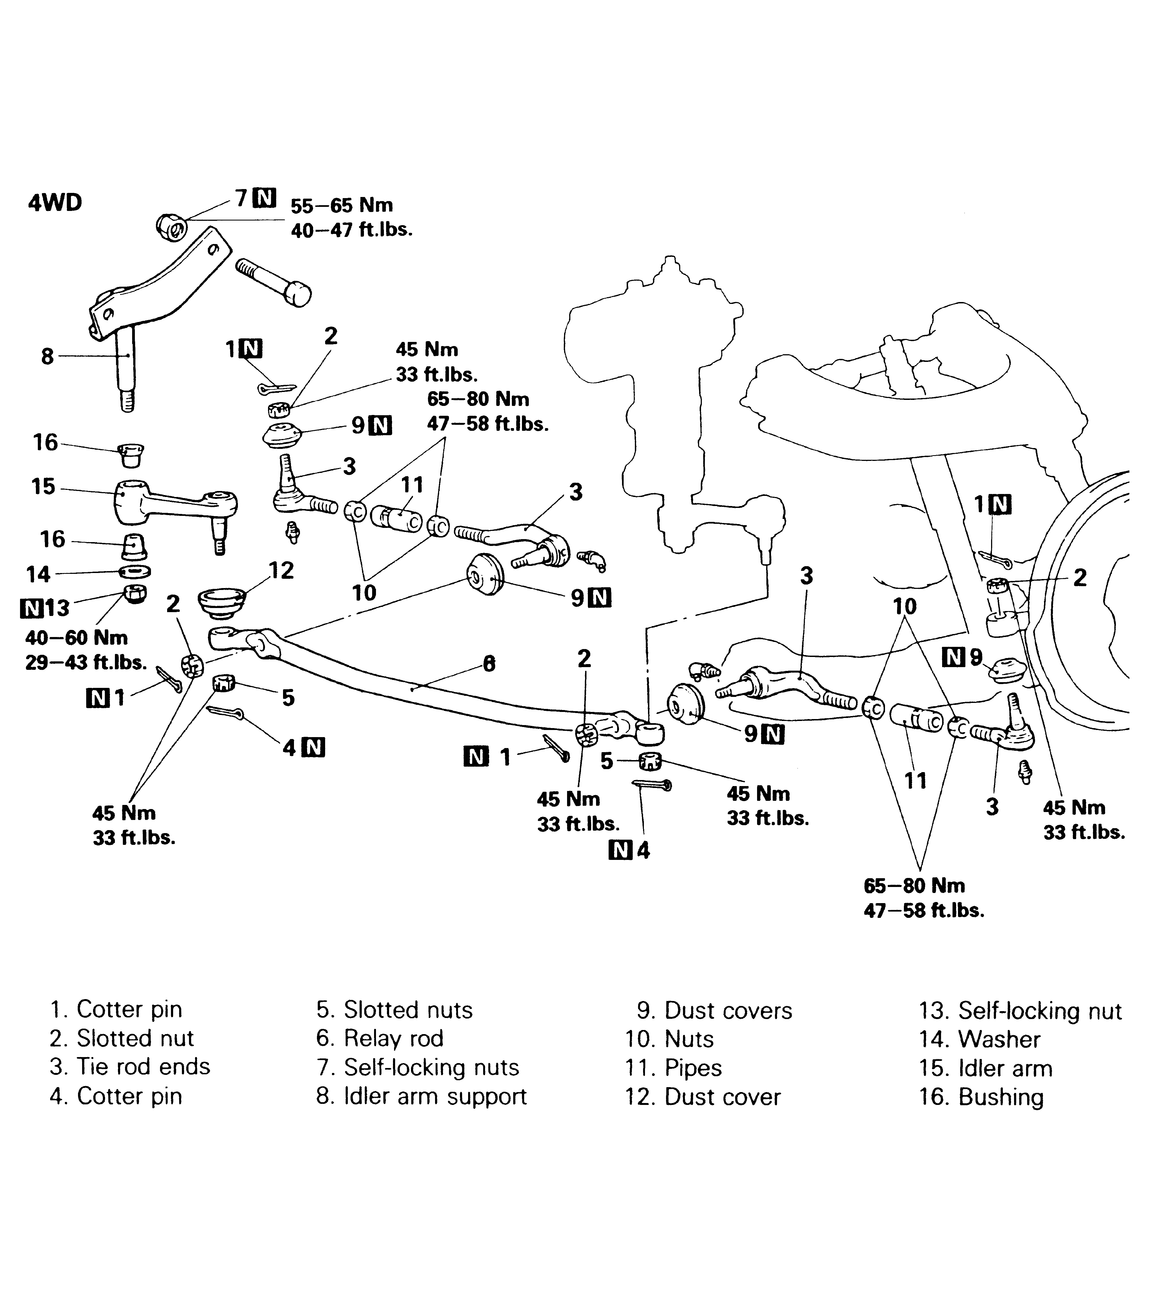
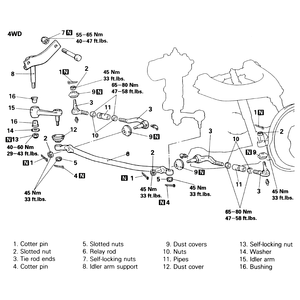
| Fig. 2: Steering linkage components and torque values
for 1983–91 4-wheel drive vehicles
|
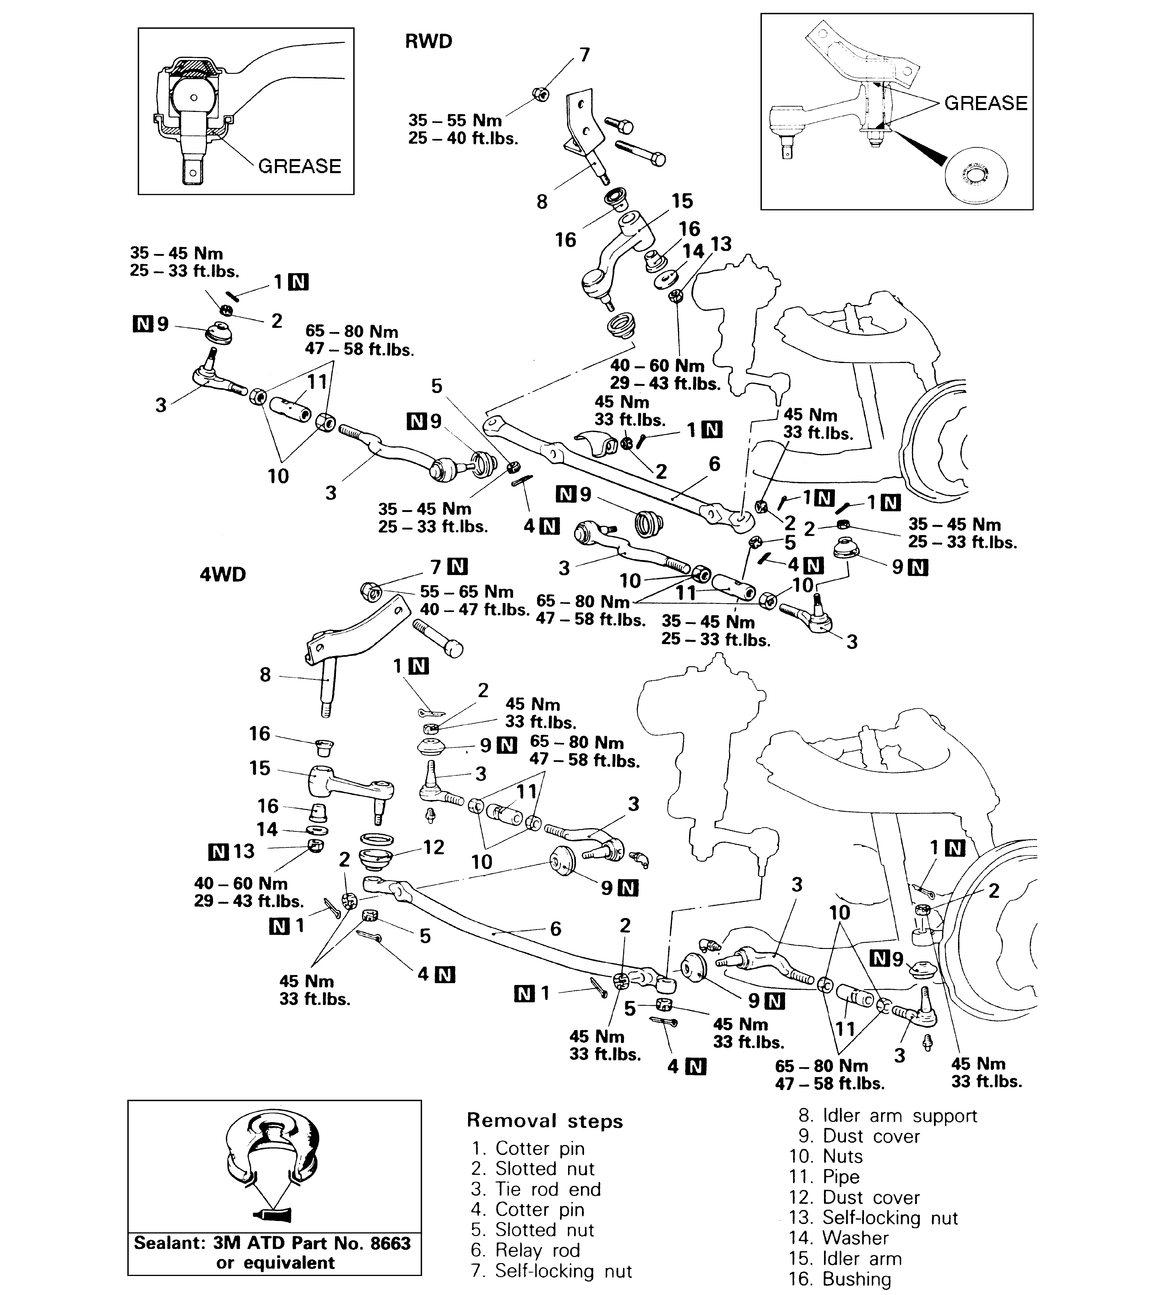
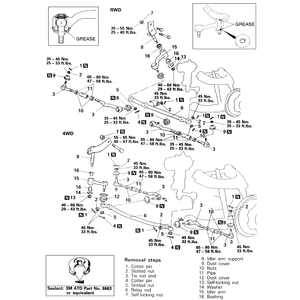
| Fig. 3: Steering linkage components and torque values
for 1992–95 Pick-ups and Monteros
|
| Fig. 4: The fork-type joint separator will be needed
for removal of some of the front steering components

|
NOTE: It is possible to remove the Pitman arm with the steering
box on the car. The job is much easier if the steering gearbox is removed.
- Elevate and safely support the vehicle on jackstands.
- Remove the left front wheel.
- Remove the cotter pin and castle nut holding the Pitman arm to the relay
rod.
- Use a screw-type joint separator to pull the relay rod off the Pitman arm
joint. Do not hammer on the joint and do not use a fork-type separator.
- Remove the locknut and washer from the bottom of the steering gearbox.
- Using a Pitman arm puller (MB 990809–01 or equivalent), remove the
arm from the steering box.
- When installing the arm, note that there are matchmarks on both the arm
and the gearbox output shaft. These marks MUST be aligned at reinstallation.
- Install the locknut and washer to the steering pump shaft. Tighten the nut
to 190 ft. lbs. (140 Nm).
- Fit the Pitman arm to the relay rod joint. Use a new boot. Install a new
castle nut, tightening it to 30 ft. lbs. (40 Nm). Install a new cotter pin.
- Install the left wheel. Lower the vehicle to the ground.
- Elevate and safely support the vehicle on stands.
- Remove the front wheels.
- Remove the cotter pin and the castle nut holding the relay rod to the idler
arm.
- Use a screw-type joint separator to split the ball joint at the relay rod.
- Remove the nut holding the idler arm to its pivot. Remove the arm, noting
the placement of the spacers, washers and the plastic bushings. Alternatively,
the idler arm pivot may be unbolted from the vehicle and the arm disassembled
on the workbench.
- Remove the dust cover and O-ring from the end of the tie rod. Apply grease
(Multipurpose grease SAE J310, NLGI No. 2) to the lip portion of the dust
cover and inside the cover. Apply 3M® ART Part No. 8663 or the equivalent
to the dust cover installation surface, then press it in.
- Apply grease to the inside surface of the bushing and the idler arm support
shaft. Insert the bushing into the idler arm, then insert the idler arm support
into the idler arm. Insert so that the knurled surface of the washer is facing
the bushing side. Tighten the self locking nut to 36 ft. lbs. (50 Nm).
- If the entire pivot and bracket was removed, tighten the mounting bolts
to 40 ft. lbs. (55 Nm).
- Connect the idler arm to the relay rod and install the nut on the ball stud.
Tighten the nut to 33 ft. lbs. (45 Nm); install a new cotter pin.
- Lubricate the front end components.
- Install the wheels and lower the vehicle to the ground.
Mitsubishi refers to this component as the Relay Rod.
- Disconnect the tie-rod ends from the relay rod on each side.
- Disconnect the relay rod at the Pitman arm, using a screw-type puller to
separate the joint.
- Position a jack or jackstand under the relay rod at the Pitman arm to support
it; allowing the linkage to hang free may damage one of the joints.
- Disconnect the relay rod from the idler arm.
- Remove the linkage assembly from the car.
- Individual pieces of the linkage may be separated on the workbench. Do not
reuse any dust cover, O-ring or cotter pin.
To install:
- Reassemble the linkage and position it under the car, using the jack to
assist you.
- Install the joint to the idler arm first, then connect the Pitman arm joint
and install the tie rod ends to the knuckle. Each castellated nut should be
tightened to 33 ft. lbs. (45 Nm) and be secured with a new cotter pin.
- Lubricate the front end steering components.
- Raise the vehicle and support it safely on jackstands.
- Remove the wheel on the same side as the tie rod end which needs to be replaced.
- Remove the cotter pin from the tie rod end. Loosen, but do not remove, the
nut on the tie rod.
- Use a fork-type tie rod separator, remove the tie rod from the steering
knuckle. Remove the nut and pull the outer tie rod out of the knuckle. Use
a screw-type joint separator to remove the inner tie rod end from the relay
rod (center link).
- Loosen the sleeve clamp nut, if equipped, and unscrew the tie rod end from
the sleeve or inner tie rod. Count the number of turns required to remove
the end, or measure, before removal, the amount of threads protruding from
the sleeve. Do the same for the inner tie rod end.
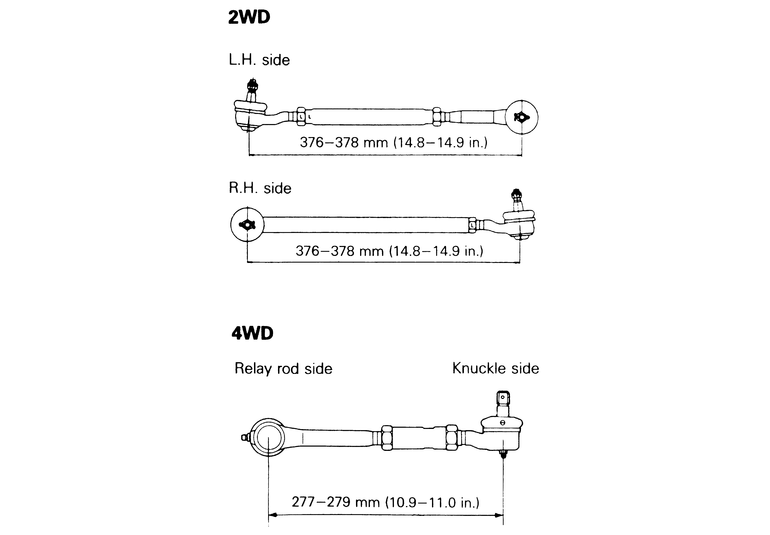
- If both ends of the tie rod were removed, there is a third way to measure
the correct location of the tie rods. Install the tie rods into the sleeve
and continue to tighten until the distance between the centers of each tie
rod end is equal to the following dimensions:
- 1983–91 Rear wheel drive vehicles — 14.8–14.9
in. (37.6–37.8cm)
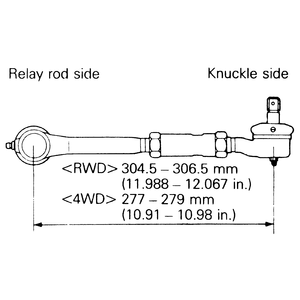
- 1992–95 Rear wheel drive vehicles — 11.988–12.067
in. (30.45–30.65cm)
- 1983–95 4-wheel drive vehicles — 10.9–11.0
in. (27.7–27.9cm)
| Fig. 5: Tie rod end measurements for reassembly — 1983–91
vehicles
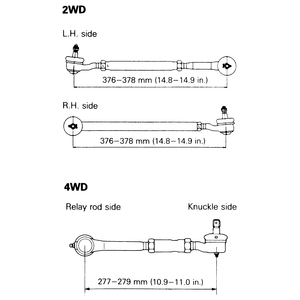
|
| Fig. 6: Tie rod end measurements for reassembly — 1992–95
vehicles
|
- Install the new end and turn it in the same number of turns or until the
same amount of threads is left protruding from the sleeve. This will approximate
the original setting.
- Install the tie rod joint to the knuckle. Tighten the nut to 25–33
ft. lbs. (35–45 Nm). Install a new cotter pin.
- Install the inner tie rod end to the relay rod, then tighten to the castle
nut to 33 ft. lbs. (45 Nm). Install a new cotter pin.
- Lubricate the front end.
- Install the wheels and lower the vehicle to the ground.
- Have the front end aligned at an automotive shop.