Previous Next

REMOVAL & INSTALLATION

  1. Slide back the clip and disconnect the vacuum supply line at the brake booster. Pull the hose off gently in order to avoid damaging the check valve.
  2. Remove the master cylinder as described previously.
  3. Disconnect the pushrod at the brake pedal. Pull the cotter pin or lockpin out of the pedal clevis. Separate the rod from the pedal.
  4. Remove the mounting bolts and nuts from the firewall and remove the booster.
  5. On the 1983–85 diesel powered Pick-ups, the 1983–86 gasoline powered Pick-ups and the 1983–95 Monteros, remove the two gaskets and the booster spacer from the firewall.

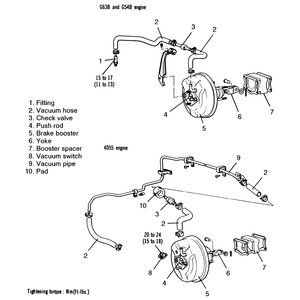
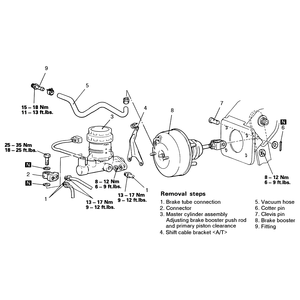
    Fig. 1: Power brake booster removal and installation components — 1983–86 Pick-ups and Monteros

    Fig. 2: Power brake booster removal and installation components — 1987–95 Pick-ups; 1987–95 Monteros similar

  6. Install the booster and tighten the nuts and bolts to 9 ft. lbs. (12 Nm). Do not overtighten these bolts.

    NOTE: Some boosters use a spacer block and gaskets between the firewall and the booster. If present, they must be reinstalled in the correct order and position.

  7. Connect the brake pedal to the pushrod and install a new cotter pin. A light coat of multipurpose grease on the clevis pin and washer is recommended.
  8. Before reinstalling the master cylinder, the booster pushrod clearance must be calculated and adjusted. This is particularly important if the booster has been replaced. Please refer to the master cylinder procedure given previously and perform the necessary steps.
  9. Install the master cylinder and bleed the brake system completely.

Previous Next