Code No.P1773: LR Solenoid Valve System

OPERATION
- Solenoid valve closes or opens according to the signals from the A/T-ECU.
- The A/T-ECU energises or deenergises solenoid valve, based on input signals such as accelerator pedal position sensor opening angle, inhibitor switch, etc.
DIAGNOSIS CODE SET CONDITIONS
If the drive terminal voltage of the LR solenoid valve is 3.0 V or less, it is judged that there is a short circuit or open circuit in the LR solenoid valve, and diagnosis code P1773 is set.
If diagnosis code P1773 is set 4 times, the transmission is fixed in 3rd as a fail-safe measure.
PROBABLE CAUSES
- Malfunction of LR solenoid valve
- Damaged harness wires and connectors
- Malfunction of the A/T-ECU
|
|
STEP 1. M.U.T.-III diagnosis code
|
|
|
Q.
Is diagnosis code P1778 set?
|
|
|
 Go to Step 9. Go to Step 9.
|
|
|
|
|
|
 Go to Step 2. Go to Step 2.
|
|
|
|
|
|
STEP 2. M.U.T.-III actuator test
|
|
|
Item 1: LR solenoid valve
|
|
|
OK: Operating sound can be heard.
|
|
|
Q.
Is the check result normal?
|
|
|
Intermittent malfunction (Refer to GROUP 00 -
How to Cope with Intermittent Malfunction  ). ).
|
|
|
|
|
|
Go to Step 3.
|
|
|
|
|
|
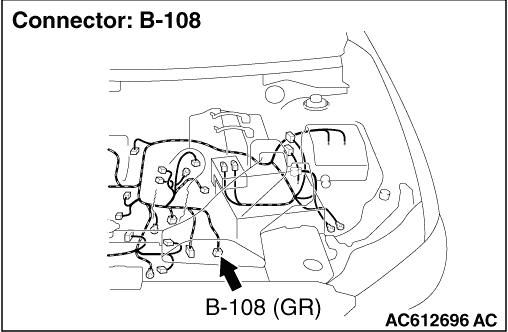
STEP 3. Connector check: B-108 A/T control solenoid valve assembly connector
|
|
|
Check for the contact with terminals.
|
|
|
Q.
Is the check result normal?
|
|
|
Go to Step 4.
|
|
|
|
|
|
Repair the defective connector.
|
|
|
|
|
|
STEP 4. Measure the resistance at A/T control solenoid valve assembly connector B-108.
|
|
|
Disconnect the connector, and measure the resistance between terminal No.6 and No.10 at the solenoid valve side.
|
|
|
OK: 2.7 -
3.4 Ω
(A/T fluid temperature 20°C)
|
|
|
Q.
Is the check result normal?
|
|
|
Go to Step 5.
|
|
|
|
|
|
Check the LR solenoid valve and solenoid valve harness.
|
|
|
|
|
|
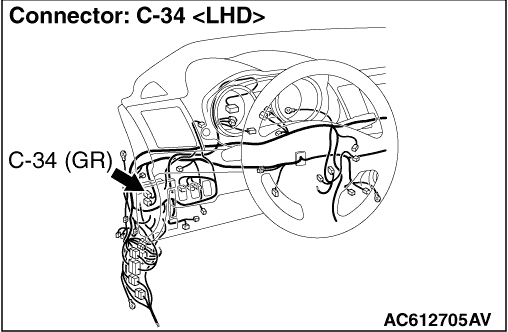
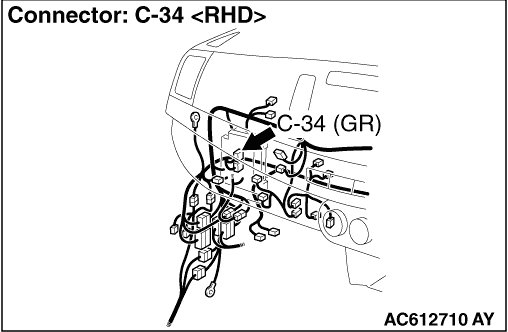
STEP 5. Measure the voltage at A/T-ECU connector C-34.
|
|
|
(1)Connect A/T control solenoid valve assembly connector B-108.
|
|
|
(2)Turn the ignition switch to the ON position.
|
|
|
(3)Measure the voltage between A/T-ECU connector C-34 terminal No.61 and earth.
OK: System voltage
|
|
|
Q.
Is the check result normal?
|
|
|
Go to Step 8.
|
|
|
|
|
|
Go to Step 6.
|
|
|
|
|
|
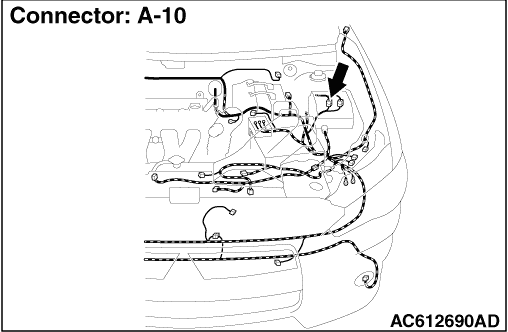
STEP 6. Connector check: A-10 intermediate connector, C-34 A/T-ECU connector
|
|
|
Check for the contact with terminals.
|
|
|
Q.
Is the check result normal?
|
|
|
Go to Step 7.
|
|
|
|
|
|
Repair the defective connector.
|
|
|
|
|
|
STEP 7. Check the harness between A/T control solenoid valve assembly connector B-108 terminal No.6 and A/T-ECU connector C-34 terminal No.61.
|
|
|
Check the output line for short or open circuit.
|
|
|
Q.
Is the check result normal?
|
|
|
Go to Step 8.
|
|
|
|
|
|
Repair the wiring harness.
|
|
|
|
|
|
STEP 8. M.U.T.-III actuator test
|
|
|
Item 1: LR solenoid valve
|
|
|
OK: Operating sound can be heard.
|
|
|
Q.
Is the check result normal?
|
|
|
Intermittent malfunction (Refer to GROUP 00 -
How to Cope with Intermittent Malfunction ).
|
|
|
|
|
|
Replace the A/T-ECU.
|
|
|
|
|
|
STEP 9. Connector check: B-108 A/T control solenoid valve assembly connector
|
|
|
Check for the contact with terminals.
|
|
|
Q.
Is the check result normal?
|
|
|
Go to Step 10.
|
|
|
|
|
|
Repair the defective connector.
|
|
|
|
|
|
STEP 10. Measure the resistance at A/T control solenoid valve assembly connector B-108.
|
|
|
Disconnect the connector, and measure the resistance between terminal No.6 and No.10 at the solenoid valve side.
|
|
|
OK: 2.7 -
3.4 Ω
(A/T fluid temperature 20°C)
|
|
|
Q.
Is the check result normal?
|
|
|
Go to Step 11.
|
|
|
|
|
|
Check the solenoid valve harness.
|
|
|
|
|
|
STEP 11. Connector check: A-10 intermediate connector, A-16X A/T control relay connector
|
|
|
Check for the contact with terminals.
|
|
|
Q.
Is the check result normal?
|
|
|
Go to Step 12.
|
|
|
|
|
|
Repair the defective connector.
|
|
|
|
|
|
STEP 12. Check the harness between A/T control solenoid valve assembly connector B-108 terminal No.10 and A/T control relay connector A-16X terminal No.3.
|
|
|
Check the power supply line for short or open circuit.
|
|
|
Q.
Is the check result normal?
|
|
|
Go to Step 8.
|
|
|
|
|
|
Repair the wiring harness.
|
|
|
|
)
)
)
)
)
)