FRONT COMBINATION LAMP
XENON TYPE
Exploded View
 REMOVAL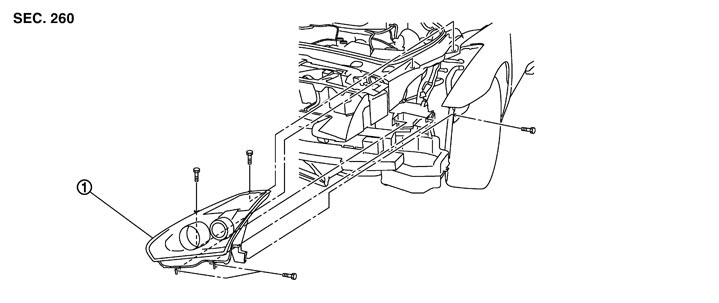
|
1. |
Front combination lamp |
|
|
|
|
DISASSEMBLY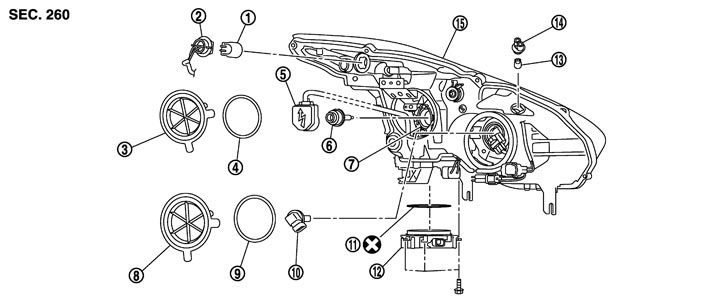
|
1. |
Front turn signal lamp bulb |
2. |
Front turn signal lamp bulb socket |
3. |
Resin cap |
|
4. |
Seal packing |
5. |
Xenon bulb socket |
6. |
Xenon bulb (LO) |
|
7. |
Retaining spring |
8. |
Resin cap |
9. |
Seal packing |
|
10. |
Halogen bulb (HI) |
11. |
Seal packing |
12. |
HID control unit |
|
13. |
Parking lamp bulb |
14. |
Parking lamp bulb socket |
15. |
Headlamp housing assembly |
|
Refer to Components for symbols in the figure. |
|||||
Removal and Installation
REMOVAL■ CAUTION ■
Disconnect the battery negative terminal or remove the fuse.
- 1.Remove front bumper fascia. Refer to Exploded View.
- 2.Remove the headlamp mounting bolts.
- 3.Remove the harness clip (A) and the washer tube (B)*.*: Left side only
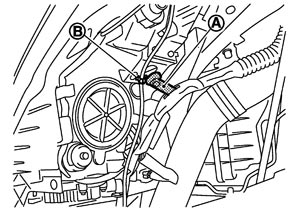
- 4.Pull out the headlamp assembly forward the vehicle.
- 5.Disconnect the connector before removing the headlamp housing assembly.
INSTALLATIONInstall in the reverse order of removal.
NOTE:
After installation, perform aiming adjustment. Refer to Description.Replacement
■ CAUTION ■
- Disconnect the battery negative terminal or remove the fuse.
- After installing the bulb, install the resin cap and the bulb socket securely for watertightness.
- Never touch the glass of bulb directly by hand. Keep grease and other oily matters away from it.
- Never touch bulb by hand while it is lit or right after being turned off.
- Never leave bulb out of lamp reflector for a long time because dust, ,moisture smoke, etc. may affect the performance of lamp. When replacing bulb, be sure to replace it with new one.
HEADLAMP BULB (LO)- 1.Remove the front tire.
- 2.Remove the fender protector. Keep a service area. Refer to Exploded View.
- 3.Rotate the resin cap counterclockwise and unlock it.
- 4.Rotate the bulb socket counterclockwise and unlock it.
- 5.Remove the retaining spring lock. Remove the bulb from the headlamp housing assembly.
■ CAUTION ■
Never break the xenon bulb ceramic tube when replacing the bulb. HEADLAMP BULB (HI)- 1.Remove the front tire.
- 2.Remove the fender protector. Keep a service area. Refer to Exploded View.
- 3.Remove the washer tank inlet. Refer to Exploded View.*: When replace a left.
- 4.Rotate the resin cap counterclockwise and unlock it.
- 5.Disconnect the headlamp bulb (HI) connector.
- 6.Rotate the bulb socket counterclockwise and unlock it.
- 7.Remove the bulb from the headlamp housing assembly.
PARKING LAMP BULB- 1.Rotate the bulb socket counterclockwise and unlock it.
- 2.Remove the bulb from the bulb socket.
FRONT TURN SIGNAL LAMP BULB- 1.Remove the front tire.
- 2.Remove the fender protector. Keep a service area. Refer to Exploded View.
- 3.Rotate the bulb socket counterclockwise and unlock it.
- 4.Remove the bulb from the bulb socket.
Disassembly and Assembly
DISASSEMBLY- 1.Rotate the resin cap counterclockwise and unlock it.
- 2.Rotate the xenon bulb socket counterclockwise and unlock it.
- 3.Remove the retaining spring lock. And then remove the xenon bulb.
- 4.Remove the HID control unit installation screw.
- 5.Remove the HID control unit harness installation screw. And then disconnect the connector from HID control unit.
- 6.Pull out the xenon bulb socket from the headlamp housing assembly.
- 7.Rotate the resin cap counterclockwise and unlock it.
- 8.Disconnect the headlamp (HI) connector.
- 9.Rotate the halogen bulb socket counterclockwise and unlock it.
- 10.Remove the halogen bulb socket from the headlamp housing assembly.
- 11.Rotate the parking lamp bulb socket counterclockwise and unlock it.
- 12.Remove the bulb from the parking lamp bulb socket.
- 13.Rotate the front turn signal lamp bulb socket counterclockwise and unlock it.
- 14.Remove the bulb from the front turn signal lamp bulb socket.
ASSEMBLYAssemble in the reverse order of disassembly.
■ CAUTION ■
- Install HID control unit securely.
- After installing the bulb, install the resin cap and the bulb socket securely for watertightness.