EVAP CANISTER
VR38
Exploded View
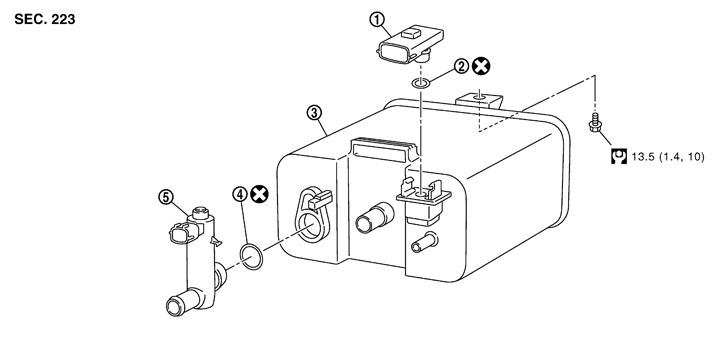
|
1. |
EVAP canister system pressure sensor |
2. |
O-ring |
3. |
EVAP canister |
|
4. |
O-ring |
5. |
EVAP canister vent control valve |
|
|
|
Refer to Contents for symbols not described on the above. |
|||||
Removal and Installation
 REMOVAL
- 1.Lift up the vehicle.
- 2.Remove EVAP canister fixing bolt.
- 3.Remove EVAP canister.
NOTE:
The EVAP canister vent control valve and EVAP canister system pressure sensor can be removed without removing the EVAP canister.
INSTALLATIONInstall in the reverse order of removal.
NOTE:
Tighten EVAP canister fixing bolt to the specified torque. DISASSEMBLY- 1.Turn EVAP canister vent control valve counterclockwise.
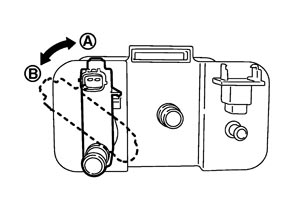
| A | : Lock |
| B | : Unlock |
- 2.Remove the EVAP canister vent control valve.
ASSEMBLYAssemble in the reverse order of disassembly.
■ CAUTION ■
Always replace O-ring with a new one.Inspection
Check EVAP canister as follows:
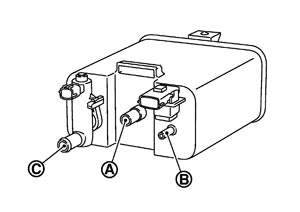
- 1.Block port (B).
- 2.Blow air into port (A) and check that it flows freely out of port (C).
- 3.Release blocked port (B).
- 4.Apply vacuum pressure to port (B) and check that vacuum pressure exists at the ports (A) and (C).
- 5.Block port (A) and (B).
- 6.Apply pressure to port (C) and check that there is no leakage.