BRAKE PAD
REAR DISC BRAKE
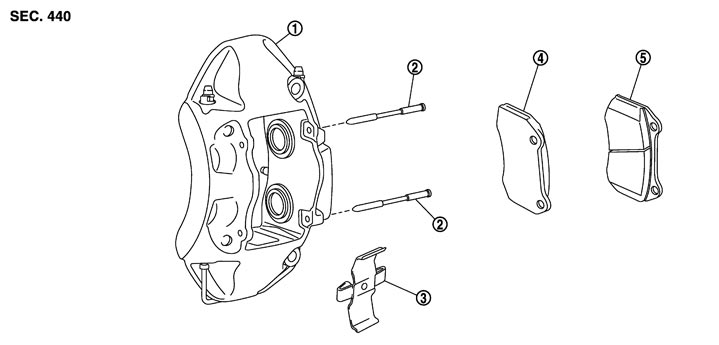
Exploded View
|
1. |
Caliper |
2. |
Pad pin |
3. |
Cross spring |
|
4. |
Outer pad |
5. |
Inner pad (with pad wear sensor) |
|
|
|
Refer to Components for the symbols in the figure. |
|||||
Removal and Installation
 REMOVAL
■ WARNING ■
Clean any dust from the brake caliper and brake pads with a vacuum dust collector. Never blow with compressed air.
■ CAUTION ■
Never depress the brake pedal while removing the brake pads because the piston may pop out.
- 1.Remove tires with power tool.
- 2.Remove the pad pin (lower side) (1) using a pin punch.
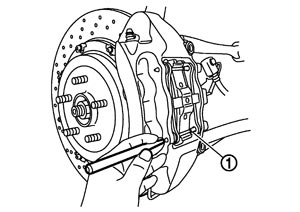
■ CAUTION ■
Never damage the caliper. - 3.Remove cross spring
■ CAUTION ■
Never deform the cross spring. - 4.Remove the pad pin (upper side) (1) using a pin punch.
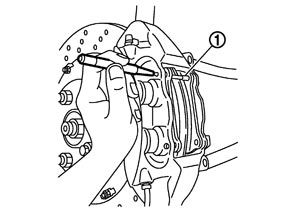
■ CAUTION ■
Never damage the caliper. - 5.Remove brake pad.
- 6.Check the piston boots. Refer to Inspection (GT-R certified NISSAN dealer).
INSTALLATION■ WARNING ■
Clean any dust from the brake caliper and brake pads with a vacuum dust collector. Never blow with compressed air.
■ CAUTION ■
- Never depress the brake pedal while removing the brake pads because the piston may pop out.
- Check the fluid level in the reservoir tank. Because the brake fluid returns to the reservoir tank of master cylinder when pressing the piston.
- When replacing the brake pad, replace it together with the disc rotor and replace the brake pads of all wheels as a set.
- 1.Use a brake caliper wrench [SST: KV991112S0 (J-49023)] to press back the piston when replacing the brake pad.
- 2.Install brake pad to caliper.
■ CAUTION ■
Never damage the piston boot. - 3.Insert the pad pin (upper side) from the inner side of caliper, and then install it to the outer side of caliper through the upper hole of brake pad.
- Never damage the caliper.
- Install the pad pin to fix on the metal bushing.
■ CAUTION ■
- 4.Install the cross spring. Insert the pad pin (lower side) from the inner side of caliper while pressing the bottom of the cross spring in, and then install it to the outer side of caliper through the upper hole of brake pad.
- Never damage the caliper.
- Install the pad pin to fix on the metal bushing.
■ CAUTION ■
- 5.Depress the brake pedal several times to check that no drag is present for the rear disc brake. Refer to Inspection (GT-R certified NISSAN dealer).
- 6.Check the fluid level in the master cylinder reservoir tank. Refer to Inspection.
- 7.Perform the air bleeding and adjustment when replacing the brake pad and disc rotor. Refer to Bleeding Brake System and Inspection and Adjustment.
Inspection
INSPECTION AFTER REMOVAL Brake Pad
- Check the following item, and then replace the brake pad together with the disc rotor and replace the brake pads of all wheels as a set.
- Check the brake pad for streaks, cracks or fractures.
- Check the disc rotor contact surface of brake pad for whitening (carbonizing) because it is remarkably burned.
- Peeling paint on the contact surface of piston and brake pad.
- Check that the anti-corrosion paint (silver color) of disc rotor is eliminated.■ CAUTION ■If the anti-corrosion paint (silver color) remains on the surface of brake pad, polish it with sandpaper until completely eliminated.
INSPECTION AFTER INSTALLATIONCheck the rear disc brake for drag. Perform the following procedure if necessary.
- 1.Remove the brake pad. Refer to Exploded View.
- 2.Use a brake caliper wrench [SST: KV991112S0 (J-49023)] to return the piston.
■ CAUTION ■
Check the fluid level in the reservoir tank. Because the brake fluid returns to the reservoir tank of master cylinder when pressing the piston. - 3.Install the brake pad. Refer to Exploded View.
- 4.Depress the brake pedal several times, and check the rear disc brake for drag again. Disassemble the caliper if necessary. Refer to Disassembly and Assembly.