BRAKE CALIPER ASSEMBLY
REAR DISC BRAKE
Exploded View
 REMOVAL
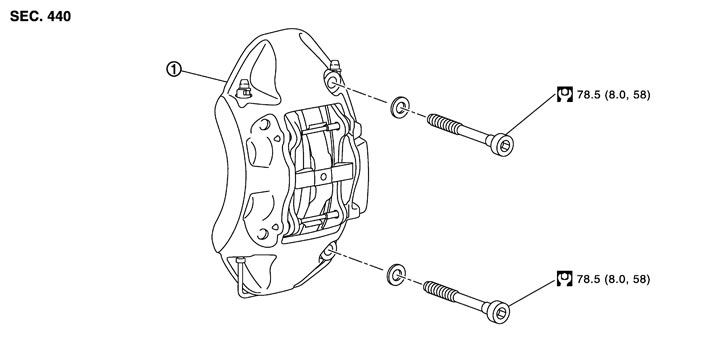 DISASSEMBLY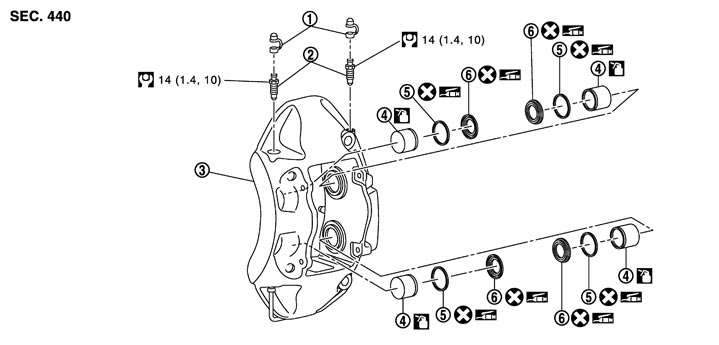
|
1. |
Cap |
2. |
Bleeder valve |
3. |
Caliper |
|
4. |
Piston |
5. |
Piston seal |
6. |
Piston boot |
 : Apply rubber grease. : Apply rubber grease. |
|||||
 : Apply brake fluid. : Apply brake fluid. |
|||||
|
Refer to Components for symbols not described on the above. |
|||||
Removal and Installation
REMOVAL■ WARNING ■
Clean any dust from the brake caliper and brake pads with a vacuum dust collector. Never blow with compressed air.
■ CAUTION ■
- Never spill or splash brake fluid on painted surfaces. Brake fluid may seriously damage paint. Wipe it out immediately and wash with water if it gets on a painted surface.
- Wrap the flare nut wrench with waste cloth to protect the caliper from damage.
- If the brake fluid adheres to the caliper or disc rotor, quickly wipe it out.
- 1.Return the parking brake lever.
- 2.Remove tires with power tool.
- 3.Fix the disc rotor using wheel nuts.
- 4.Drain brake fluid. Refer to Draining.
■ CAUTION ■
Never spill or splash brake fluid on the disc rotor.- 5.Loosen the flare nut with a flare nut wrench and separate the brake tube from the caliper.
- Never depress the brake pedal. Brake fluid may splash while removing the brake tube.
- Never scratch the flare nut and the brake tube.
- Never bend sharply, twist or strongly pull out the brake tubes.
- Cover open end of brake tubes and hoses when disconnecting to prevent entrance of dirt.
■ CAUTION ■
- 6.Remove brake hose bracket. Refer to Exploded View.
- 7.Remove caliper mounting bolts, and then remove caliper.
- The steering knuckle is made of aluminum. Rotate the caliper mounting bolt slowly. Never use a power tool.
- Never drop brake pad and caliper assembly.
- Never hold the brake tube of caliper.
- Never subject the brake tube of caliper to impact.
- Never contact with the brake tube when the caliper is placed.
■ CAUTION ■
- 8.Remove disc rotor.
- Put matching marks on the wheel hub and bearing assembly and the disc rotor before removing the disc rotor.
- Never drop disc rotor.
- The disc rotor cannot be disassembled. Never use the nut (
 ) for loosening or tightening the disc rotor.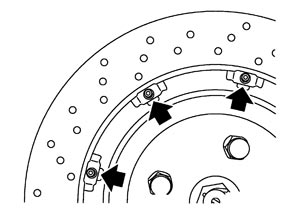
■ CAUTION ■
INSTALLATION■ WARNING ■
Clean any dust from the brake caliper and brake pads with a vacuum dust collector. Never blow with compressed air.
■ CAUTION ■
- Never depress the brake pedal. Brake fluid may splash while removing the brake tube.
- Never spill or splash brake fluid on painted surfaces. Brake fluid may seriously damage paint. Wipe it out immediately and wash with water if it gets on a painted surface.
- Wrap the flare nut wrench with waste cloth to protect the caliper from damage.
- If the brake fluid adheres to the caliper or disc rotor, quickly wipe it out.
- When replacing the disc rotor, replace it together with the brake pad and replace the brake pads of all wheels as a set.
- 1.Install disc rotor.
■ CAUTION ■
Align the matching marks that have been made during removal when reusing the disc rotor.- 2.Install caliper.
- Never hold the brake tube of caliper.
- Never subject the brake tube of caliper to impact.
- Never spill or splash any grease and moisture on the caliper mounting face, threads, mounting bolts or washers. Wipe out any grease and moisture.
- Check the caliper mounting bolt threads for damage or aluminum powders. Replace or clean if necessary.
- Install the washer and temporarily tighten the caliper mounting bolt.
- The steering knuckle is made of aluminum. Rotate the caliper mounting bolt slowly. Never use a power tool.
■ CAUTION ■
- 3.Install brake hose bracket. Refer to Exploded View.
- 4.Install the brake tube to the caliper, temporarily tighten the flare nut by hand until it does not rotate further, and tighten the flare nut to the specified torque using a flare nut torque wrench.
- Never scratch the flare nut and the brake tube.
- Never bend sharply, twist or strongly pull out the brake tubes.
■ CAUTION ■
- 5.Refill with new brake fluid and perform the air bleeding. Refer to Bleeding Brake System.
- Perform the air bleeding (after disassembly of brake piping and caliper) with the procedures from 1 to 7.
- Never reuse drained brake fluid.
■ CAUTION ■
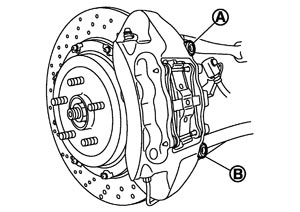
- 6.Tighten the caliper mounting bolts in order of (A) to (B) to the specified torque while the brake pedal is depressed.
■ CAUTION ■
Perform it when the temperature of the caliper is room temperature. - 7.Check that no drag is present for the rear disc brake. Refer to Inspection (GT-R certified NISSAN dealer).
- 8.Perform the air bleeding (disassembly of brake piping and caliper) with the procedures from 7 to 8. Refer to Bleeding Brake System.
- 9.Perform the adjustment when the disc rotor and brake pad are replaced. Refer to Inspection and Adjustment.
Disassembly and Assembly
DISASSEMBLY■ CAUTION ■
- Never contact with the brake tube when the caliper is placed.
- Never hold the brake tube of caliper.
- Never subject the brake tube of caliper to impact.
- Never tighten or loosen the flare nut () of caliper unit.
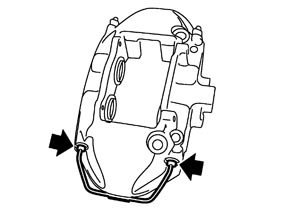
- Never damage the caliper.
- 1.Place a wooden block as shown in the figure, and blow air from union bolt mounting hole to remove pistons and piston boots.
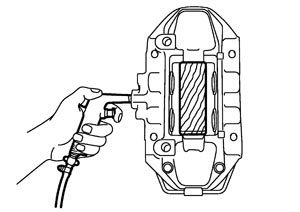
■ CAUTION ■
Never get fingers caught in the pistons.- 2.Remove piston seal (1) from cylinder body using suitable tool (A).
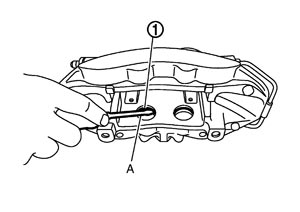
■ CAUTION ■
Never damage a cylinder inner wall. ASSEMBLY■ CAUTION ■
- Never hold the brake tube of caliper.
- Never subject the brake tube of caliper to impact.
- Never tighten or loosen the flare nut () of caliper unit.
- Never damage the caliper.
- 1.Apply new brake fluid to piston seals (1), and install them to caliper.
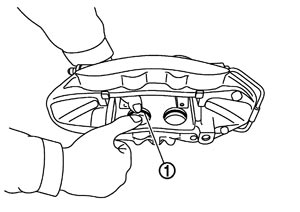
■ CAUTION ■
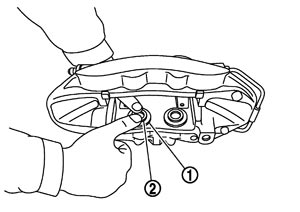
Never reuse piston seal.- 2.Apply rubber grease to the piston boots (1). Apply new brake fluid to the pistons (2). Cover the piston boots to the tip of piston. Assemble the lips of piston boots to the caliper grooves.
■ CAUTION ■
Never reuse piston boot.- 3.Press pistons into caliper by hand. Assemble piston side lip of the piston boots into groove on piston.
■ CAUTION ■
Press the pistons evenly and vary the pressing point to prevent cylinder inner wall from being rubbed.Inspection
INSPECTION BEFORE REMOVALCheck the piston boots for breakage or hardening. Disassemble the caliper if necessary. (Replace the piston boots and piston seals as a set.) Refer to Disassembly and Assembly (GT-R certified NISSAN dealer).
INSPECTION AFTER INSTALLATIONCheck the rear disc brake for drag. Perform the following procedure if necessary.
- 1.Remove brake pad. Refer to Exploded View (GT-R certified NISSAN dealer).
- 2.Use a brake caliper wrench [SST: KV991112S0 (J-49023)] to return the piston.
■ CAUTION ■
Check the fluid level in the reservoir tank. Because the brake fluid returns to the reservoir tank of master cylinder when pressing the piston. - 3.Install brake pad. Refer to Exploded View (GT-R certified NISSAN dealer).
- 4.Depress the brake pedal several times, and check the rear disc brake for drag again. Disassemble the caliper if necessary. Refer to Disassembly and Assembly (GT-R certified NISSAN dealer).
INSPECTION AFTER DISASSEMBLYCheck the following items and replace if necessary.
 Caliper
Check the cylinder inner wall for wear, cracks or damage.
■ CAUTION ■
Always clean with new brake fluid. Never clean with mineral oil such as gasoline and light oil. PistonCheck the piston surface for wear, cracks or damage.
■ CAUTION ■
A piston sliding surface is plated. Never polish with sandpaper. Pad Pin- Check the piston pin for corrosion, wear, cracks or damage.
- Check the metal bushing of pad pin for settling and damage.
Cross SpringCheck the cross spring for wear, cracks or damage.