HEADLINING
Exploded View
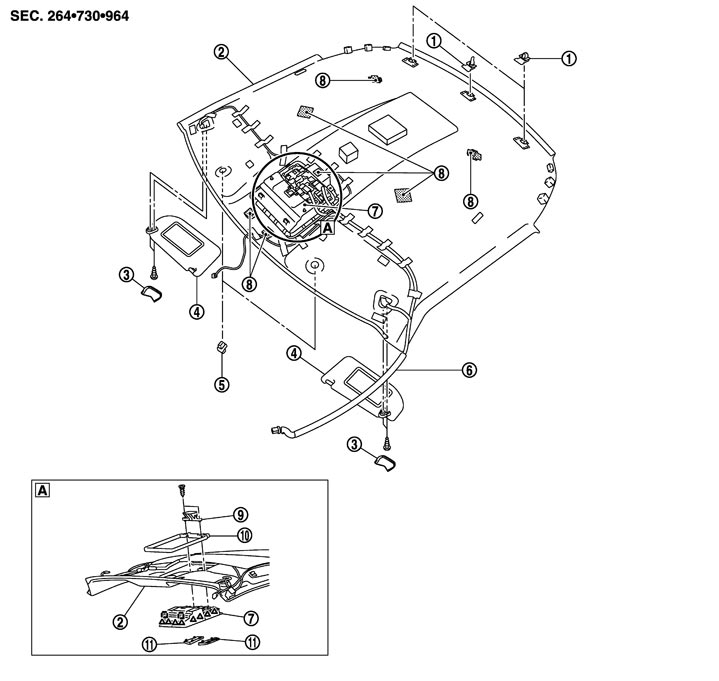
|
1. |
Rear hidden clip |
2. |
Headlining |
3. |
Sun-visor cover |
|
4. |
Sun-visor assembly |
5. |
Sun-visor holder |
6. |
Antenna feeder assembly |
|
7. |
Roof console assembly |
8. |
Dual-lock fastener |
9. |
Roof bracket |
|
10. |
Roof plate |
11. |
Map lamp lens |
|
|

|
: Pawl |
|
|
|
|

|
: Metal clip |
|
|
|
|

|
: Vehicle front |
|
|
|
|
Removal and Installation
 REMOVAL
- 1.Remove the body side welt (LH/RH) and the front pillar garnish (LH/RH). Refer to Removal and Installation.
- 2.Disconnect the inside mirror harness connector. Refer to Removal and Installation.
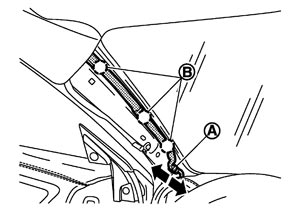
- 3.Disengage the clips (B) and then, disconnect the connector (A) of roof harness of front pillar LH.
- 4.Remove the sun-visor assembly (LH/RH).
- Remove the sun-visor cover (LH/RH).
- Remove the mounting screw (B) of sun-visor (1) (LH/RH) using screwdriver (A).
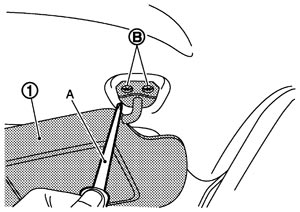
- Disconnect the vanity mirror lamp harness connector.
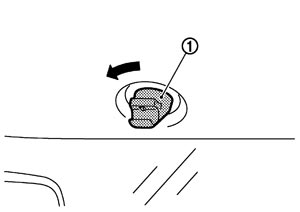
- 5.Rotate the sun-visor holder (1) 90 degrees counterclockwise, pull it downward, and then remove.
- 6.Remove the kicking plate inner (LH/RH), rear seat cushion back (LH/RH), rear side finisher (LH/RH), rear pillar finisher (LH/RH), and rear body side welt (LH/RH). Refer to Removal and Installation.
- 7.Remove the passenger side front seat. Refer to Removal and Installation.
- 8.Remove the control device. Refer to Removal and Installation.
- 9.Remove the center console assembly. Refer to Removal and Installation.
- 10.Remove the rear hidden clips from the roof panel at the rear end of the headlining, using a remover tool.
- 11.Disengage the joint of dual-lock fastener (A) and metal clip (B) of roof console assembly.
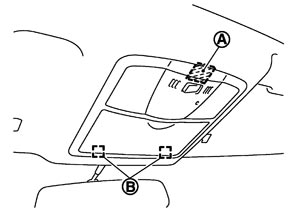
| : Metal clip |
- 12.Check that the dual-lock fastener on the front end of the headlining is removed. If it is not removed, use a remover tool to remove it.
- Roof console assembly is crimped from the back of headlining. Remove it by disengaging the crimped area from back of roof console assembly after removing headlining from the vehicle.
- Never wrinkle the headlining by bending during work.
■ CAUTION ■
- 13.Remove the headlining from passenger side door opening.
- 2 workers are required for removal in order to prevent damage.
- Apply protective tape to the portion where contact may occur during work.
- Never bend headlining when removing.
■ CAUTION ■
- 14.Remove the following parts after removing the headlining.
- Remove roof console assembly.
- Map lamp assembly. Refer to Removal and Installation.
- Antenna feeder assembly. Refer to Harness layout.
INSTALLATIONNote the following, and install in the reverse order of removal.
■ CAUTION ■
- First install the metal clip of map lamp and the clip of the rear end of the headlining for positioning.
- Never bend headlining when installing.