CENTER CONSOLE ASSEMBLY
Exploded View
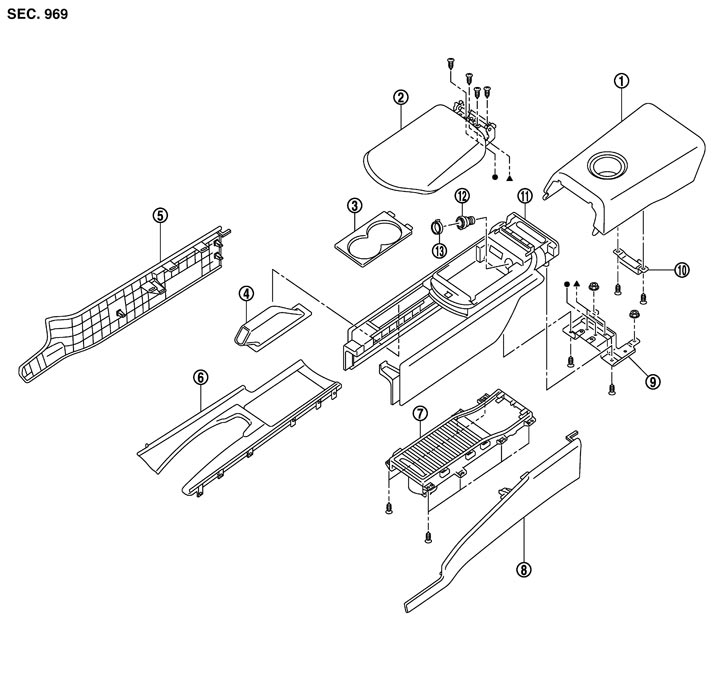
|
1. |
Rear console assembly |
2. |
Console lid |
3. |
Cup holder finisher |
|
4. |
Parking brake lever boot |
5. |
Instrument side panel RH |
6. |
Console finisher assembly |
|
7. |
Cup holder assembly |
8. |
Instrument side panel LH |
9. |
Console bracket |
|
10. |
Inside key antenna |
11. |
Center console assembly |
12. |
Power socket |
|
13. |
Socket knob |
|
|
|
|
Removal and Installation
■ CAUTION ■
When removing, always use a remover tool that is made of plastic.
 REMOVAL
- 1.Remove the rear console assembly.
- Lift up the rear side of rear console assembly (1), and then disengage the pawls and the metal clips.
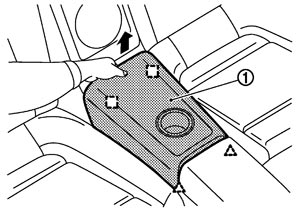
- Disconnect the harness connector on the back.

: Pawl 
: Metal clip
- 2.Remove the instrument garnish LH.
- Insert the remover tool (A), wrapped in a shop cloth, into the clearance between the lower side of instrument garnish LH (1) and the cluster lid C (lower) (2).
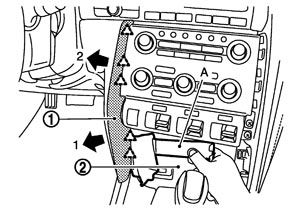
- Pull back the instrument garnish LH, and then disengage the pawls.
: Pawl
- 3.Remove the instrument garnish RH.
- Insert the remover tool (A), wrapped in a shop cloth, into the clearance between the lower side of instrument garnish RH (1) and the cluster lid C (lower) (2).
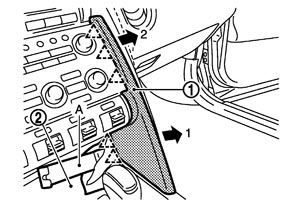
- Pull back the instrument garnish RH, and then disengage the pawls.
: Pawl
- 4.Remove the console finisher.
- Open the console lid.
- Insert the remover tool (A) between the console finisher (1) and the center console, lift up the console finisher, and then disengage the clips and the pawls.
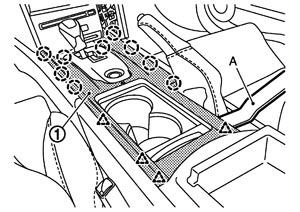

: Clip : Pawl
- 5.Remove the instrument side panel LH. Pull the instrument side panel LH (1) from vehicle front in lateral direction, then disengage the clips, pawl and the metal clips.
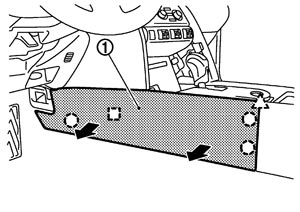
■ CAUTION ■
Be careful of the pawl when disengaging the clips. | : Clip |
| : Pawl |
| : Metal clip |
- 6.Remove the instrument side panel RH. Pull the instrument side panel RH (1) from vehicle front in lateral direction, then disengage the clips, pawl and the metal clips.
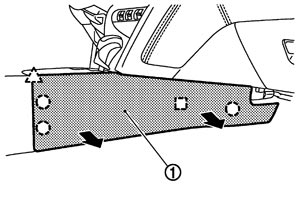
■ CAUTION ■
Be careful of the pawl when disengaging the clips. | : Clip |
| : Pawl |
| : Metal clip |
- 7.Remove the center console assembly.
- Remove the mounting screws (A) from front end of the center console (1).
- Remove the mounting nuts (B) from rear end of the center console.
- Lift up the center console, and then remove the harness clamps (C) and disconnect the harness connector from back side.
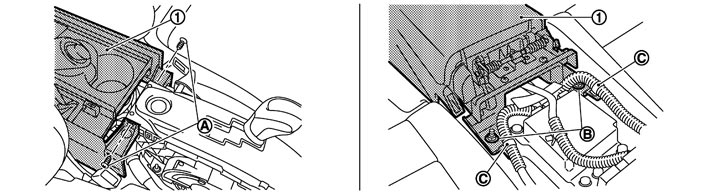 INSTALLATION
Install in the reverse order of removal.
Disassembly and Assembly
■ CAUTION ■
When disassembling, always use a remover tool that is made of plastic.
Disassembly - 1.Remove the center console assembly. Refer to Removal and Installation.
- 2.Remove the mounting screws, and then remove the console lid.
- 3.Remove the mounting screws, and then remove the cup holder assembly.
- 4.Remove the parking brake lever boot from the center console assembly.
- 5.Remove the console power socket. Refer to Removal and Installation.
AssemblyAssemble in the reverse order of disassembly.