FRONT SEAT
Exploded View
 Driver seat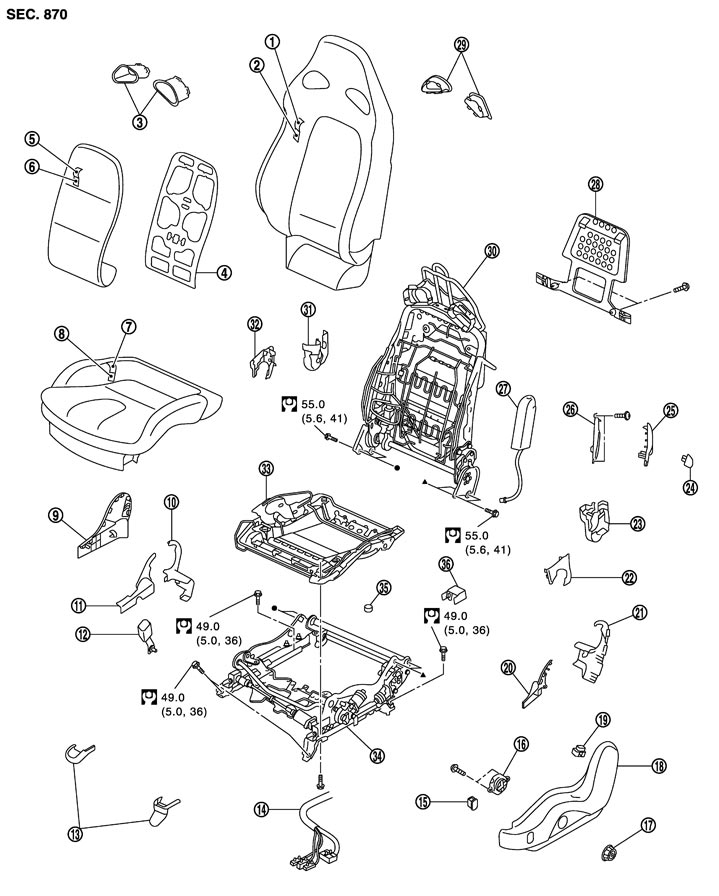
|
1. |
Seatback trim |
2. |
Seatback pad |
3. |
Seatback ornament (front) |
|
4. |
Seatback plate (main) |
5. |
Seatback trim (main) |
6. |
Seatback pad (main) |
|
7. |
Seat cushion trim |
8. |
Seat cushion pad |
9. |
Seat cushion inner finisher outside |
|
10. |
Seat cushion inner finisher inside (rear) |
11. |
Seat cushion inner finisher inside (front) |
12. |
Seat belt buckle |
|
13. |
Front slide cover |
14. |
Seat harness |
15. |
Thigh support switch |
|
16. |
Seat control switch |
17. |
Seat control switch knob |
18. |
Seat cushion outer finisher outside |
|
19. |
Heater seat switch |
20. |
Seat cushion outer finisher inside (front) |
21. |
Seat cushion outer finisher inside (rear) |
|
22. |
Reclining device outer cover (outside) |
23. |
Reclining device outer cover (inside) |
24. |
Walk-in lever knob |
|
25. |
Walk-in lever escutcheon |
26. |
Walk-in lever bracket |
27. |
Side air bag module |
|
28. |
Seatback cover panel |
29. |
Seatback ornament (rear) |
30. |
Seatback frame |
|
31. |
Reclining device inner cover (inside) |
32. |
Reclining device inner cover (outside) |
33. |
Seat cushion frame |
|
34. |
Adjuster assembly |
35. |
Rear inner bolt cap |
36. |
Rear slide outer cover |
|
Refer to Components for symbols in the figure. |
|||||
Passenger seat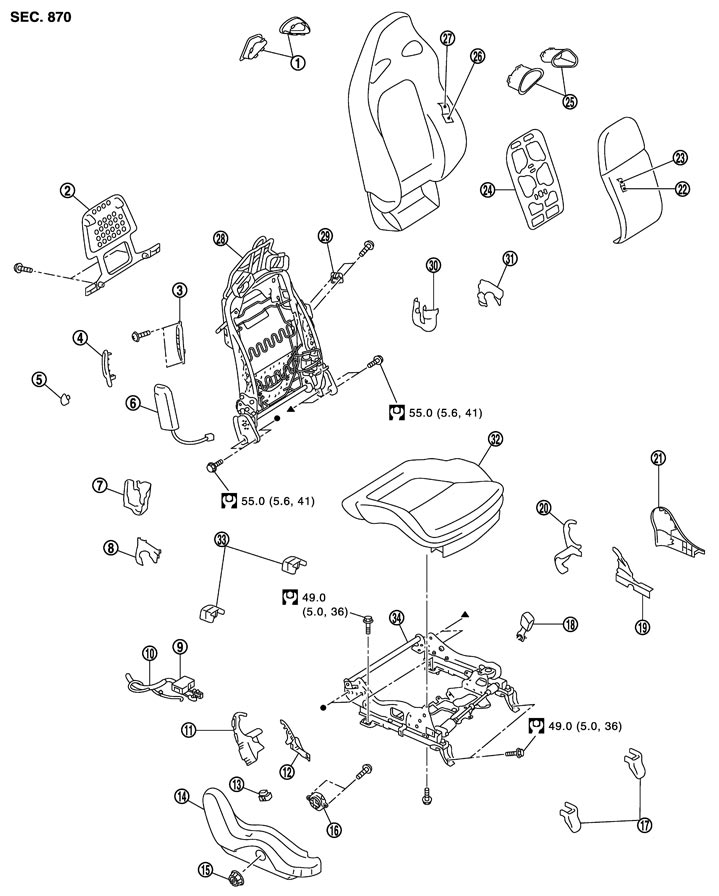
|
1. |
Seatback ornament (rear) |
2. |
Seatback cover panel |
3. |
Walk-in lever bracket |
|
4. |
Walk-in lever escutcheon |
5. |
Walk-in lever knob |
6. |
Side air bag module |
|
7. |
Reclining device outer cover (inside) |
8. |
Reclining device outer cover (outside) |
9. |
Heater seat control unit |
|
10. |
Seat harness |
11. |
Seat cushion outer finisher inside (rear) |
12. |
Seat cushion outer finisher inside (front) |
|
13. |
Heater seat switch |
14. |
Seat cushion outer finisher outside |
15. |
Seat control switch knob |
|
16. |
Seat control switch |
17. |
Front slide cover |
18. |
Seat belt buckle |
|
19. |
Seat cushion inner finisher inside (front) |
20. |
Seat cushion inner finisher inside (rear) |
21. |
Seat cushion inner finisher outside |
|
22. |
Seatback pad (main) |
23. |
Seatback trim (main) |
24. |
Seatback plate (main) |
|
25. |
Seatback ornament (front) |
26. |
Seatback pad |
27. |
Seatback trim |
|
28. |
Seatback frame |
29. |
Seat slide switch |
30. |
Reclining device inner cover (inside) |
|
31. |
Reclining device inner cover (outside) |
32. |
Seat cushion assembly |
33. |
Rear slide cover |
|
34. |
Adjuster assembly |
|
|
|
|
|
Refer to Components for symbols in the figure. |
|||||
Removal and Installation
REMOVAL■ CAUTION ■
Use shop cloths to protect parts from damage during removal and installation.
- 1.Operate the seat control switch knob to move the seat slide to the rearmost position.
- 2.Remove the front slide cover.
-
(1)Front outer slide cover
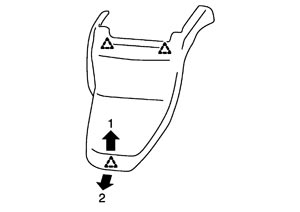
 | :Pawl |
-
(2)Front inner slide cover
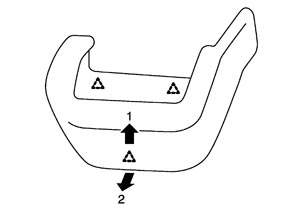
| :Pawl |
- 3.Remove the mounting bolts from the front seat front side.
- 4.Operate the seat control switch knob to move the seat slide to the foremost position.
- 5.Remove the rear slide outer and inner covers.
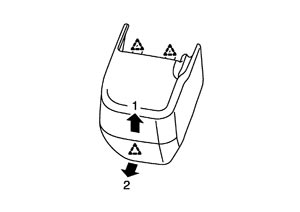
| :Pawl |
- 6.Remove the rear inner bolt cap (Driver seat only).
- 7.Remove the mounting bolts from the front seat rear side.
- 8.Set the seatback vertically.
- 9.Lift up the seat cushion front side, and disconnect the harness connector under the seat cushion and remove the harness clamp.
■ CAUTION ■
For the seat with side air bag, disconnect the battery cable from the negative terminal after checking that the ignition switch is OFF, wait for at least 3 minutes, and then disconnect the connector. - 10.Remove the front seat from the vehicle.
- Use shop cloths to protect parts from damage during removal and installation.
- Two people must perform removal and installation of the seat assembly to prevent damage or to keep from dropping it.
■ CAUTION ■
INSTALLATIONInstall in the reverse order of removal.
■ CAUTION ■
- Always fix the harness clamp in the normal position.
- Be careful that only driver seat rear inner mounting bolt is different from others among the front seat mounting bolts.
Disassembly and Assembly
Seatback Disassembly
- 1.Remove the seat cushion.
- Disconnect the harness connector of seat cushion heater unit (with heater seat only).
- Remove the seat cushion lower surface mounting bolts (A).
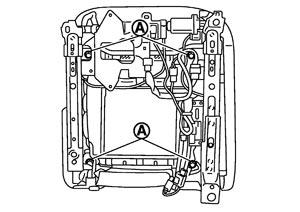
- Remove the seat cushion trim retainer from the lower rear of the seat cushion.
- 2.Remove the seat cushion outer finisher outside. Disconnect the connectors of seat control switch, heater switch, and thigh support (Driver seat only) switch.
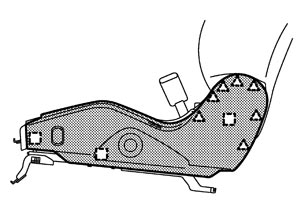
 | :Metal clip |
| :Pawl |
- 3.Remove the seat cushion inner finisher outside.
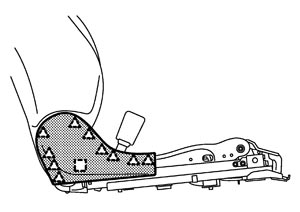
| :Metal clip |
| :Pawl |
- 4.Remove the seatback ornament.
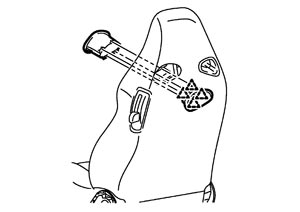
| :Pawl |
- 5.Remove the walk-in lever knob (1) and walk-in lever escutcheon (2).
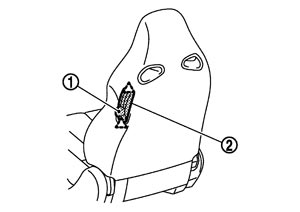
| :Pawl |
- 6.Remove the seatback (main).
- Unfasten the seatback trim fastener.
- Remove the seatback trim lower retainer.
- Remove the seatback panel mounting screws, and then remove the seatback panel.
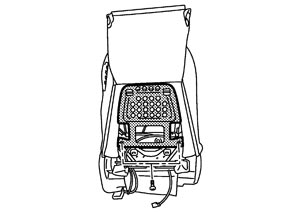
- Remove the retainer and hog ring of the seatback (main), and then remove the seatback (main).
- Remove the hog ring of the seatback (main), and then separate the seatback trim (main) from the seatback pad (main).
- 7.Remove the seatback trim.
- Remove the hog ring.
- Remove the side air bag module.
- Remove the seatback trim.
- 8.Remove the seatback pad.
- 9.Remove the seat cushion outer finisher inside (front) (1) and the seat cushion outer finisher inside (rear) (2).
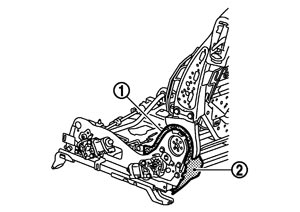
- 10.Remove the seat cushion inner finisher inside (front) (1) and the seat cushion inner finisher inside (rear) (2).
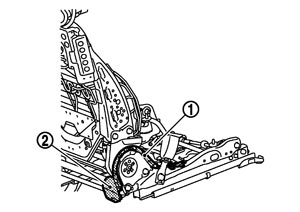
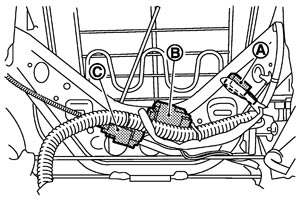
- 11.Disconnect the harness connector. Driver sideDisconnect the reclining motor harness connector (A), the heater unit harness connector (B), and the reclining limit switch harness connector (C).
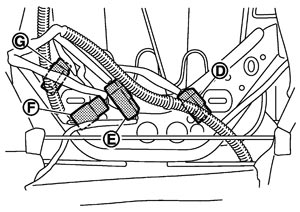
Passenger sideDisconnect the reclining limit switch harness connector (D), the heater unit harness connector (E), the slide motor harness connector (F), and the reclining motor harness connector (G).
- 12.Remove the seatback frame.
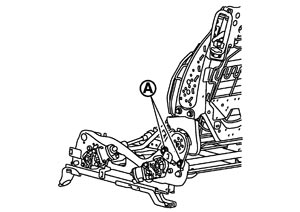
Remove the seatback frame mounting bolts (A).
- 13.Remove the reclining device outer cover (outside) (1) and the reclining device outer cover (inside) (2).
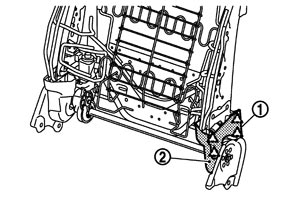
| :Pawl |
- 14.Remove the reclining device inner cover (outside) (1) and the reclining device inner cover (inside) (2).
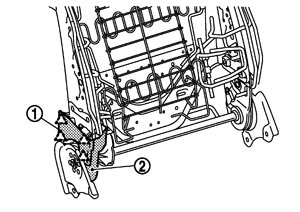
| :Pawl |
- 15.Remove the walk-in lever bracket.
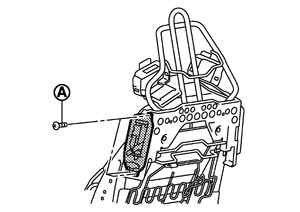
Remove the walk-in lever bracket mounting screws (A), and then remove the walk-in escutcheon bracket.
AssemblyAssemble in the reverse order of disassembly.
■ CAUTION ■
Install the hog rings of seatback trim in position, and then securely connect the trim or trim cord with the pad side wire. Seat cushion Disassembly■ CAUTION ■
Never disassemble front passenger seat cushion assembly.Always replace as an assembly.
For front passenger seat service parts, refer to the service part catalogue.
- 1.Remove the seat cushion.
- Disconnect the harness connector from the seat cushion heater unit.
- Remove the seat cushion lower surface mounting bolts (A).
- Remove the seat cushion trim retainer from the lower rear of the seat cushion.
- 2.Remove the seat cushion outer finisher outside. Disconnect the connectors of seat control switch, heater switch, and thigh support (driver seat only) switch.
| :Metal clip |
| :Pawl |
- 3.Remove the seat cushion inner finisher outside.
| :Metal clip |
| :Pawl |
- 4.Remove the seatback trim retainer.
- 5.Remove the seatback panel.
- Unfasten the seatback trim fastener.
- Remove the seatback panel mounting screws, and then remove the seatback panel.
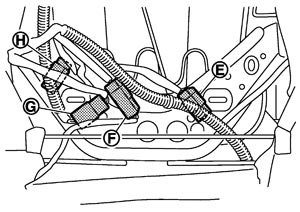
- 6.Disconnect the harness connector. Driver side
- Disconnect the reclining motor harness connector (A), the heater unit harness connector (B), and the reclining limit switch harness connector (C).
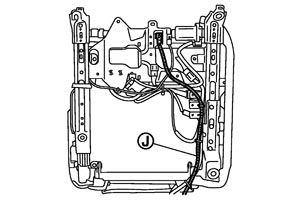
- Disconnect the side air bag harness (D) of seat cushion lower surface.
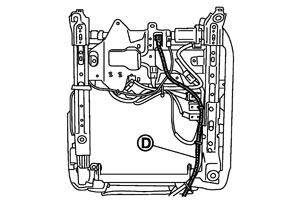
Passenger side
- Disconnect the reclining limit switch harness connector (E), the heater unit harness connector (F), the slide motor harness connector (G), and the reclining motor harness connector (H).
- Disconnect the side air bag harness (J) of seat cushion lower surface.
- 7.Remove the seatback assembly.
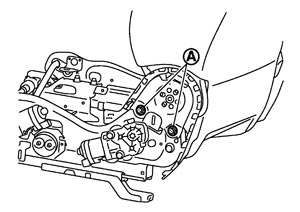
Remove the seatback mounting bolts (A), and then remove the seatback assembly.
- 8.Remove the seat cushion trim and the seat cushion pad. (Driver seat only)
- Remove the seat cushion retainer and hog ring.
- Remove the seat cushion trim and the seat cushion pad from the seat cushion frame.
- Remove the hog rings, and then disassemble the seat cushion pad and the seat cushion trim.
- 9.Remove the seat belt buckle. Refer to Removal and Installation.
- 10.Remove the heater seat control unit (passenger seat only). Refer to Removal and Installation.
AssemblyAssemble in the reverse order of disassembly.
■ CAUTION ■
Install the hog rings of seat cushion trim in position, and then securely connect the trim or trim cord with the pad side wire.