TRUNK LID ASSEMBLY
TRUNK LID
Exploded View
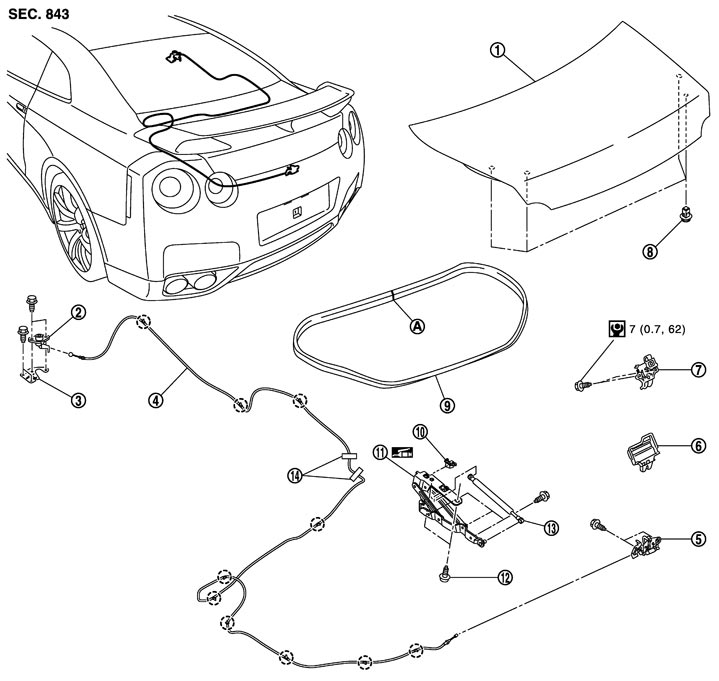
|
1. |
Trunk lid assembly |
2. |
Trunk lid key cylinder |
3. |
Trunk lid cylinder bracket |
|
4. |
Trunk lid lock control cable |
5. |
Trunk lid striker |
6. |
Trunk lid lock cover |
|
7. |
Trunk lid lock assembly |
8. |
Bumper rubber |
9. |
Trunk lid weather-strip |
|
10. |
Trunk lid hinge stopper |
11. |
Trunk lid hinge |
12. |
TORX bolt |
|
13. |
Trunk lid stay |
14. |
Protector harness |
|
|
|
A. |
Vehicle center mark |
|
|
|
|

|
: Clip |
|
|
|
|
|
Refer to Components for the symbols shown in the figure. |
|||||
Removal and Installation
■ CAUTION ■
- Operate with two workers, because of its heavy weight.
- Use protective tape or shop cloth to protect from damage during removal and installation.
 REMOVAL
- 1.Remove the trunk lid finisher inner. Refer to Removal and Installation.
- 2.Disconnect the clamp of each harness connector in trunk lid, remove the grommet, and then pull out the harness form the trunk lid.
- 3.Place a supporting block on the trunk lid striker to prevent it from dropping.
■ WARNING ■
Bodily injury may occur if no supporting rod is holding the trunk lid open when removing the trunk lid stay.- 4.Remove the metal clip from the trunk lid side stud ball of trunk lid stay using a screwdriver.
- 5.Disengage the trunk lid side joint of trunk lid stay (LH/RH) and stud ball.
- 6.Remove the TORX bolt (trunk lid side) of trunk lid hinge (LH/RH).
- 7.Remove the trunk lid assembly.
INSTALLATIONInstall in the reverse order of removal.
■ CAUTION ■
- Apply anticorrosive agent onto the mounting surface.
- Check trunk lid hinge rotating part for poor lubrication. If necessary, apply body grease.
- After installation, check trunk lid open/close, lock/unlock operation.
- After installation, perform the fitting adjustment. Refer to Adjustment.
- After installation, apply touch-up paint (the body color) onto the head of back door hinge mounting bolts and nuts.
Adjustment
ADJUSTMENT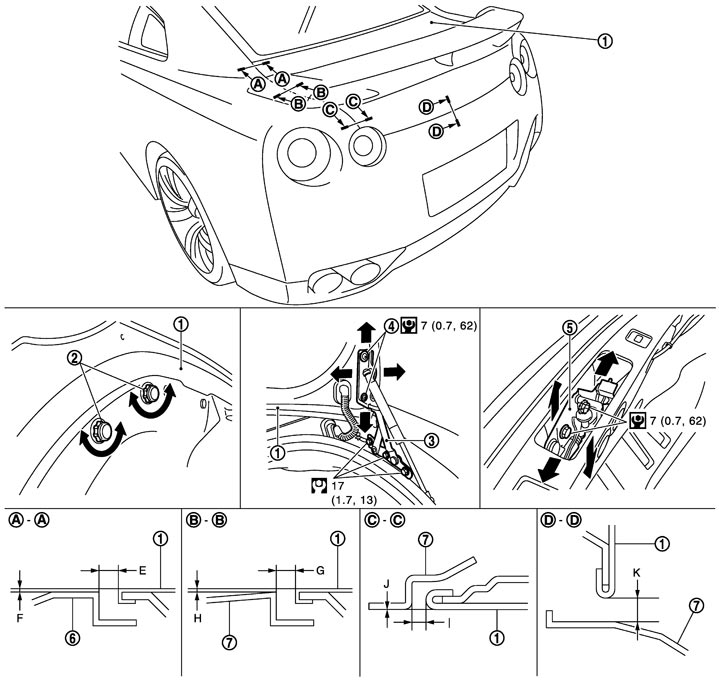
|
1. |
Trunk lid panel |
2. |
Bumper rubber |
3. |
Trunk lid hinge |
|
4. |
TORX bolt |
5. |
Trunk lid striker |
6. |
Rear fender |
|
7. |
Rear bumper fascia |
|
|
|
|
|
Refer to Components for the symbols shown in the figure. |
|||||
Check both visually and by touch that the clearance and surface height difference between trunk lid panel and each part are with in the specified value. If they are out of the specified value, adjust them as per the following procedures.
| Location | Standard | Difference (RH/LH, MAX) | |||
| Trunk lid panel and rear fender | A – A | E | Clearance | 2.5 – 4.5 (0.098 – 0.177) | 1.5 (0.059) |
| F | Surface height | - 1.0 – 1.0 (-0.039 – 0.039) | 1.5 (0.059) | ||
| Trunk lid panel and rear bumper fascia | B – B | G | Clearance | 2.0 – 6.0 (0.079 – 0.236) | 2.5 (0.098) |
| H | Surface height | -1.5 – 0.5 (-0.059 – 0.020) | 2.0 (0.079) | ||
| Trunk lid panel and rear bumper | C – C | I | Clearance | 2.5 – 6.5 (0.098 – 0.256) | — |
| J | Surface height | - 1.9 – 1.9 (-0.075 – 0.075) | — | ||
| D – D | K | Clearance | 1.8 – 4.2 (0.071 – 0.165) | 2.0 (0.079) | |
- 1.Loosen the trunk lid striker mounting bolt, and then adjust the values of E and G on the table to within the specified value.
- 2.Lift up the trunk lid assembly to 100 – 150 mm (3.937 – 5.906 in) and close.
- 3.Check for noise when engaging trunk lid lock and trunk lid striker.
- 4.Check that the trunk lid assembly is within the specified value as shown in the table.
- 5.Loosen the mounting bolt of trunk lid striker, adjust the position, and then repeat steps 3 and 4 if necessary.
- 6.Tighten the mounting bolts of trunk lid striker and trunk lid hinge to the specified torque after adjustment.
- 7.Initialize the height of bumper rubber.
- Insert screwdriver (A) wrapped with the protective tape between the body (1) and the collar (2), and then pull out the bumper rubber (3) from the trunk lid (4).
- Rotate the collar and contact it with the bumper rubber.
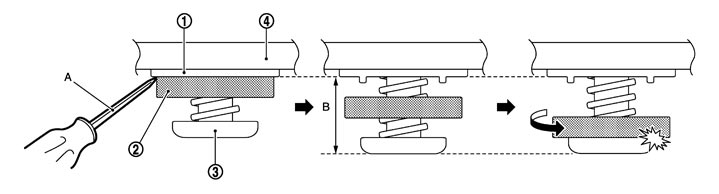
- 8.Close the trunk lid by pushing with hands.
- Close the trunk lid gently because the bumper rubber is compressed excessively by slamming the trunk lid.
- If the bumper rubber is compressed excessively, initialize the height of bumper rubber, and then repeat the procedure again.
NOTE:
The bumper rubber is pressed to the vehicle body side, and it is compressed in the trunk lid. ■ CAUTION ■
- 9.Open the trunk lid, and then engage it with the body by rotating the collar.
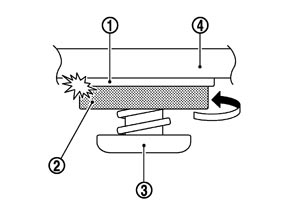
■ CAUTION ■
Check the collar for looseness. | 1. | Body |
| 2. | Collar |
| 3. | Bumper rubber |
| 4. | Trunk lid |
■ CAUTION ■
- Apply anticorrosive agent onto the mounting surface.
- After installation, check trunk lid open/close, lock/unlock operation.
- After installation, apply touch-up paint (the body color) onto the head of back door hinge mounting bolts and nuts.