HOOD LOCK
Exploded View
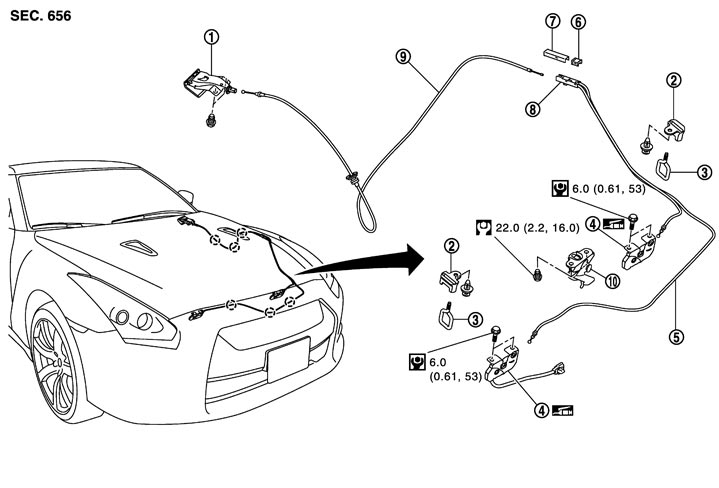
|
1. |
Hood lock opener handle |
2. |
Hood lock cover |
3. |
Hood striker |
|
4. |
Hood lock |
5. |
Hood lock control cable (front) |
6. |
Hood lock control cable protector cover (front) |
|
7. |
Hood lock control cable protector cover (rear) |
8. |
Hood lock cable protector |
9. |
Hood lock control cable (rear) |
|
10. |
Secondary latch |
|
|
|
|
 : Clip : Clip |
|||||
|
Refer to Components for the symbols shown in the figure. |
|||||
Removal and Installation
 REMOVAL
- 1.Disengage the clips, and then remove the radiator cover.
- 2.Remove the front bumper fascia and the bumper reinforcement. Refer to Removal and Installation.
- 3.Remove the dust duct side (LH/RH). Refer to Exploded View.
- 4.Remove the harness clip and hood lock cable clamp from the bumper fascia bracket.
- 5.Remove the hood lock cable clamp from the air intake duct assembly 1.
- 6.Disengage the connector of horns (HIGH/LOW). Refer to Removal and Installation.
- 7.Disengage the hood switch connector of hood lock (RH).
- 8.Disconnect the ambient sensor connector. Refer to Removal and Installation.
- 9.Remove the power steering oil cooler mounting bolt. Refer to Exploded View.
- 10.Remove the washer tank and the washer tank inlet. Refer to Exploded View.
- 11.Disconnect the air inlet hose, air inlet pipe, and recirculation hose from the charge air cooler assembly (bank 1 and bank 2). Refer to Exploded View.
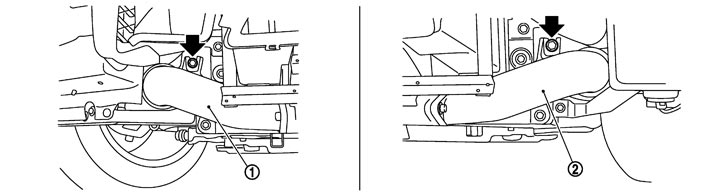
- 12.Remove the mounting bolts of charge air cooler assembly [bank 1: (1), bank 2: (2)] by the arrows in the figure.
- 13.Remove the mounting bolts of the hood lock (LH/RH).
- 14.Check that all connections of connector, hose, and pipe are disconnected from the air intake duct assembly.
- 15.Remove the mounting bolts, and then remove the air intake duct assembly.
- 16.Remove the hood lock (LH/RH) from the air intake duct assembly 1.
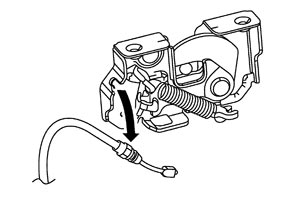
- 17.Remove the hood lock control cable (front) from the hood lock (LH/RH).
 INSTALLATION
Install in the reverse order of removal.
■ CAUTION ■
- After installation, check hood open/close, lock/unlock operation.
- After installation, perform the fitting adjustment. Refer to Adjustment.
Inspection
NOTE:
Replace the hood lock control cable if it is bent or deformed.
- 1.Check that the secondary and the hood lock stay are securely engaged by the weight of the hood when letting the hood free fall from a height of approximately 100 mm (3.937 in).
- 2.Check that the front end of the hood rises by approximately 20 mm (0.787 in) when pulling the hood opener lever gently. Also check that the hood opener lever returns to the original position.
- 3.Check that the tension of hood opener lever is less than 49.0 N (5.0 kg, 11.02
 b).
b). - 4.Check that the hood striker and the hood lock are securely engaged by the weight of the hood when letting the hood free fall from a height of approximately 300 mm (11.811 in).
■ CAUTION ■
Check that the hood locks LH/RH are engaged securely. - 5.Check hood lock lubrication level. Apply multi-purpose grease or an equivalent if necessary.